
My Fave Vanilla Birthday Cake
DISCLAIMER: This post may contain affiliate links, which means that I make a small commission off items you purchase at no additional cost to you. Please read my policy page!
My Fave Vanilla Birthday Cake
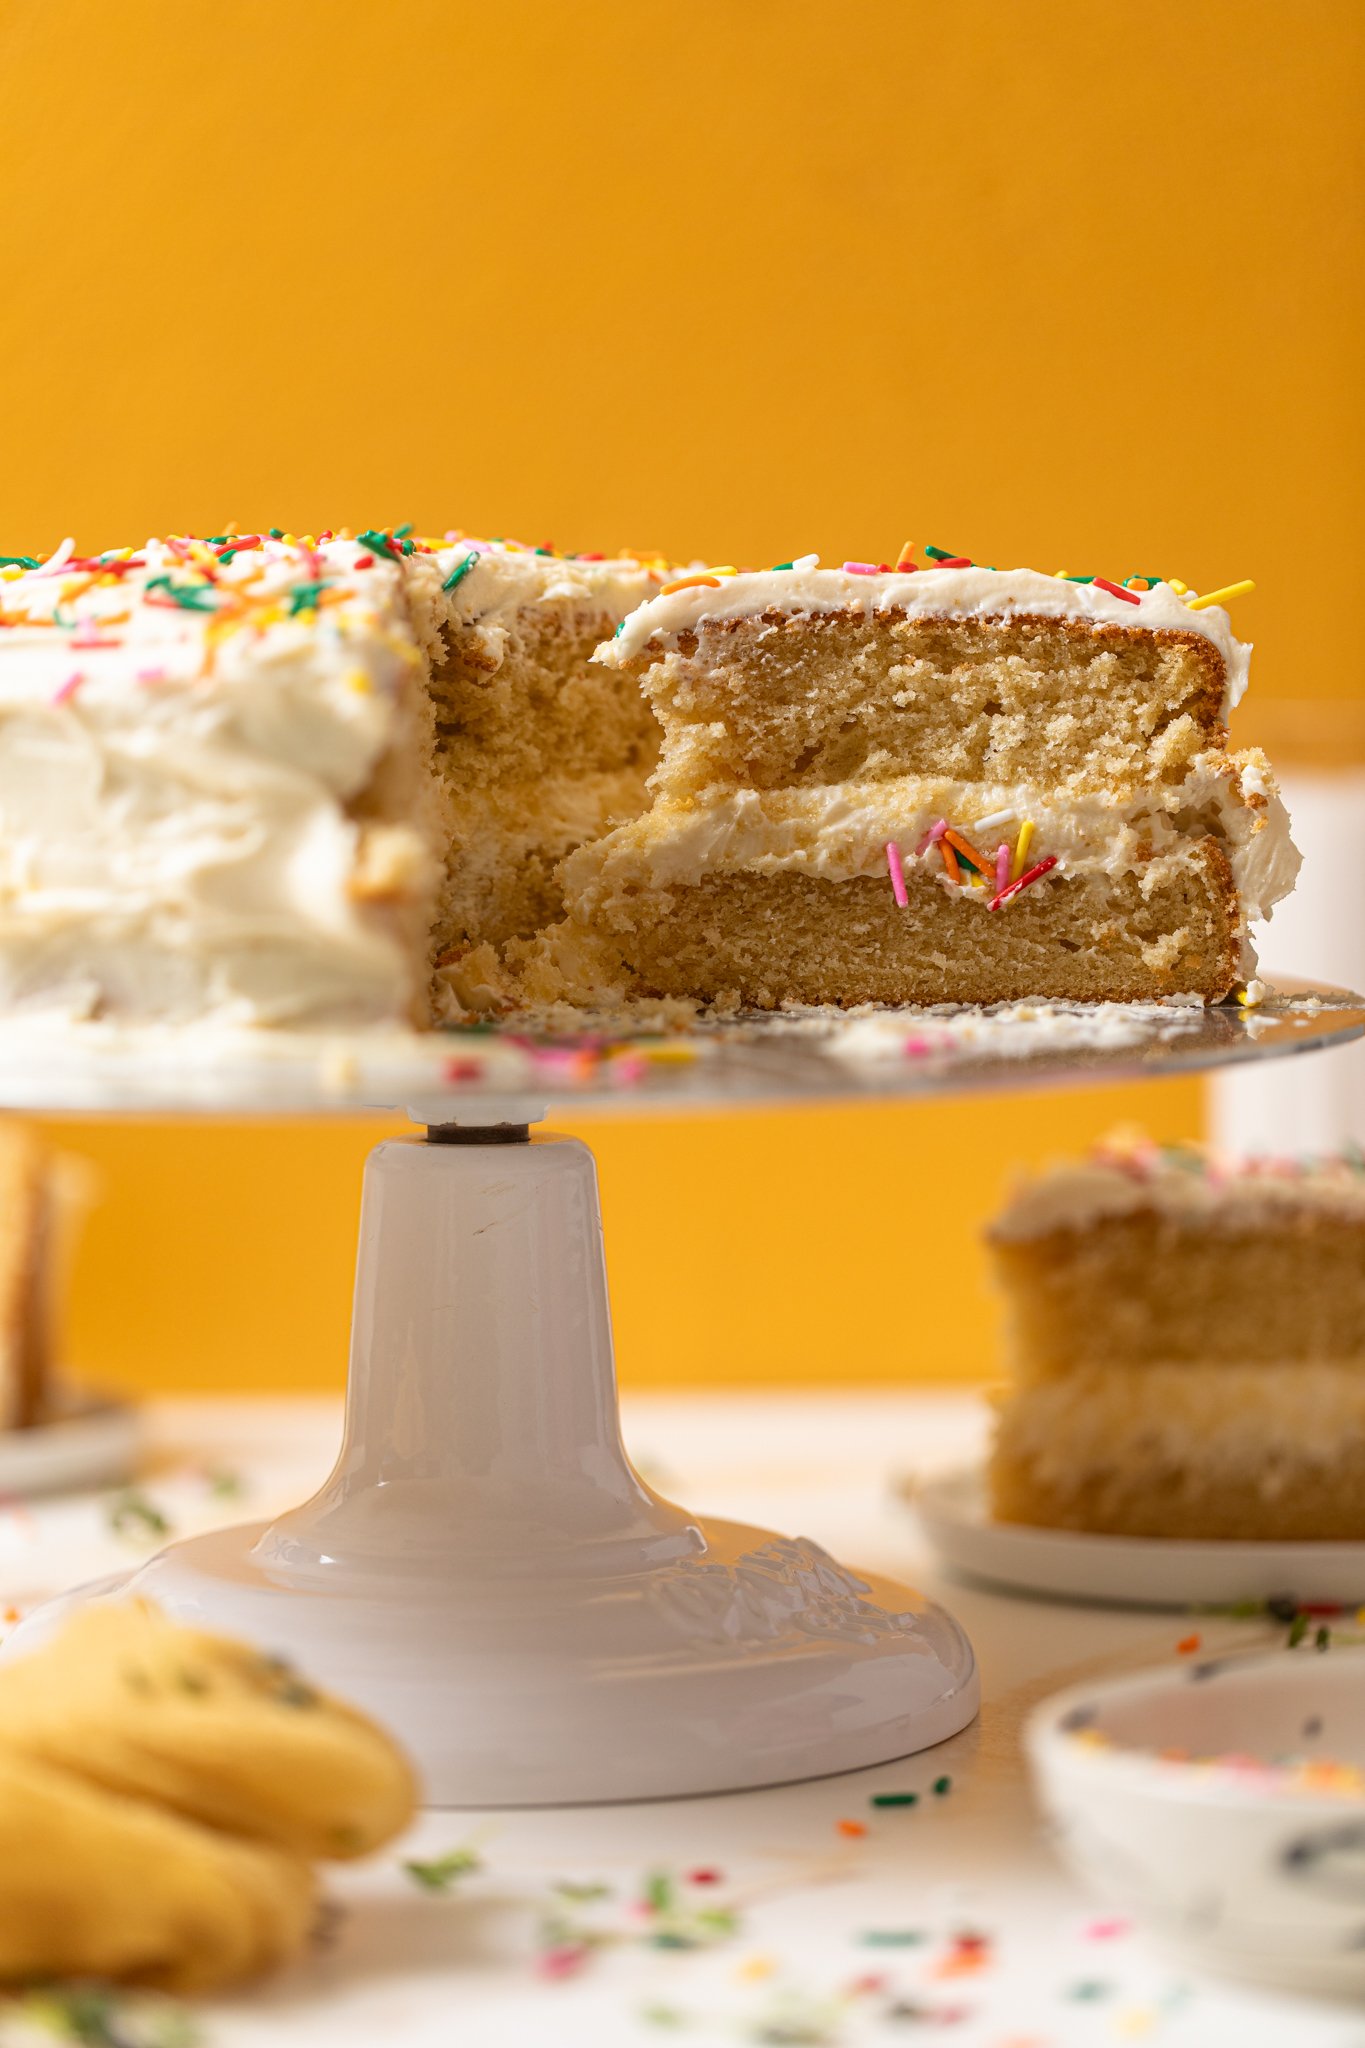
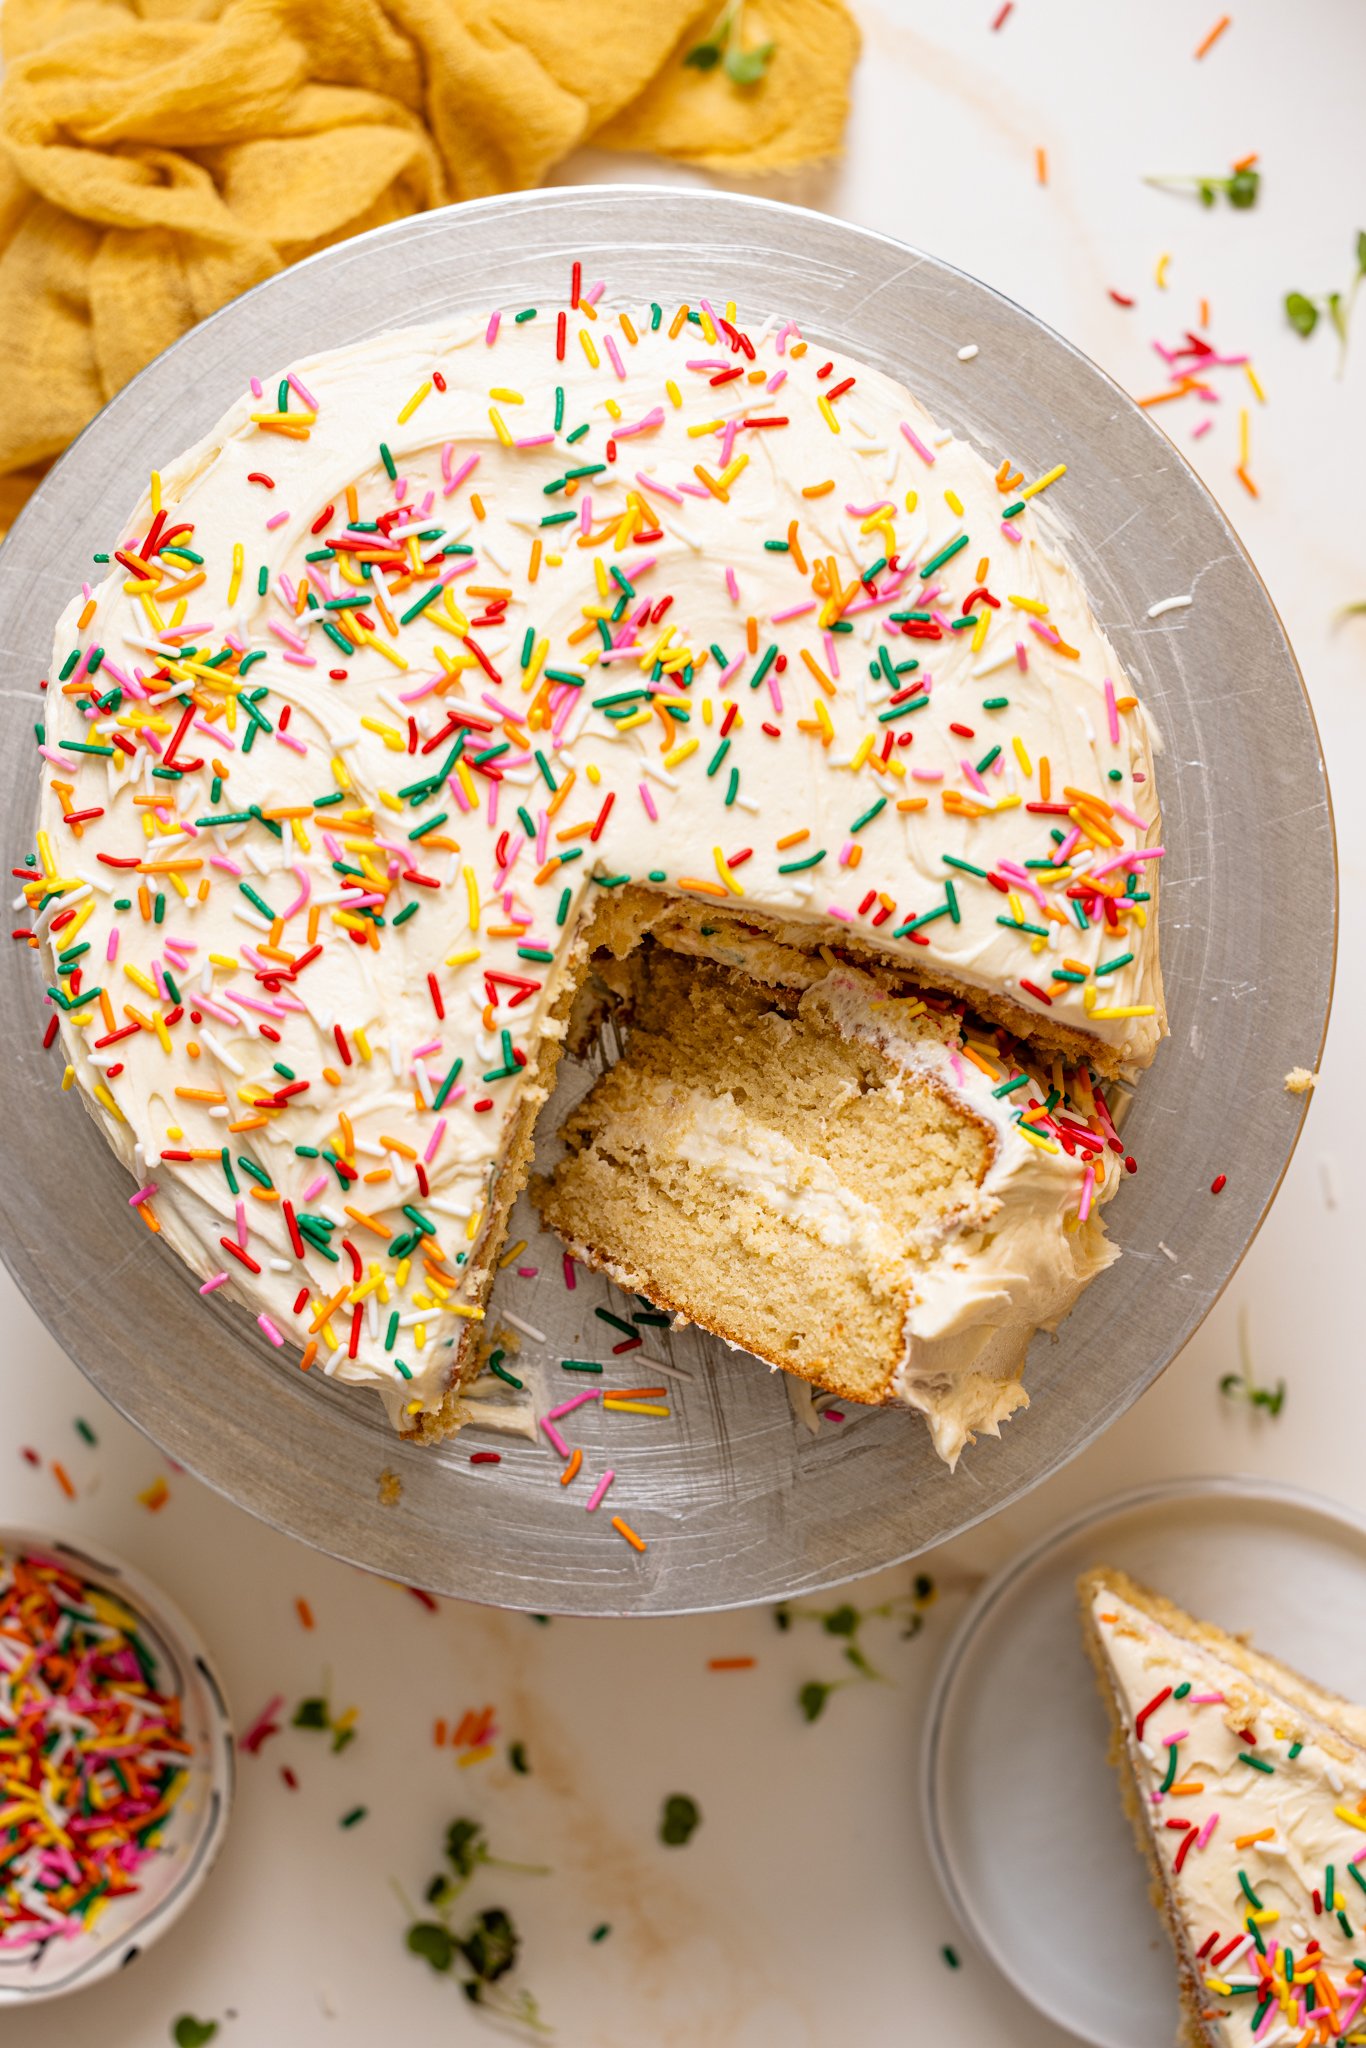
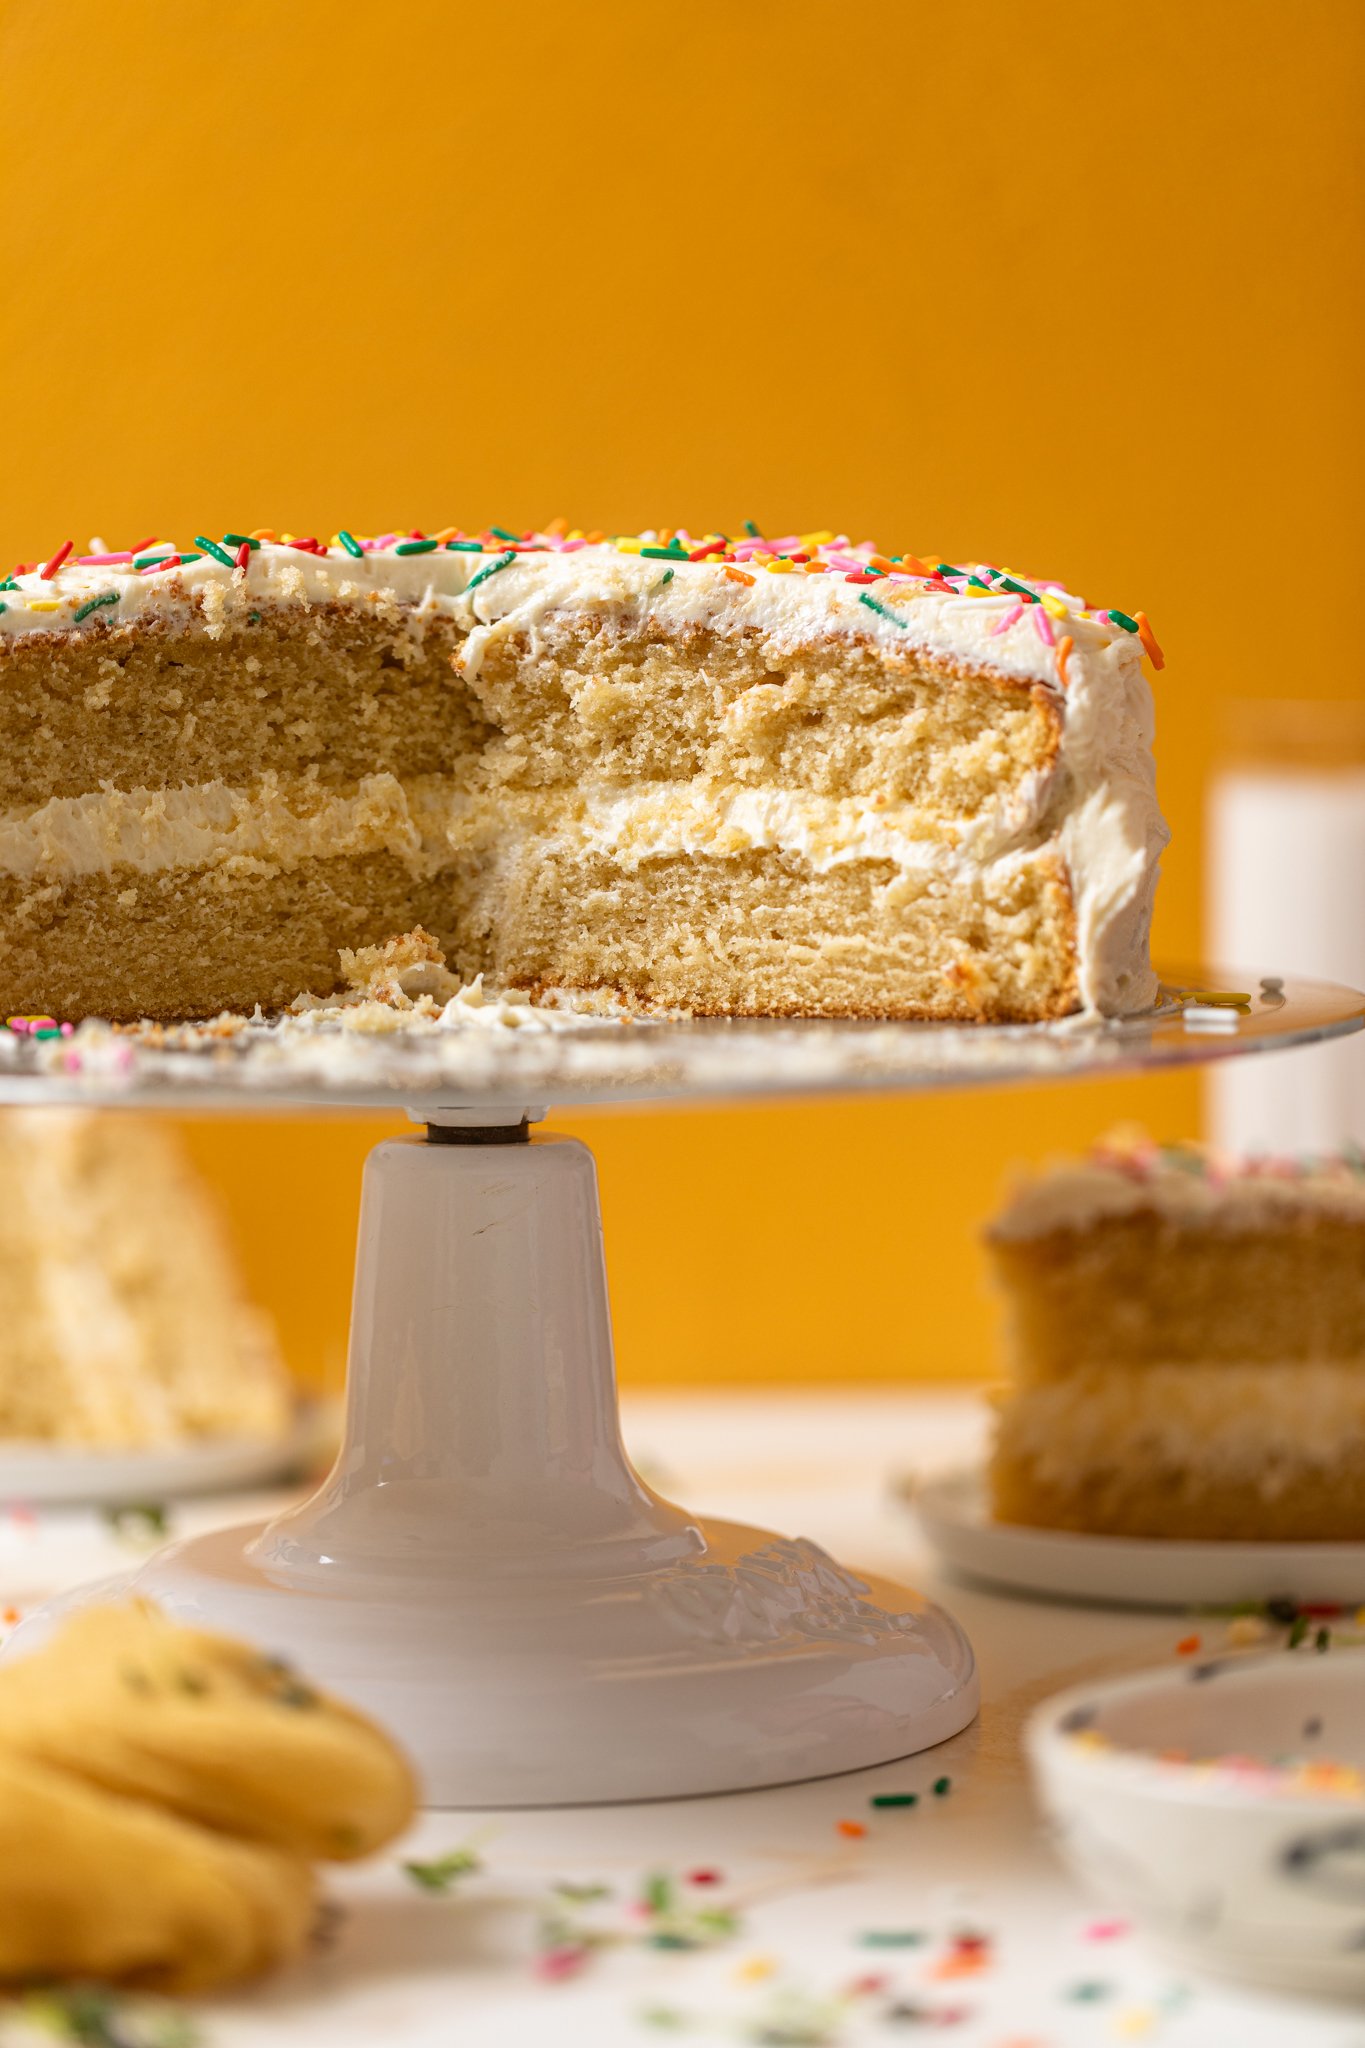
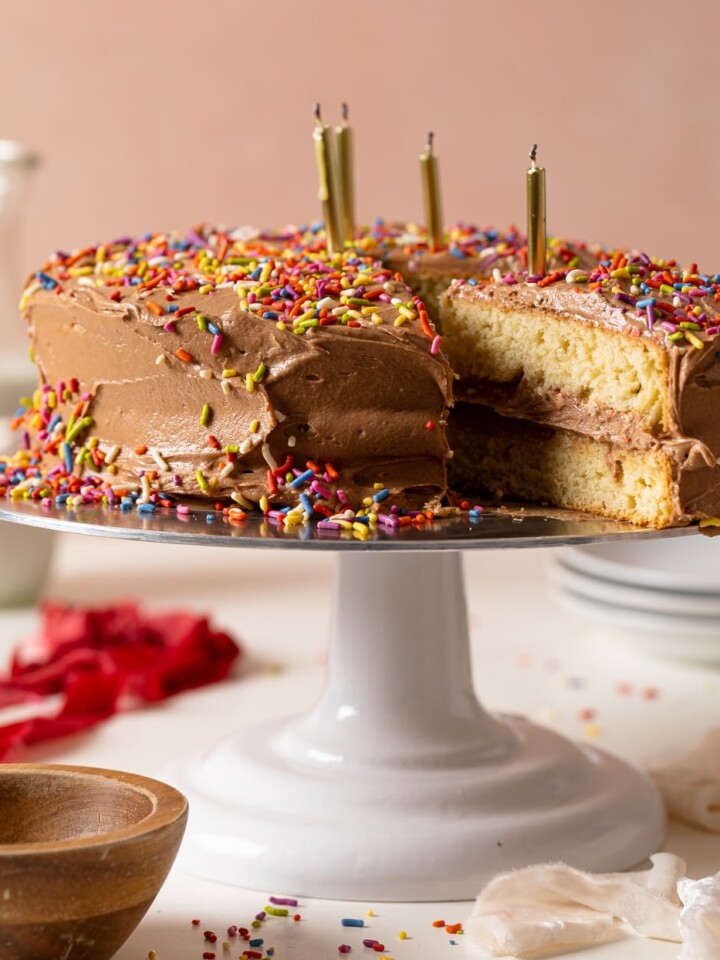
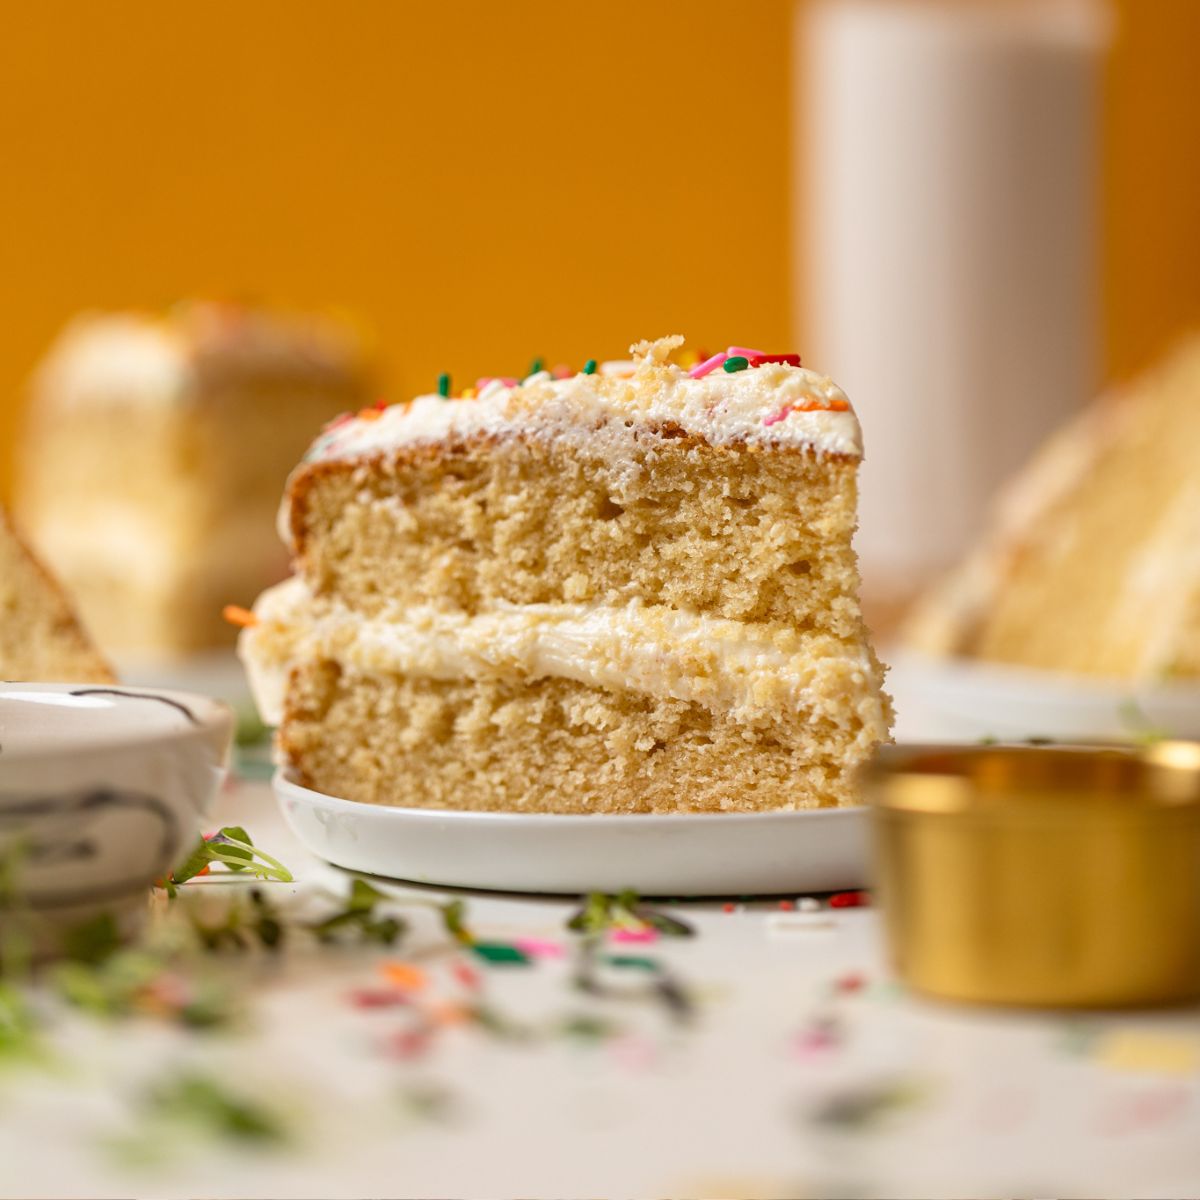
Celebrate every special occasion with My Fave Vanilla Birthday Cake—a soft, moist, and buttery vanilla layer cake that's bursting with nostalgic flavor and finished with fluffy vanilla buttercream. Made from simple pantry staples, this crowd-pleasing cake is perfect for birthdays, holidays, and just-because moments. Whether you’re going for a classic sprinkle-topped look or a more elegant layered vibe, this homemade vanilla cake is tender, flavorful, and guaranteed to impress. Plus, it’s easy to make, customizable with gluten-free or dairy-free or vegan swaps, and a total showstopper for cake lovers of all ages.
Honestly, there’s not much to say about this Vanilla Birthday Cake—it's just SO amazing. Moist, fluffy, soft + pillowy—everything you want in a cake and the small twist in the frosting just brings it all together so nicely. Growing up, I was all about a good ole' slice of birthday cake. It seriously was my favorite part of summers, especially-----when there wee handfuls of birthday parties to attend.
Now, let's talk about the sprinkles. Although they're optional, I just feel like having it creates such a great festive vibe that's needed! If you haven’t tried my No-Churn Vanilla Ice Cream with Rainbow Sprinkles or Vanilla Cupcakes with Buttercream Frosting or Oreo Funfetti Chocolate Chip Cookies yet, you're missing out. And if you're more into classic cakes, try my Perfect One-Bowl Lemon Birthday Sheet Cake, Lemon Strawberry Layer Cake, or Southern Salted Caramel Cake for a sweet treat! And if you're a cake lover like me, be sure to check out our Best Cake Flavors for Any Occasion list next!
Overall, this cake is just the right amount of sweetness, fluffiness, softness and includes a beautiful marriage of vanilla + a hint of cream cheese flavors, and is altogether easy to make—using simple ingredients. It’s a win, win situation—believe me! Plus, you can easily transform it into a dairy-free, gluten-free, or vegan option that works for the entire family.
Jump to:
- Why You’ll Love this Birthday Cake
- Perfect Occasions For A Slice Of My Fave Vanilla Birthday Cake
- How to Make Your Own Homemade Cake Flour
- How to Make Vanilla Birthday Cake
- How To Assemble Vanilla Birthday Cake
- Ingredients for Vanilla Birthday Cake
- Why The Ingredients NEED To Be At Room Temp
- Can I Make this Vanilla Birthday Cake Vegan?
- How to Make It Dairy-Free or Vegan
- Can I Make this Cake Ahead of Time?
- Can I Use Other Types of Milk?
- Pro Tips for Baking Bliss (That’ll Elevate Every Cake You Make!)
- How to Know If Your Baking Powder + Baking Soda Are Fresh
- So, What Does It Taste Like?
- Can I Make this Vanilla Cake Into Cupcakes?
- Easy Flavor Variations to Try
- What To Serve Vanilla Birthday Cake With?
- How to Store + Freeze Vanilla Birthday Cake
- Troubleshooting Common Cake Mistakes
- Common Q + A's for My Fave Vanilla Birthday Cake
- More Amazing Special Occassion Dessert Recipes
- MADE OUR RECIPE(S)?
- My Fave Vanilla Birthday Cake
Nothing beats the classic joy of a moist and tender vanilla birthday cake—reliable, easy-to-make, and perfect for any celebration. Inspired by my love for a good slice of cake, here’s why this cake stands out for the better:
Why You’ll Love this Birthday Cake
- Simple, pantry-friendly ingredients. Think: All-purpose flour [mixed with cake flour or not], salted butter, sugar, eggs, buttermilk, and high-quality vanilla extract combined for a delicious homemade sweet treat!
- Soft, moist crumb. The secret? Buttermilk adds tang, richness, and extra moisture—so no more dry slices. Instead, you'll enjoy the perfect fluffiness in every bite!
- Simple and easy even for beginner bakers!
- Rich + creamy vanilla + cream cheese-infused frosting.
- Classic combo of vanilla + vanilla goodness.
- Perfect for birthdays and special occasions.
- Layers of happiness in every forkful.
- Totally decadent, and did I mention delicious?
Perfect Occasions For A Slice Of My Fave Vanilla Birthday Cake
These events are a great excuse to eat cake!
- Birthdays (It's in the title Haha!)
- Anniversaries
- Barbecues
- Potlucks
- Kids Sleepovers
- Holiday Gatherings
- Graduations
- Baby Showers
- Dinner Parties
- Actually, any time is a good time for cake, right? Bake away for a little weekday pep-up!
How to Make Your Own Homemade Cake Flour
If you're in a pinch and you don't have any cake flour on hand and you only have all-purpose flour---no worries! You can still achieve that extra fluffiness that cake flour would by simply adding 1 teaspoon of arrowroot or starch to your flour before whisking.
How to Make Vanilla Birthday Cake
This birthday cake as I’ve mentioned before is super easy to whip together and doesn’t require anything special when it comes to ingredients. You start by beating the softened butter with the sugar until fluffy, then you add the liquid ingredients: eggs, vanilla, etc. Lastly, you mix in the dry ingredients and "buttermilk" alternatively for the best results. Bake in prepared cake pans and wallah!
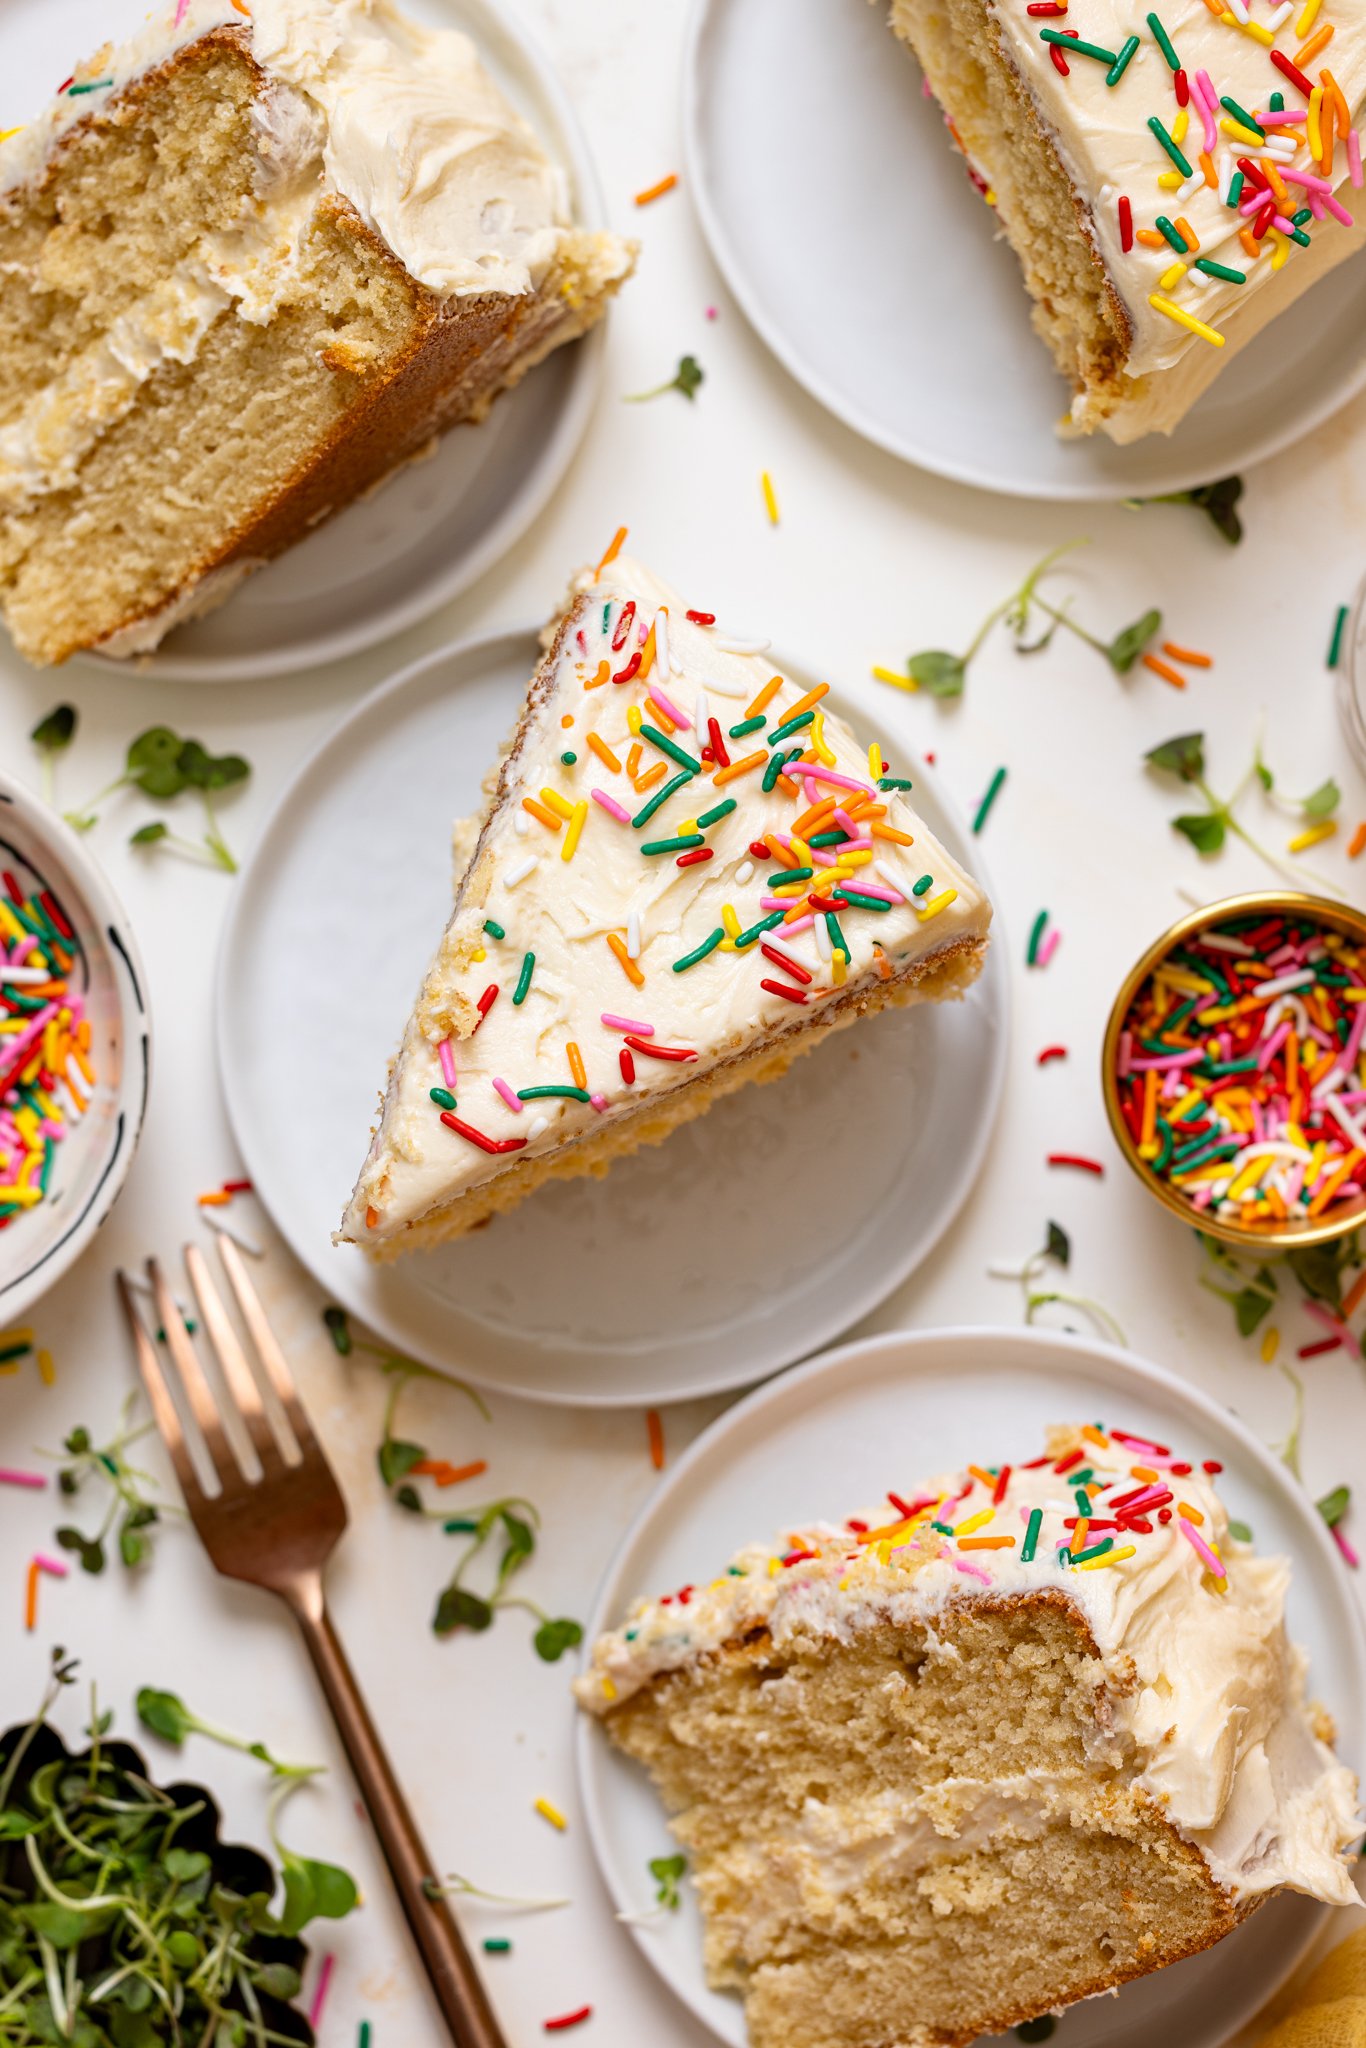
How To Assemble Vanilla Birthday Cake
- Before you frost your cake, you’ll need to trim it. Use a long serrated knife (or cake slicer) to slice the thin crust layer off the top of each cake to make a flat surface.
- Place the first cake layer on your cake stand and evenly cover the top with buttercream. Now, top with 2nd layer and add more buttercream atop that layer, spreading it over the tops and sides of cake, evenly and thinly. NOTE: If making a 3-layer, be sure to repeat step 1 of assembly once again before getting to the final layer.
- Once fully frosted, add small little designs of the buttercream using a piping bag + tip around the sides and top of cake. Feel free to add rainbow sprinkles to the tops and side of cake and using a spatula, glide it across the cake for a nice "infuse" in buttercream. Chill for 5 minutes to ensure that buttercream sets. NOTE: For a fancy moment or occasion, add florals atop cake for a Spring or Summer vibe!
- When ready to serve, remove from the refrigerator. Slice and enjoy!
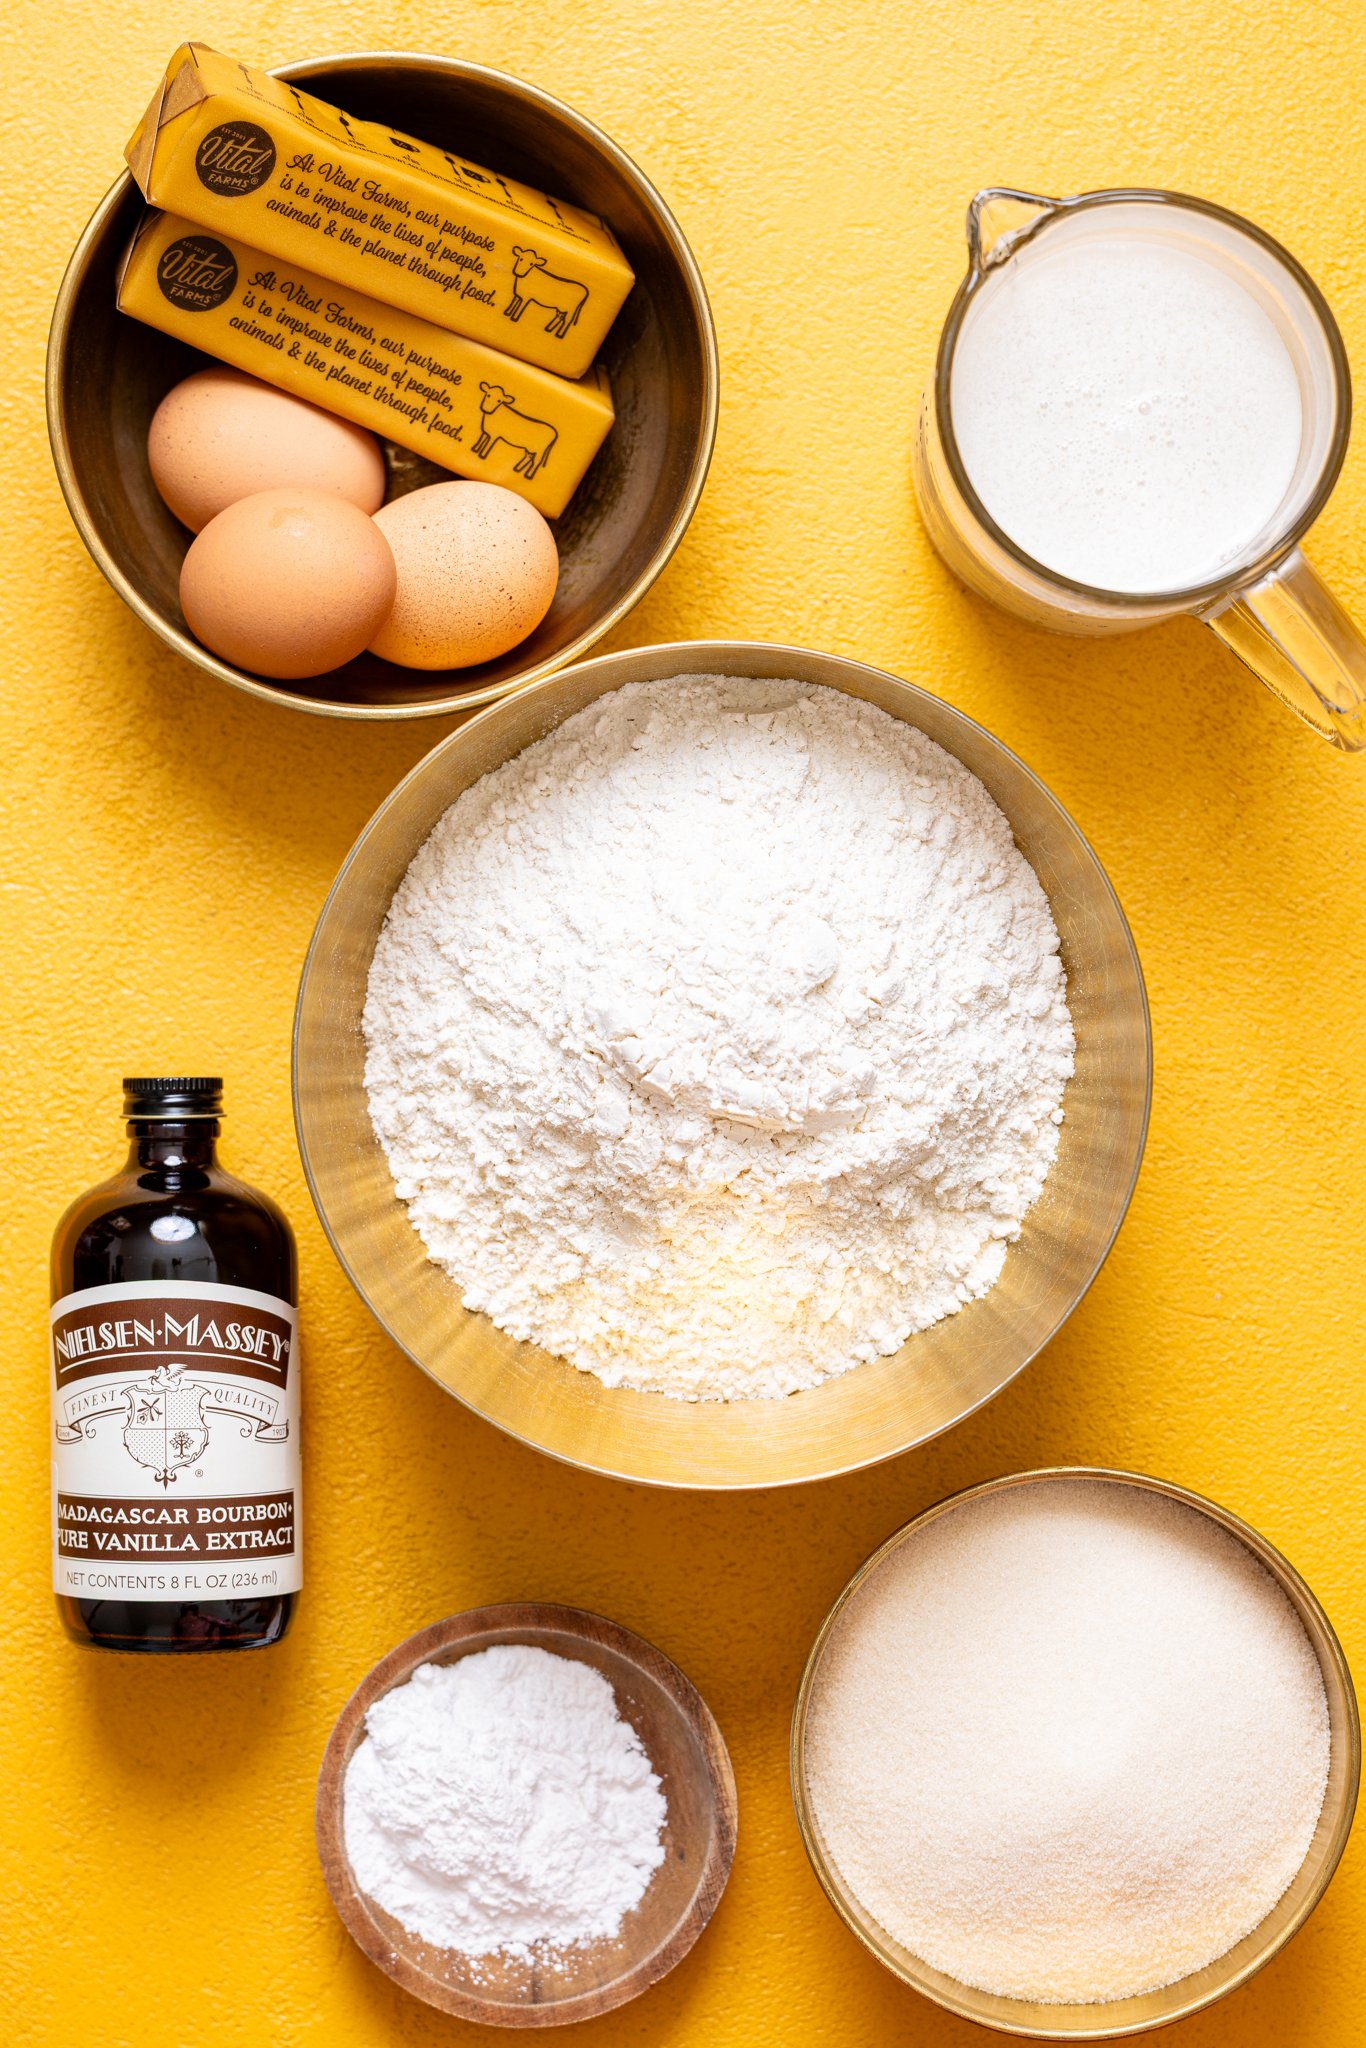
Ingredients for Vanilla Birthday Cake
Baking the perfect vanilla cake is all about balance—flavor, structure, and moisture. Here's a closer look at each ingredient in My Fave Vanilla Birthday Cake and what makes it essential (plus easy swaps):
FOR CAKE:
- All-purpose flour. Provides structure and a balanced crumb. It’s sturdy yet tender—great for classic cakes. You can also use gluten-free 1:1 flour or swap in more cake flour for a lighter texture or a GF-friendly option.
- Cake flour. Gives your cake that ultra-soft, bakery-style texture thanks to its lower protein content. You can also make your own by combining all-purpose flour and cornstarch. See blog post for more details!
- Salted butter. Adds richness, moisture, and enhances flavor. Softened butter also helps with leavening when creamed with sugar. Feel free to substitute with unsalted butter (with added salt) or plant-based butter for dairy-free or vegan options.
- Cane sugar. Sweetens and tenderizes the cake while helping it brown beautifully. you can substitute with white sugar or coconut sugar for a more caramelized flavor.
- Baking powder. Acts as the leavening agent that helps the cake rise and stay fluffy. If using self-rising flour, reduce baking powder accordingly.
- Eggs. Bind the batter together while adding moisture, richness, and stability.
For vegan option, feel free to use Flax eggs or egg replacer. - Vanilla extract. Provides that signature birthday cake flavor—warm, sweet, and nostalgic. Vanilla bean paste or a splash of almond extract for variation can be used.
- Buttermilk (plant-based milk + lemon juice). Creates a moist, tender crumb and activates the baking powder for a better rise. Feel free to us a dairy buttermilk or any milk + vinegar for a similar effect.
FOR BUTTERCREAM FROSTING:
- Powdered sugar. The sweet, fluffy base of your buttercream that creates structure and volume. Feel free to use organic confectioners’ sugar or reduce amount for less sweetness instead.
- Salted butter. Adds creaminess and depth to the frosting, while balancing sweetness. Substitute with unsalted butter or vegan butter for dairy-free or vegan option.
- Cream cheese (optional). Brings a rich, slightly tangy flavor and silkier texture to the frosting. Feel free to omit for a traditional buttercream or use dairy-free cream cheese.
- Vanilla extract. Boosts the flavor of the buttercream and enhances the vanilla notes of the cake. Can also use vanilla bean paste or another extract like almond.
- Almond milk. Helps achieve the perfect consistency for spreading or piping. Any plant-based milk, regular milk, or heavy cream for a richer version can be used.
SHOP MY FAVORITE BAKEWARE ITEMS AND ACCESSORIES!
Here, I’ve curated a list of bakeware essentials that I use to achieve my favorite baking treats, especially with this Vanilla Birthday Cake. Everything from my fave baking sheets, parchment paper, mixing bowls, and more. SEE THEM HERE!
Why The Ingredients NEED To Be At Room Temp
It’s always best to have cold ingredients at room temperature to ensure that the mixing process is more seamless and even. Please note that microwaving your butter last minute if you forget to leave it out at room temperature isn’t recommended. Microwaving often changes the consistency of the butter which doesn’t create a nice ‘creaminess’ when mixed.
QUICK BUTTER HACK:
Instead, to quickly soften your butter, run a plate and a bowl under hot water. Place the unwrapped butter on the hot plate and cover with the bowl. Let it sit for about 10 minutes. Then your butter should be nice and soft. You can also cut the butter into a few pieces to speed up the softening process even more.
Can I Make this Vanilla Birthday Cake Vegan?
Yes! To make this cake dairy-free and egg-free, substitute the butter for vegan butter. Omit the eggs and use apple cider vinegar or ‘flax eggs’ as an alternative. To decorate your vegan vanilla birthday cake, use the chocolate buttercream recipe here for a different flavor combo besides vanilla buttercream frosting.
How to Make It Dairy-Free or Vegan
Yes—you can totally enjoy this vanilla birthday cake if you’re dairy-free or plant-based! Here’s how:
Dairy-Free Swaps:
- Use plant-based butter (like Earth Balance or Miyoko's) in place of regular butter
- Almond or oat milk + lemon juice or apple cider vinegar = perfect dairy-free buttermilk
- Omit cream cheese or use dairy-free alternatives in the frosting (Violife has a great option)
Vegan Swaps:
- Use flax eggs (1 tablespoon ground flax + 2.5 tablespoon water per egg) or a commercial egg replacer like one from Bob's Red Mill
- Choose a vegan butter for both the cake and buttercream
- Use plant-based cream cheese or skip it altogether
Can I Make this Cake Ahead of Time?
Absolutely! You can always bake this cake the night or day before and let it cool, tightly wrap, and refrigerate until ready to use. The frosting/buttercream can also be made prior and tightly wrapped and stored in the fridge as well. When ready to serve, let cake sit at room temperature for 30 minutes to an hour, frost, and enjoy!
Can I Use Other Types of Milk?
Absolutely! If you’d like to switch things up with the type of plant-based milk that you use—–that’s totally fine! The world of plant-based milk is constantly expanding. From the classics like coconut milk, cashew milk, soy milk and almond milk, we now have delicious options like oat milk, and even potato and quinoa milk. Also, feel free to use regular dairy milk if desired.
Pro Tips for Baking Bliss (That’ll Elevate Every Cake You Make!)
Whether you're a beginner or seasoned baker, these tried-and-true techniques can make or break your vanilla cake's texture, flavor, and overall finish. Here’s how to get bakery-worthy results right from your home kitchen:
Use a Kitchen Scale for Precision
Baking is a science, and flour is one of the easiest ingredients to mismeasure. Scooping directly from the bag can lead to overpacking, which makes your cake dense and dry. Therefore, weigh your flour in grams with a digital kitchen scale for consistent, pro-level accuracy every time.
Listen to Your Cake
It might sound wild, but your cake can talk to you—literally (hahaha). When it’s fully baked, gently tap the top or side of the pan. If you hear a soft crackling sound, the steam has finished escaping and your cake is likely done baking. No sound? It might still be slightly underbaked in the center.
Fresh Baking Powder is a Must
Expired leavening agents are one of the top culprits of sunken, flat cakes. Baking powder loses strength over time—especially if exposed to humidity. Test it: Add 1 teaspoon to hot water. If it bubbles vigorously, it’s still active. If not, toss it and get a fresh container for guaranteed rise.
Preheat and Prep Like a Pro
Once wet and dry ingredients meet, your leavening starts working immediately. That means your oven should already be hot, and pans greased, floured, or lined. Don’t let your batter sit on the counter—it’s like wasting the lift your baking powder just worked hard to give!
Create Even Cake Layers
Ever wonder how bakeries get flat, stacked cake layers? It’s not magic: it’s cake strips. These wrap around the pans to keep edges from baking faster than the center.
DIY Tip: Wet paper towels wrapped in foil or damp dish towels pinned around your pans work too. Even baking = no domed tops = no waste of good cake.
Burst Air Bubbles Before Baking
Those pesky air pockets create holes or tunnels in your cake. Gently banging the pan on the counter releases trapped air so you get an even crumb. Just a couple of taps before sliding the cake into the oven can make a noticeable difference.
Upgrade Your Frosting Game
Want a more elevated finish than basic American buttercream? Consider trying Swiss Meringue Buttercream (smooth, less sweet, and pipe-able) or Italian Meringue Buttercream (silky, stable, and luxurious). Both frostings use cooked egg whites for an elegant, glossy texture that melts in your mouth—and won’t taste overwhelmingly sweet. Or simply add a hint of flavor to your Vanilla Buttercream---like cream cheese, almond extract, cinnamon, etc.
How to Know If Your Baking Powder + Baking Soda Are Fresh
Baking is such a science, but more importantly because certain ingredients like your leaveners (aka baking powder + baking soda) are completely fresh so that your vanilla birthday cake (and other baked goods) fully rise and bake through nicely.
Incase you weren't aware, there's an easy to double check both the baking powder and baking soda. Here's what you need:
BAKING SODA HACK:
-Add 1 teaspoon baking soda with ¼ cup vinegar or lemon juice in a bowl and if it's fresh, the mixture should "bubble/fizz". If no bubble/fizz is present, then your baking soda needs to be replaced.
BAKING POWDER:
-Add 1 teaspoon baking powder with ¼ cup Hot tap water in a bowl and if it's fresh, the mixture should "bubble/fizz". If no bubble/fizz is present, then your baking powder needs to be replaced.
So, What Does It Taste Like?
Just like a delicious Vanilla Birthday Cake should! It’s:
- The perfect sweet + rich flavor combo
- Generously frosted with a nice crunch from sprinkles
- Moist and dense and ultra soft
- Totally decadent, and did I mention delicious?
Can I Make this Vanilla Cake Into Cupcakes?
Sure! To turn this Vanilla Birthday Cake recipe into individual cupcakes, simply divide the batter between about 30 cupcake wells. Bake for 18 to 20 minutes, until the centers are set.
Easy Flavor Variations to Try
While classic vanilla is always a winner, here’s how to customize your vanilla birthday cake for different occasions and cravings:
- Funfetti Cake: Fold in ½–1 cup of rainbow sprinkles to the batter before baking for a festive, colorful twist kids and adults love.
- Lemon-Vanilla Cake: Add 1–2 teaspoons of fresh lemon zest and swap almond milk with lemon juice for extra zing.
- Almond-Vanilla Cake: Add ½ teaspoon almond extract for a deeper, nutty warmth that complements vanilla beautifully.
- Berry-Filled Layers: Add a thin layer of strawberry, raspberry, or blueberry jam between cake layers for a fruity surprise.
- Coconut-Vanilla Cake: Add shredded coconut to the batter or frosting, and replace milk with coconut milk for a tropical twist.
What To Serve Vanilla Birthday Cake With?
This Vanilla Birthday Cake is indulgent and amazing all on its own, but if you're looking to add a little something extra, here are some more fun ideas for what to serve with a Vanilla Birthday Cake:
- Whipped cream: A dollop of freshly whipped cream or coconut cream can be a delicious addition to a slice of Vanilla Birthday Cake. The lightness of the cream can help balance out the rich sweetness of the cake.
- Ice cream: The contrast between the cold ice cream and warm cake can be a winning combination. The subtle vanilla flavor can also complement the vanilla and cream cheese flavors in the cake. Try my No-Churn Vanilla Ice Cream with Rainbow Sprinkles
- Fresh Berries: The bright and juicy flavors of strawberries, blueberries, raspberries, or any seasonal berries make a perfect match with the vanilla cake. They add a refreshing touch and a burst of vibrant color.
- Coffee or tea: A cup of coffee or tea can be a great way to round out the flavors of the cake. The bitterness of the coffee or tannins in the tea can help balance out the sweetness of the cake. Try my decadent Dirty Chai Maple Iced Latte or Iced Brown Sugar Shaken Espresso or Vegan Espresso Martini Mocktail.
- Caramel sauce: If you really want to double down on flavor, drizzling some caramel sauce over the cake can be a decadent finishing touch. Just be aware that this will make the cake even sweeter!
- Toasted Nuts: Sprinkle some toasted almonds, pecans, or walnuts on top of the cake for added crunch and a nutty flavor profile.
- Mocktails: A colorful drink like this Mimosa Mocktails or Best White Russian Mocktail complements the cake beautifully and makes for the perfect bite to sip ratio.
How to Store + Freeze Vanilla Birthday Cake
Make this vanilla cake ahead and keep it fresh for days with these simple storage tips:
Room Temperature:
Store the frosted cake in an airtight cake container for up to 2 days. Keep it in a cool, dry spot away from sunlight.
Refrigerator:
Wrap leftovers or individual slices tightly in plastic wrap or foil and store for up to 5 days. Bring to room temp before serving for best flavor and texture.
Freezer:
Wrap unfrosted cake layers in plastic wrap + foil, then freeze for up to 3 months. Thaw overnight in the fridge before frosting. You can also freeze frosted slices in airtight containers!
Troubleshooting Common Cake Mistakes
Even experienced bakers have off days. Here’s how to fix (or avoid!) the most common cake mishaps:
- Dry Cake? You may have over-baked or over-measured flour. Try using a kitchen scale and check your oven temperature with an oven thermometer.
- Cake Didn’t Rise? Your baking powder might be expired. Always test it before using.
- Soggy or Dense Center? You may have underbaked or added too much liquid. Bake until a toothpick comes out clean and cool in the pan for at least 10–15 minutes. If the tops are getting too dark, cover with foil paper while the centers bake fully.
- Frosting Sliding Off? Your cake may be too warm. Always cool layers completely before frosting. For a quicker cool, once cake reaches room temperature, add cake to the fridge to cool completely before frosting.
Common Q + A's for My Fave Vanilla Birthday Cake
Keep cake leftovers stored for up to 4-5 days in the fridge. Keep it in an airtight container to keep the cake from drying out. You can also freeze the cake tightly wrapped in plastic wrap for up to 3 months. Before serving, defrost the cake on the counter.
You can use only all-purpose flour or you can also use cake flour in place of all-purpose flour for a fluffier texture.
Yes! This recipe yields about 30 cupcakes. Simply bake for 18-20 minutes instead, until centers come out clean.
Not at all! Add 2 cups of organic heavy cream [or regular milk] + 2 tablespoons lemon juice and let sit for 10 minutes, until it thickens. TIP: You may need additional buttermilk if using heavy cream since it thickens a lot.
Absolutely! To make this cake entirely dairy-free + vegan, simply omit the unsalted butter and eggs and use softened vegan butter instead and add 2 tablespoons apple cider vinegar to milk instead of lemon juice (if desired). Substitute eggs with Flax eggs or egg replacer. Ensure that all ingredients are vegan-friendly, including rainbow sprinkles.
Of course! If you would love to make this cake gluten-free, then substituting all-purpose flour with Bob’s Red Mill 1-to-1 Baking Flour is the easiest option. It’s a special blend of gluten-free flours, starches, and xanthan gum, which makes these donuts just as soft, fluffy, and airy as the original! They also have a great All-purpose GF flour that works great as well.
It’s always best to have cold ingredients at room temperature to ensure that the mixing process is more seamless and even. Please note that microwaving your butter last minute if you forget to leave it out at room temperature isn’t recommended. Microwaving often changes the consistency of the butter which doesn’t create a nice ‘creaminess’ when mixed.
No worries! Instead, to quickly soften your butter, run a plate and a bowl under hot water. Place the unwrapped butter on the hot plate and cover with the bowl. Let it sit for about 10 minutes. Then your butter should be nice and soft. You can also cut the butter into a few pieces to speed up the softening process even more.
Absolutely! You can always bake this cake the night or day before and let it cool, tightly wrap, and refrigerate until ready to use. The frosting/buttercream can also be made prior and tightly wrapped and stored in the fridge as well. When ready to serve, let cake sit at room temperature for 30 minutes to an hour, frost, and enjoy!
Yup! If you’d like to switch things up with the type of plant-based milk that you use—–that’s totally fine! The world of plant-based milk is constantly expanding. From the classics like coconut milk, cashew milk, soy milk and almond milk, we now have delicious options like oat milk, and even potato and quinoa milk.
Vanilla cake uses whole eggs and standard extract, giving it yellow tint, richness, and a slightly softer texture. White cake uses only egg whites and clear vanilla for a pure-white crumb.
Gradual addition ensures each blends in smoothly—preventing a dense, uneven crumb.
Buttermilk is key—it brings both moisture and a subtle tang that balances sweetness.

More Amazing Special Occassion Dessert Recipes
- Best Southern Salted Caramel Cake
- The Best Red Velvet Cake + Cream Cheese Frosting
- Lemon Blueberry Olive Oil Cake
- My Fave Strawberry Shortcake with Buttermilk Biscuits
- Biscoff Cookie Butter Cinnamon Rolls
- 16 Types of Cookies: Holiday Baking Edition
- My Fave Childhood Banana Split
- Strawberry Birthday Sheet Cake
- Easy Southern Peach Cobbler [with Canned Peaches]
- Orange Olive Oil Bundt Cake
- The Best Strawberry Shortcake Donuts
- The Best Vegan Chocolate Cake
- Jamaican-inspired Coconut Rum Cake

MADE OUR RECIPE(S)?
If you tried My Fave Vanilla Birthday Cake recipe or any other recipe on my website, please leave a 🌟 star rating and let me know how you go in the 📝 comments below. And don't forget to tag me @shanikagrahamwhite on Instagram. I love hearing from you!
My Fave Vanilla Birthday Cake
Ingredients
VANILLA CAKE:
- 2 cups organic all-purpose flour, sifted
- 2 cups organic cake flour, sifted
- 1 cup salted butter, softened at room temp.
- 2 cups organic cane sugar
- 2 ½ tsps baking powder
- 3 large organic eggs, at room temp.
- 1 tablespoon vanilla extract
- 2 ½ cups "Buttermilk" (You'll need Almond milk + 2 Tbsps lemon juice)
VANILLA BUTTERCREAM FROSTING:
- 5 cups organic powdered sugar, sifted
- 1 cup salted butter, softened at room temp.
- 4 oz. cream cheese, softened at room temp. (This is optional)
- 2 tsps vanilla extract
- ¼ cup Almond milk (You can use your fave plant-based milk, regular milk, or heavy cream)
TOPPING:
- Rainbow sprinkles
Instructions
TO MAKE THE CAKE:
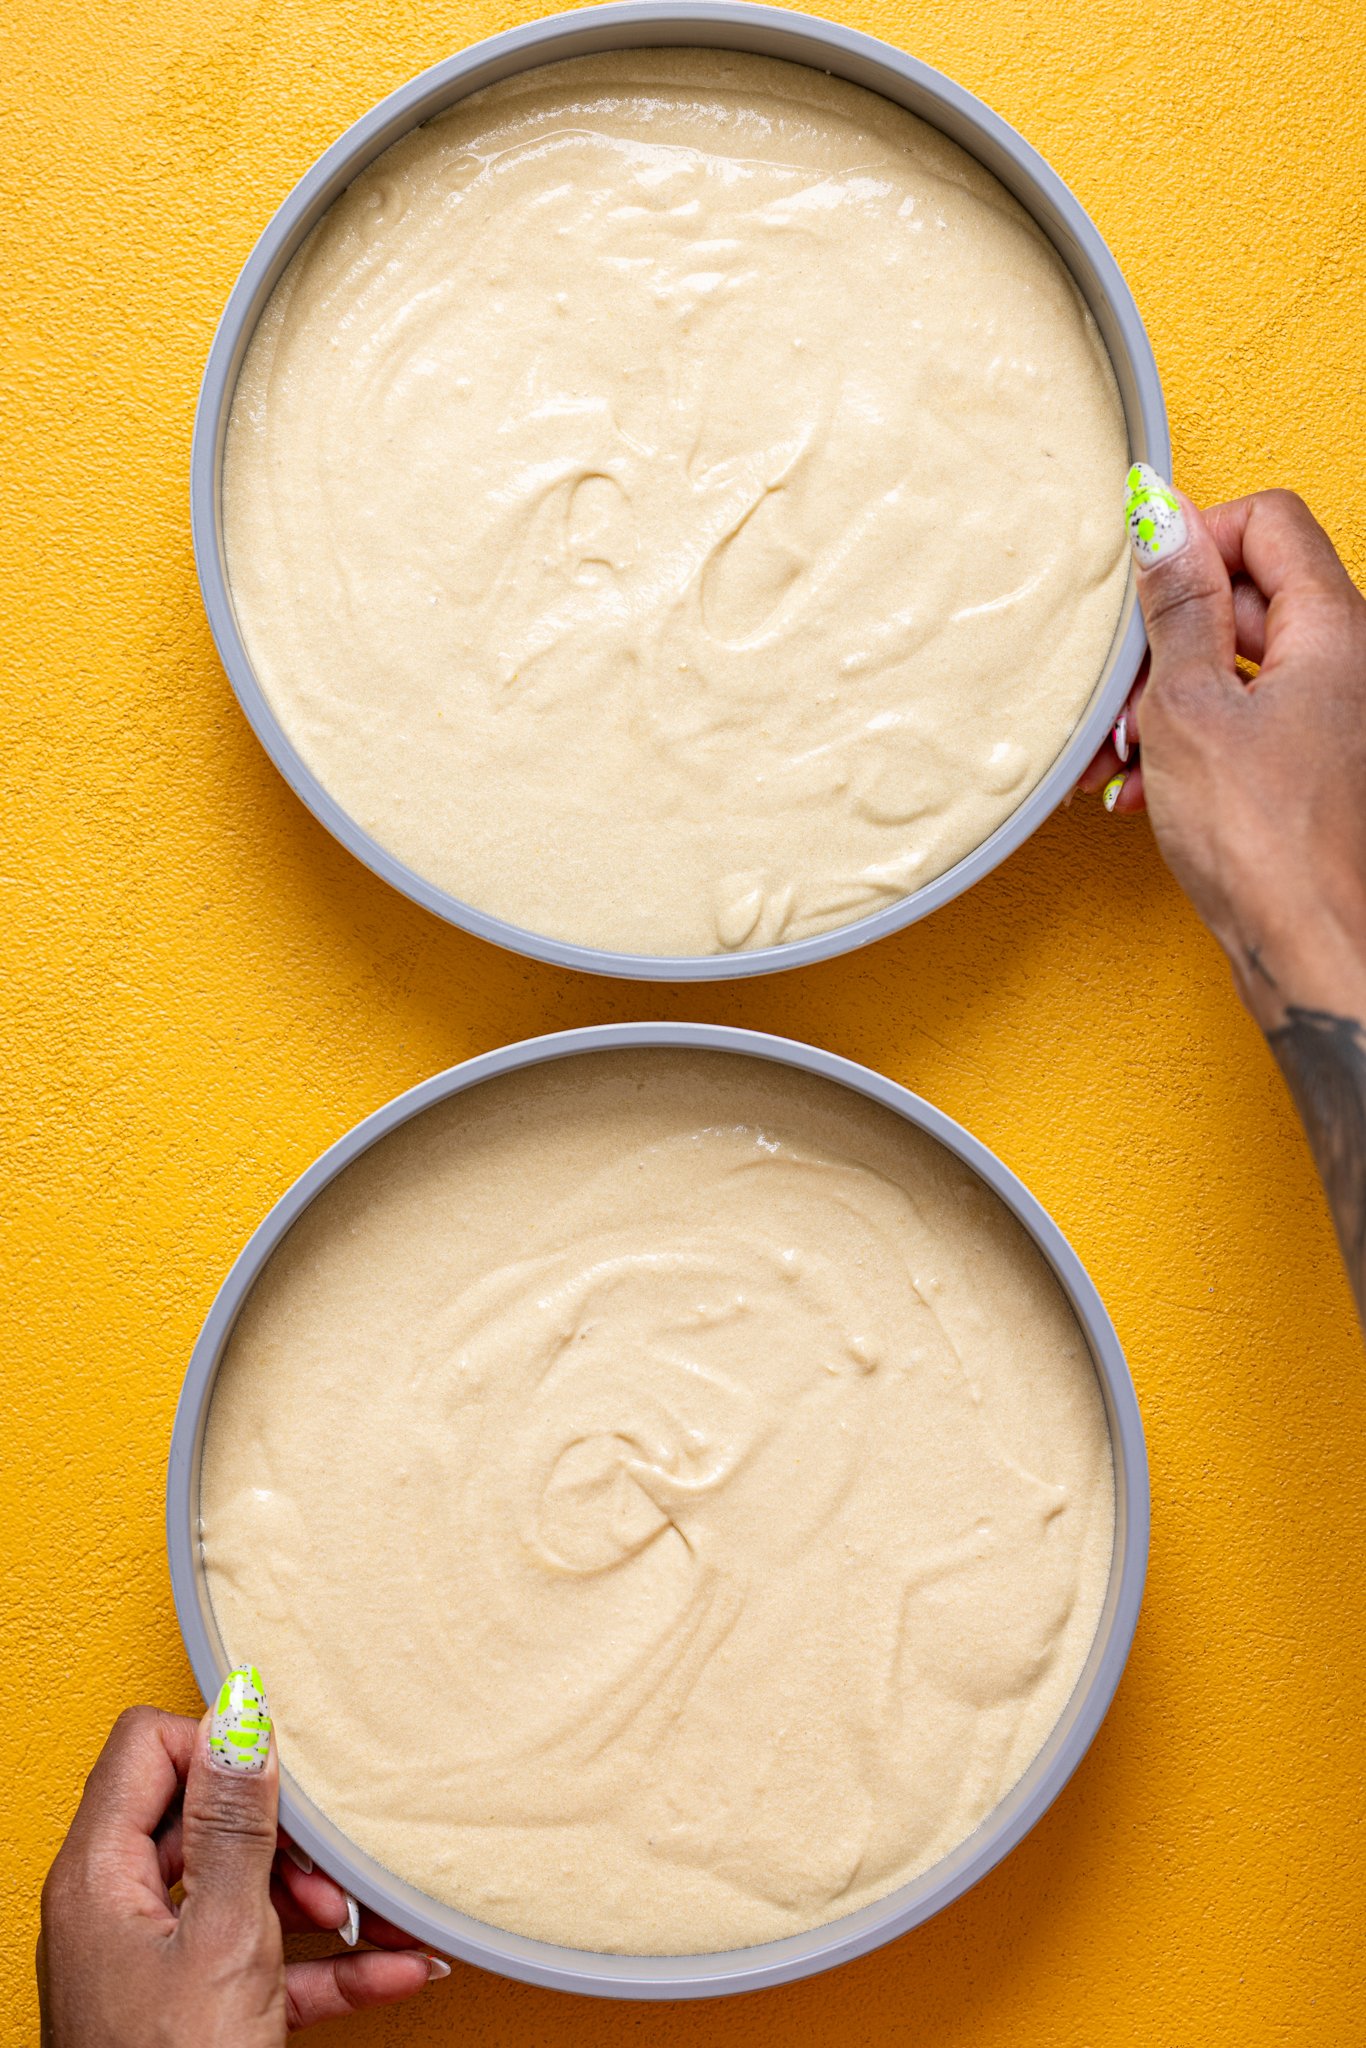
- Begin by preheating your oven to 375 degrees Fahrenheit. Lightly grease (with butter) AND line with parchment paper the bottoms of TWO 9-inch or 8-inch cake pans (for thicker layers) or THREE 6-inch cake pans.
- In a bowl, whisk together the milk and lemon juice and set aside for 5-10 minutes until everything "activates" to create the dairy-free "buttermilk".
- In a large bowl, whisk together the flours and baking powder until combined.
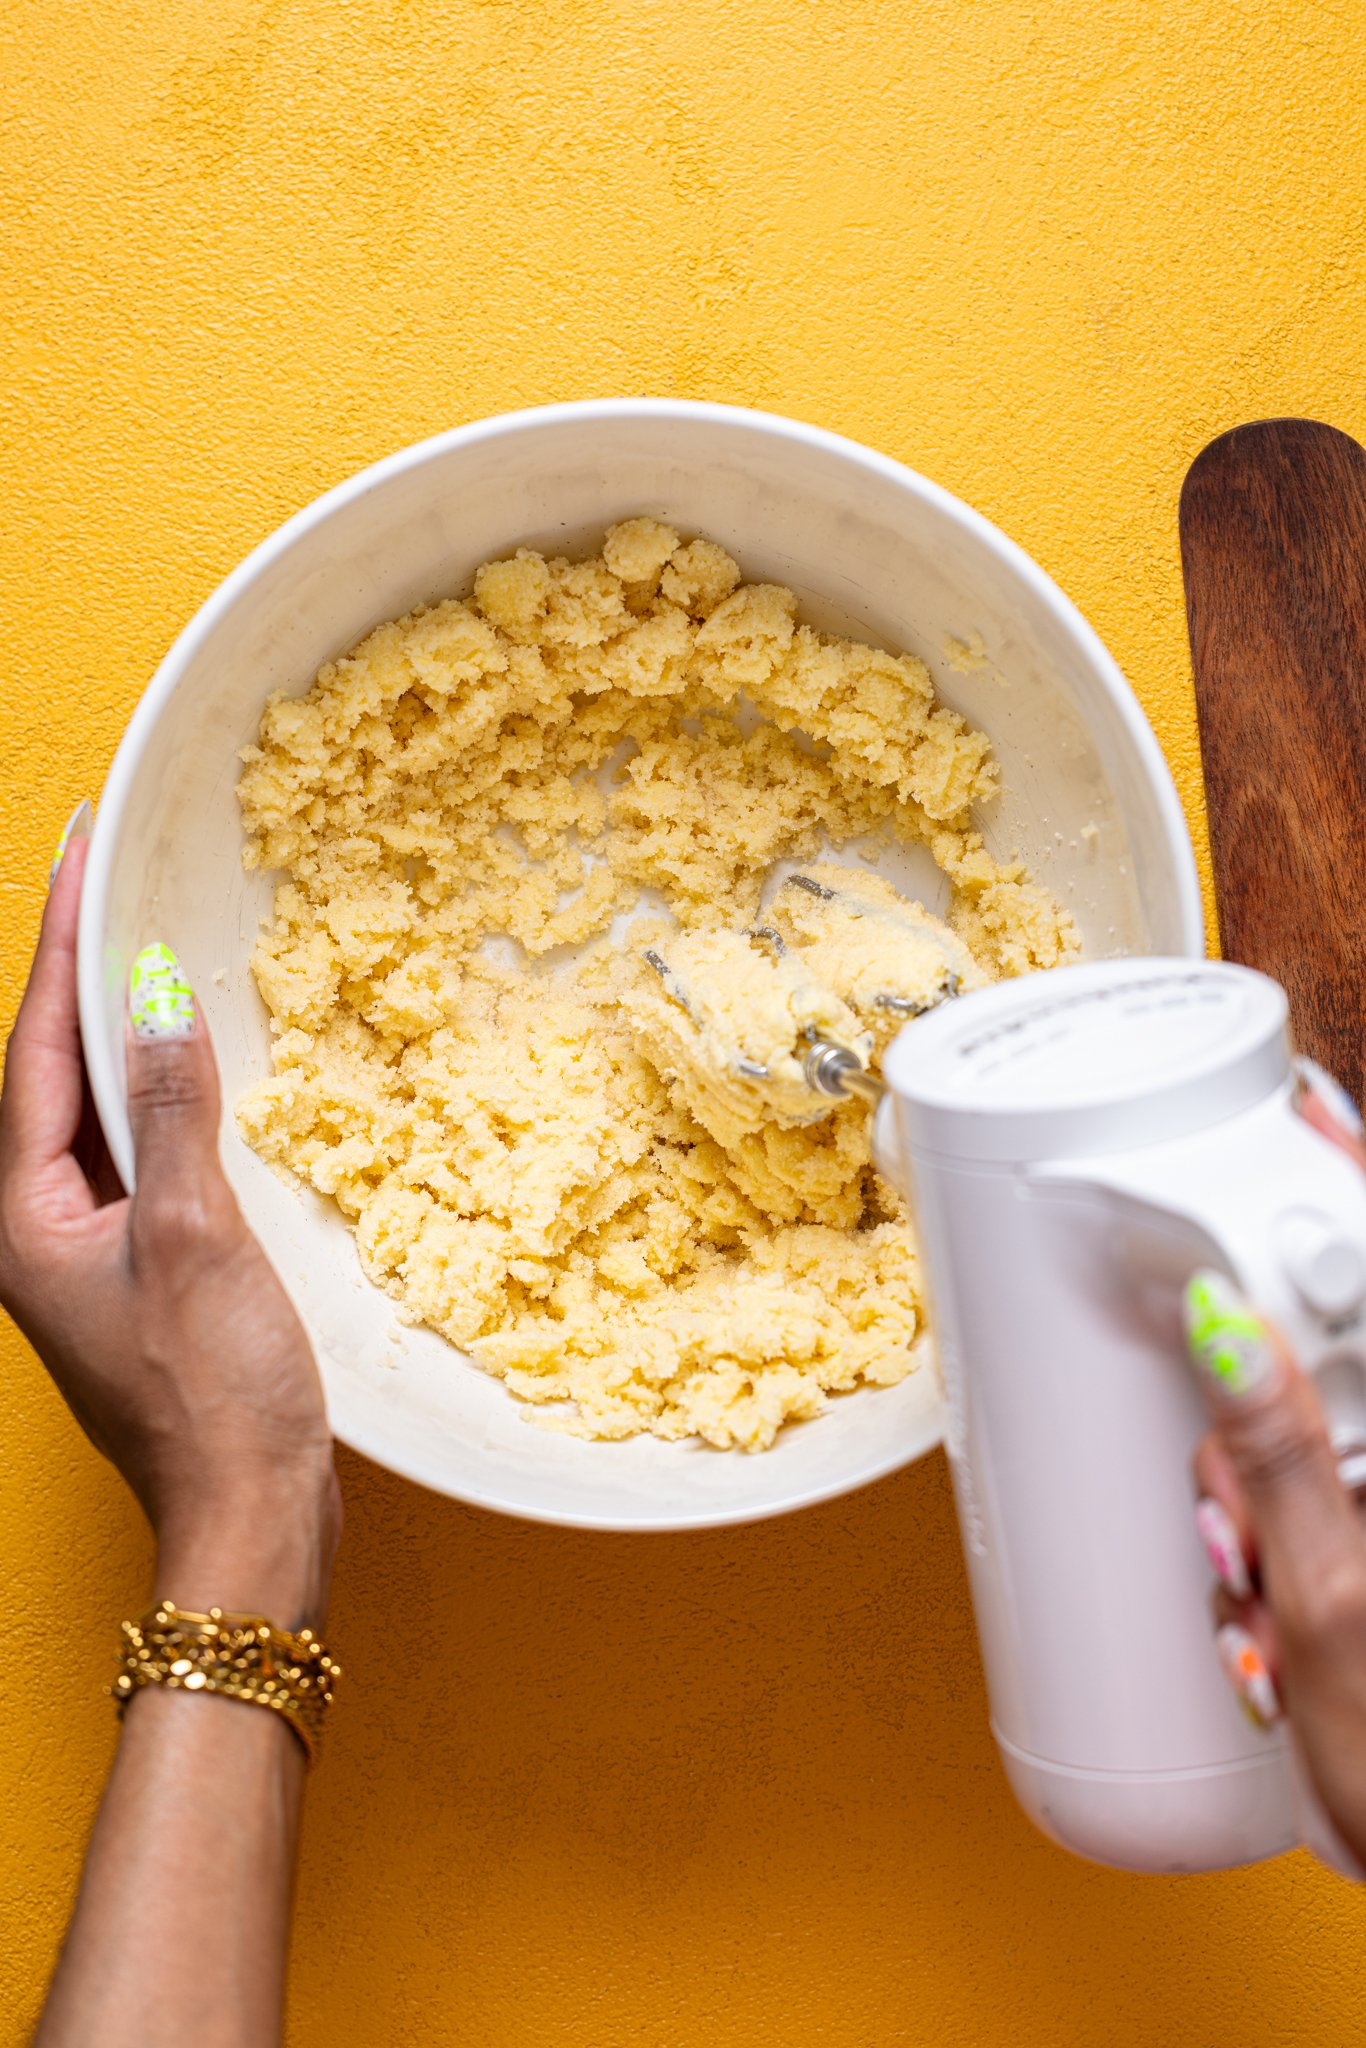
- In a bowl, add the butter and sugar, beating them together using a hand-mixer (on high-speed), until pale and fluffy, about 2-3 minutes.
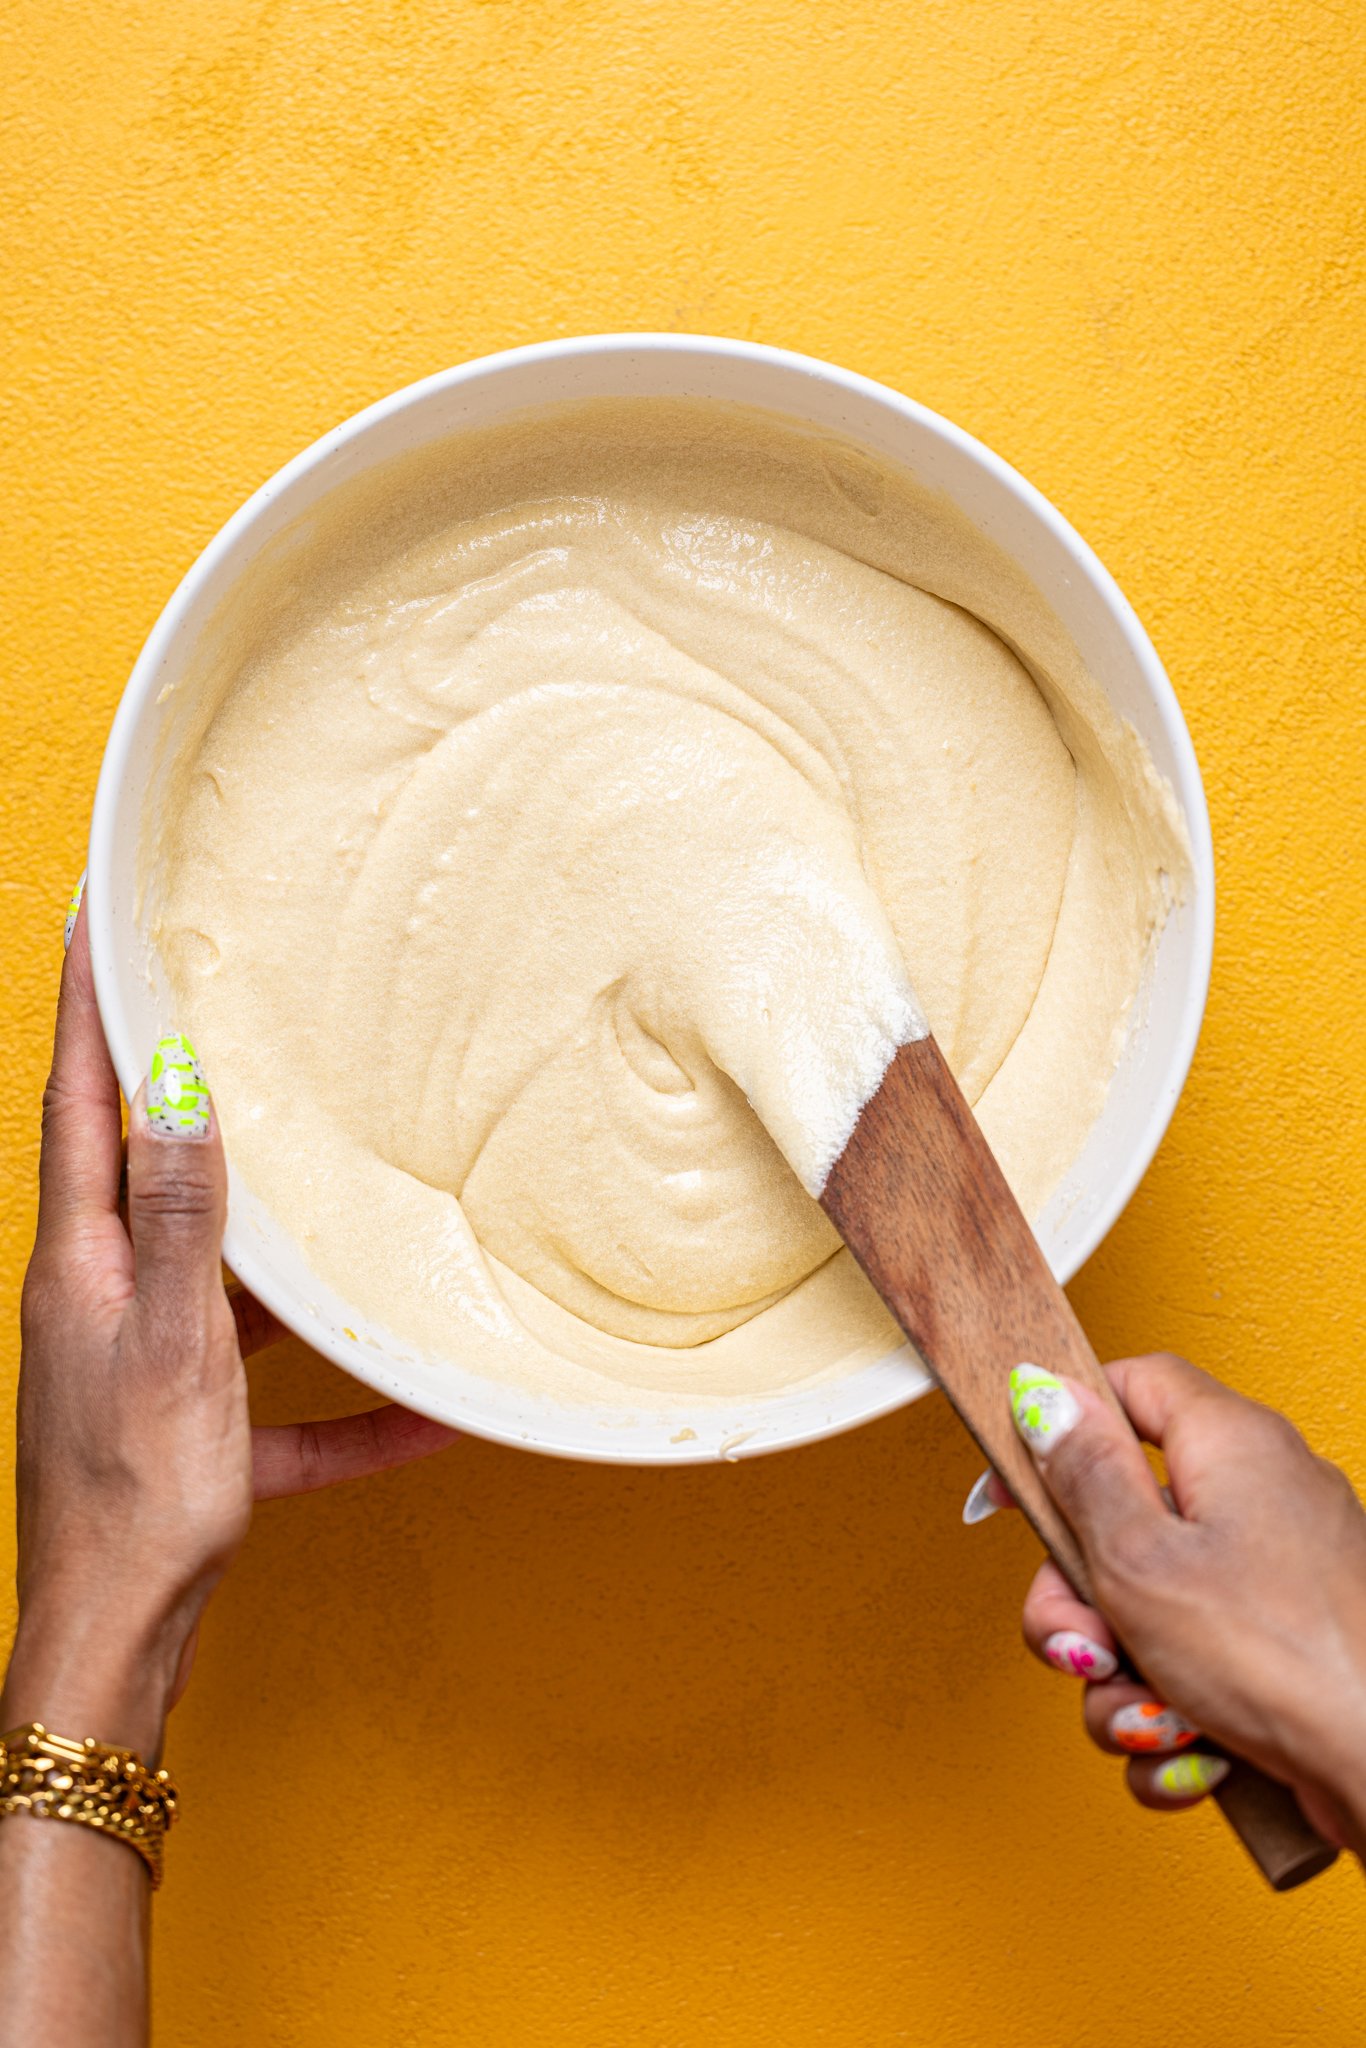
- Add the eggs (one at a time) followed by the vanilla. On low-speed, add in the dry ingredients followed by the buttermilk and continue to mix until combined and the batter is smooth, about 3-4 minutes. NOTE: The batter should be thick, yet slowly run off the whisk once lifted.
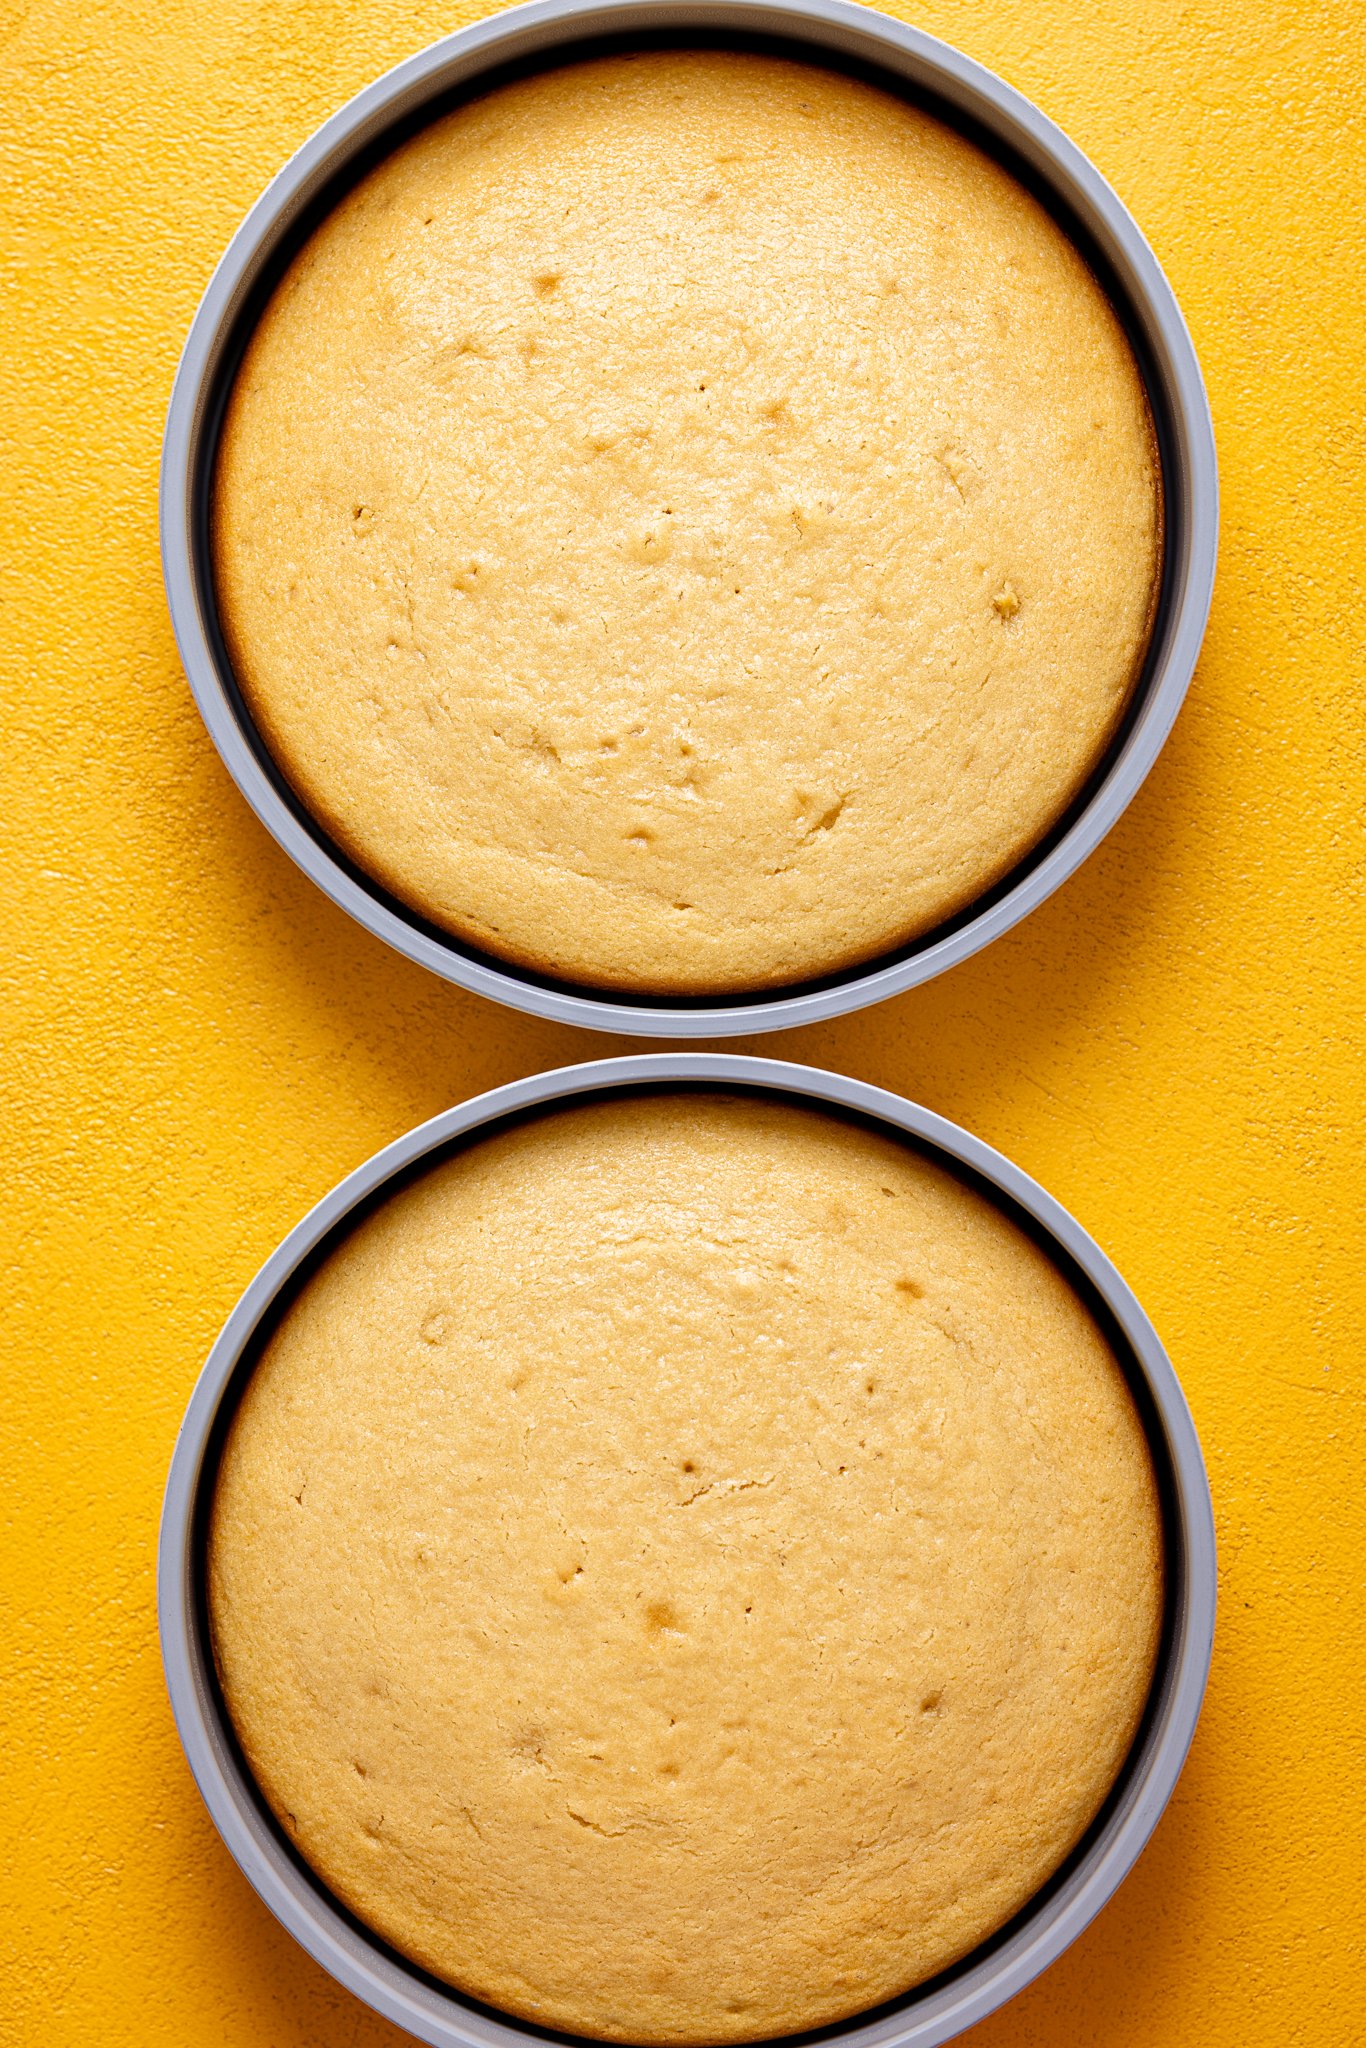
- Divide the batter evenly into each of the cake pans and bake for 30-35 minutes, or until a toothpick or butter knife comes out clean when tested in the centers.
- Remove cakes from the oven and let them rest in the pan for 10 minutes or so before removing the cakes and placing them onto a cooling rack to fully cool. NOTE: Let them cool for at least 1-2 hours in a cool place.
TO MAKE THE VANILLA BUTTERCREAM FROSTING:
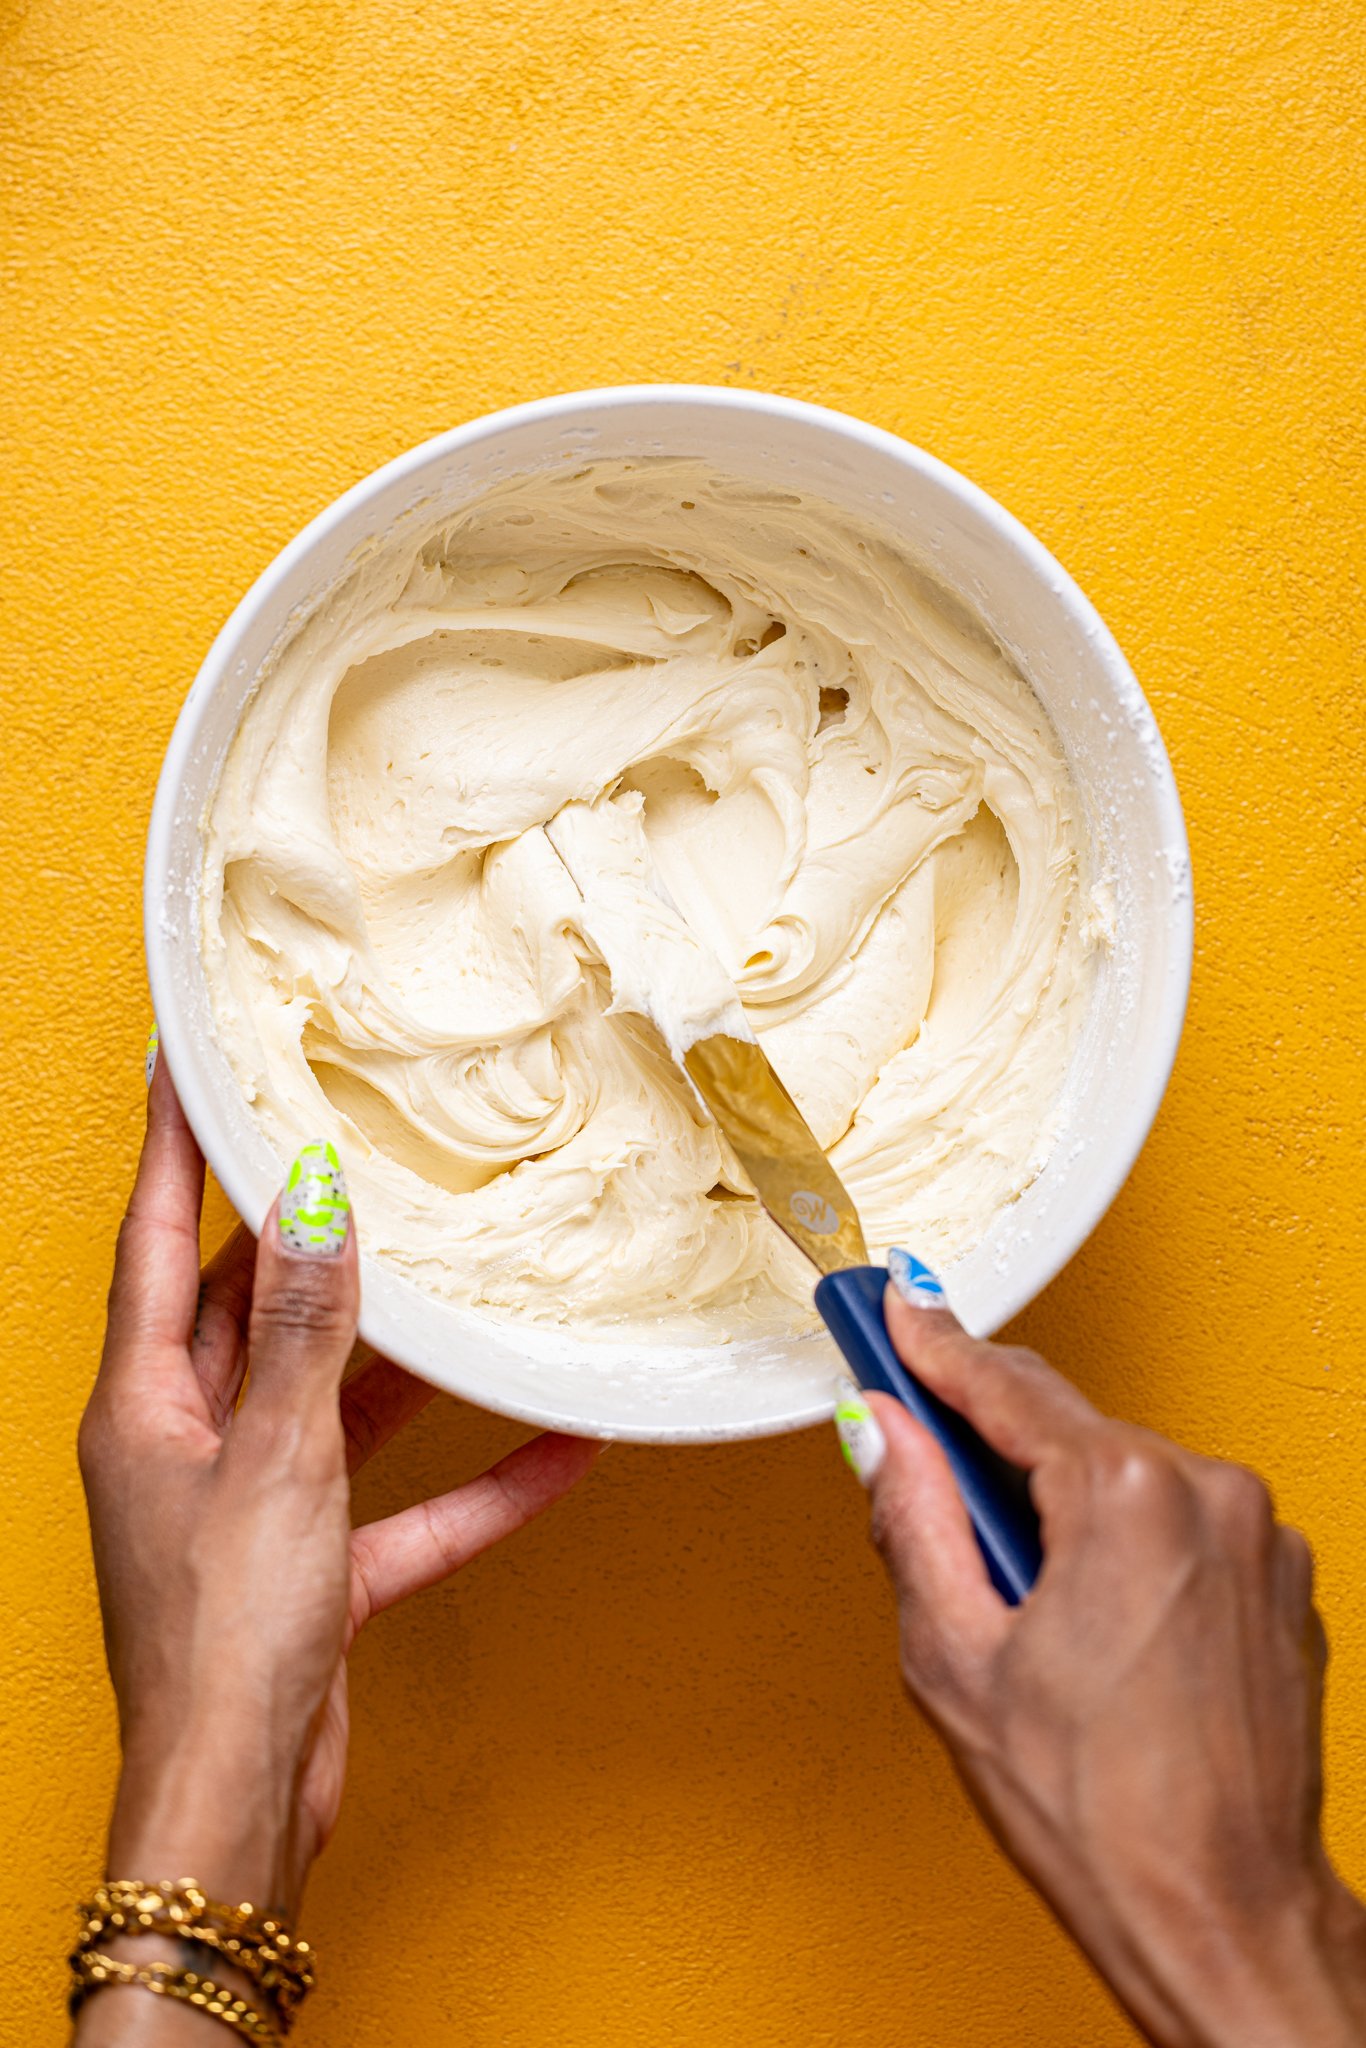
- Simply beat the butter and cream cheese (if using) in the bowl of an electric mixer (or using a hand-mixer) on medium-high speed, until smooth and pale. Add in the powdered sugar, vanilla, and milk, continuing to mix on medium-speed until you reach the desired consistency----smooth and fluffy. NOTE: Add more milk (1 tablespoon at a time if too thick) or powdered sugar (for more thickness).
ASSEMBLY:
- Place the first cake layer on your cake stand and evenly cover the top with buttercream. Now, top with 2nd layer and add more buttercream atop that layer, spreading it over the tops and sides of cake, evenly and thinly. NOTE: If making a 3-layer, be sure to repeat step 1 of assembly once again before getting to the final layer.
- Once fully frosted, add small little designs of the buttercream using a piping bag + tip around the sides and top of cake. Feel free to add rainbow sprinkles for a festive feel. Chill for 5 minutes to ensure that buttercream sets. NOTE: For a fancy moment or occasion, add florals atop cake for a Spring or Summer vibe!
- When ready to serve, remove from the refrigerator. Slice and enjoy!
- Bon Appetit!
Tips & Tricks
- STORAGE: Keep cake leftovers stored for up to 4-5 days in the fridge. Keep it in an airtight container to keep the cake from drying out. You can also freeze the cake tightly wrapped in plastic wrap for up to 3 months. Before serving, defrost the cake on the counter.
- FLOUR: You can also use cake flour in place of all-purpose flour for a fluffier texture.
- VANILLA CUPCAKES: This recipe yields about 30 cupcakes. Simply bake for 18-20 minutes instead, until centers come out clean.
- DAIRY BUTTERMILK: Add 2 cups of organic heavy cream [or regular milk] + 2 tablespoons lemon juice and let sit for 10 minutes, until it thickens. TIP: You may need additional buttermilk if using heavy cream since it thickens a lot.
- VEGAN OPTION: See FAQ section for details!
- GLUTEN-FREE OPTION: See FAQ section for details!
Nutrition
DID YOU MAKE THIS recipe?
Tag @orchidsnsweettea_ on Instagram and hashtag it #orchidsandsweettea

LOVE THIS RECIPE?
LET US KNOW!