
Southern Peach Cobbler Cinnamon Rolls
DISCLAIMER: This post may contain affiliate links, which means that I make a small commission off items you purchase at no additional cost to you. Please read my policy page!
Southern Peach Cobbler Cinnamon Rolls
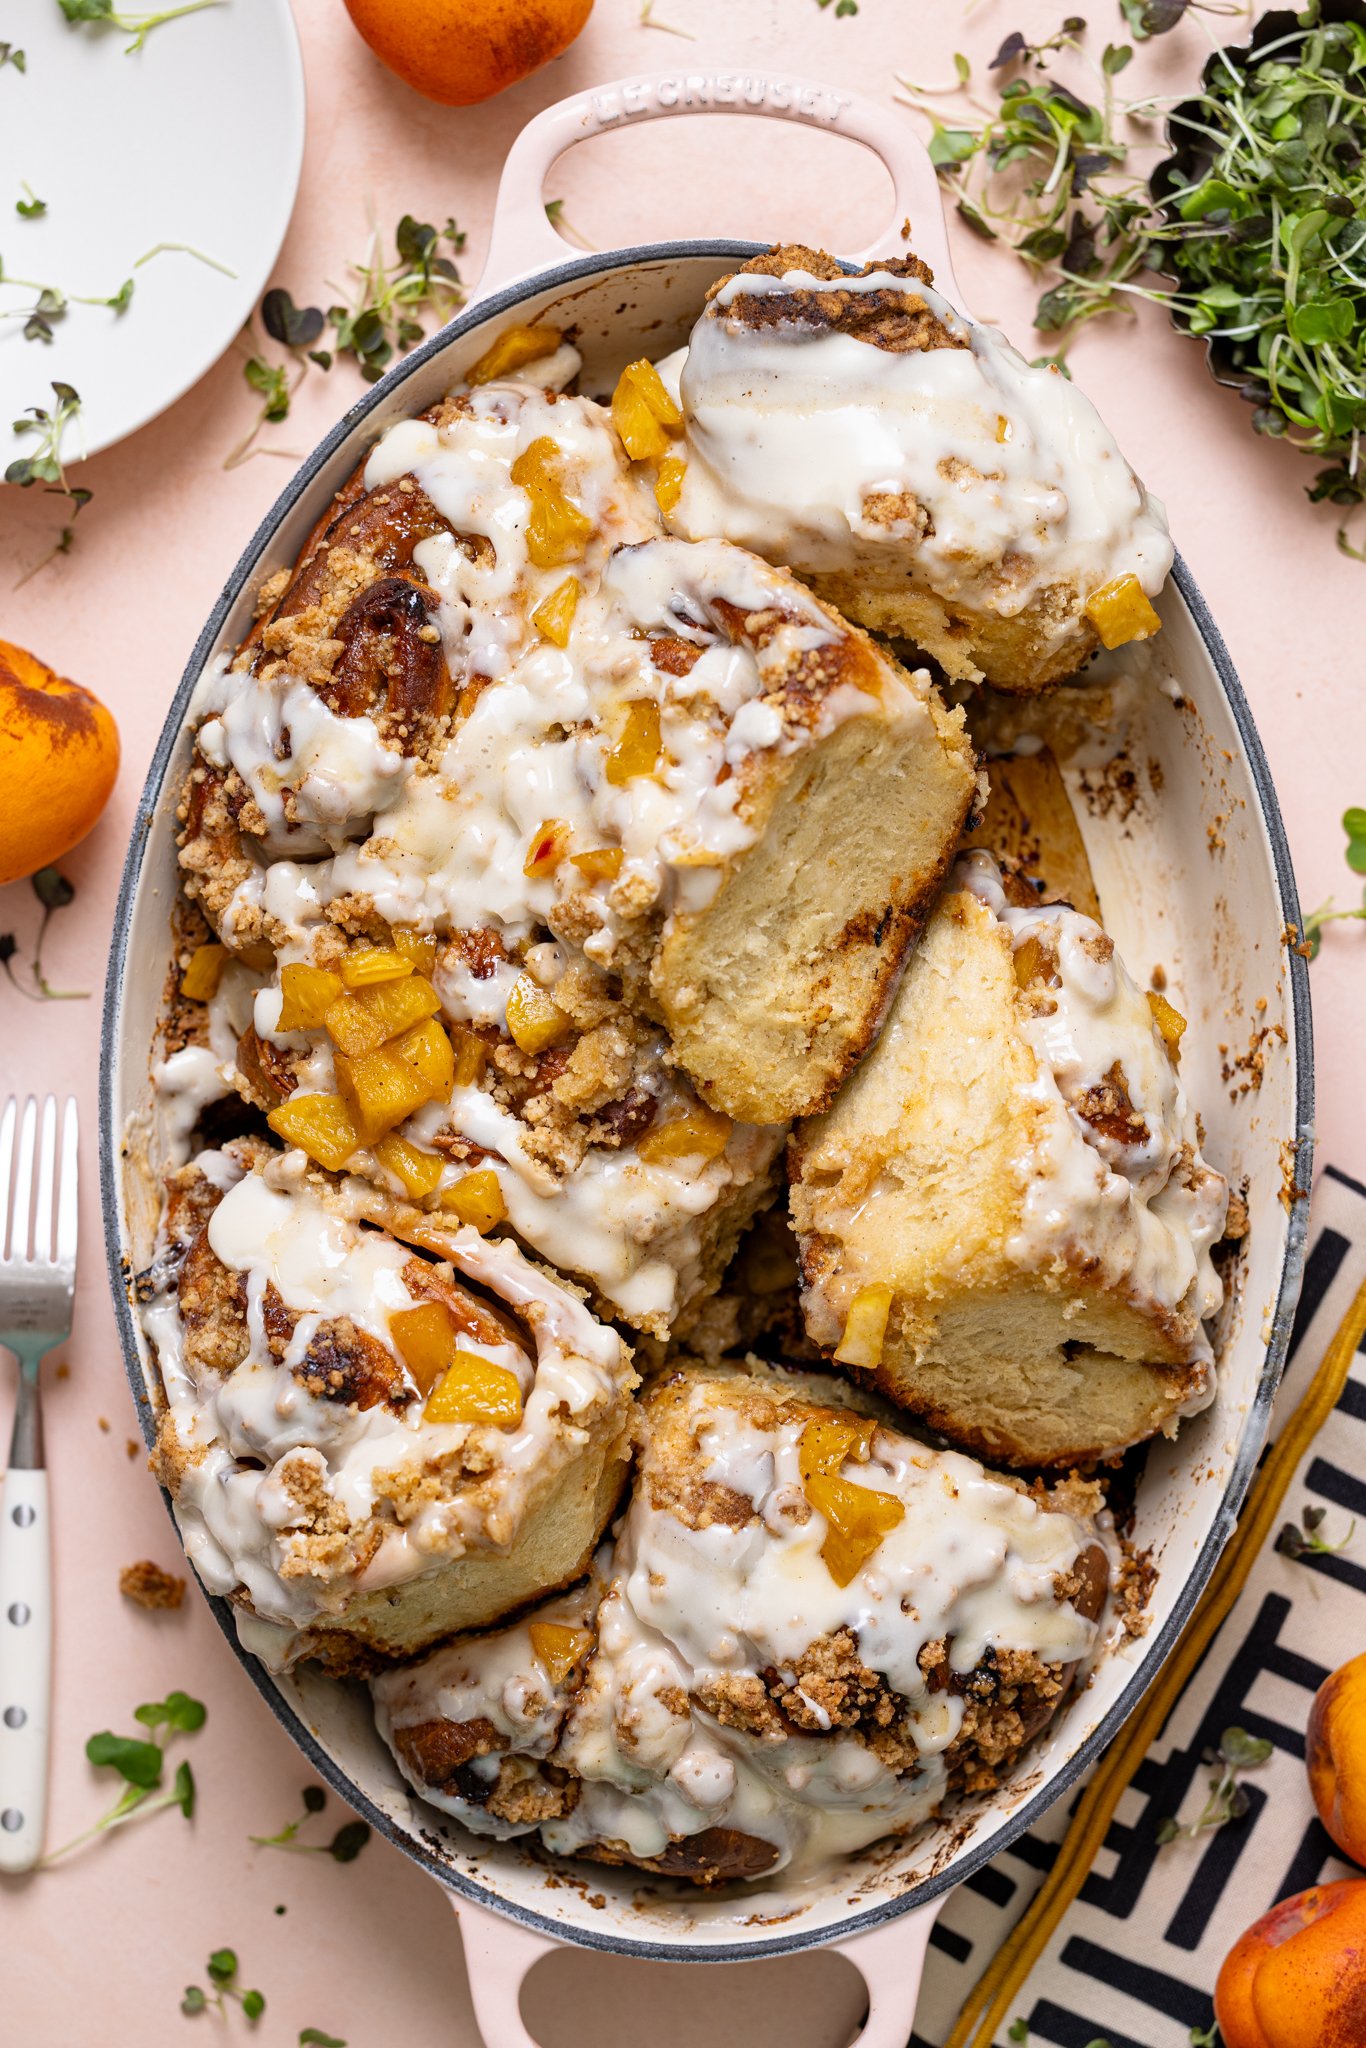
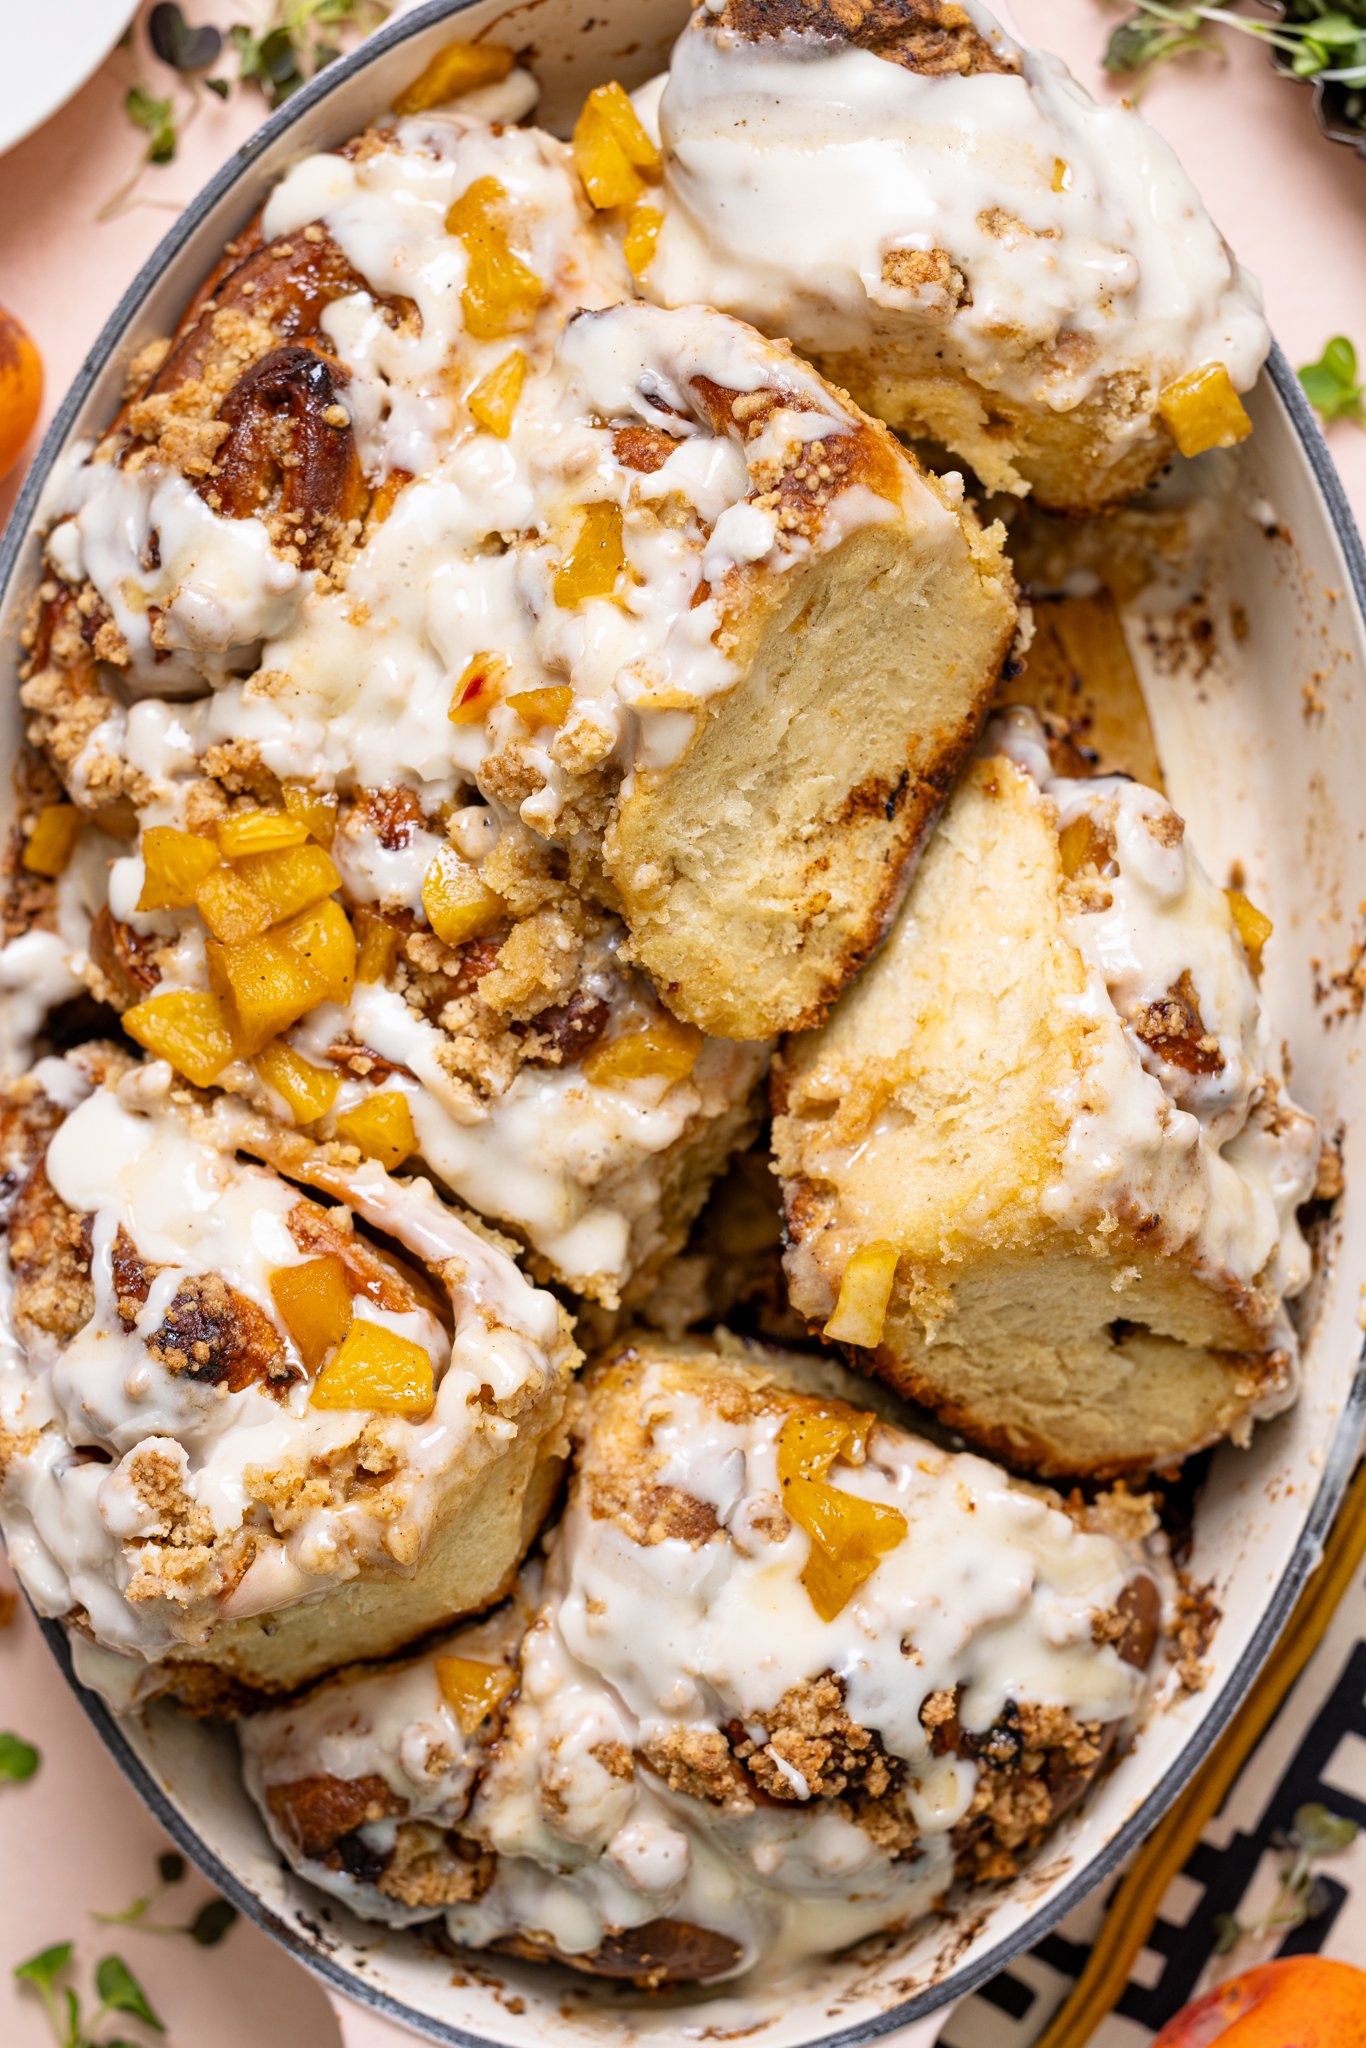
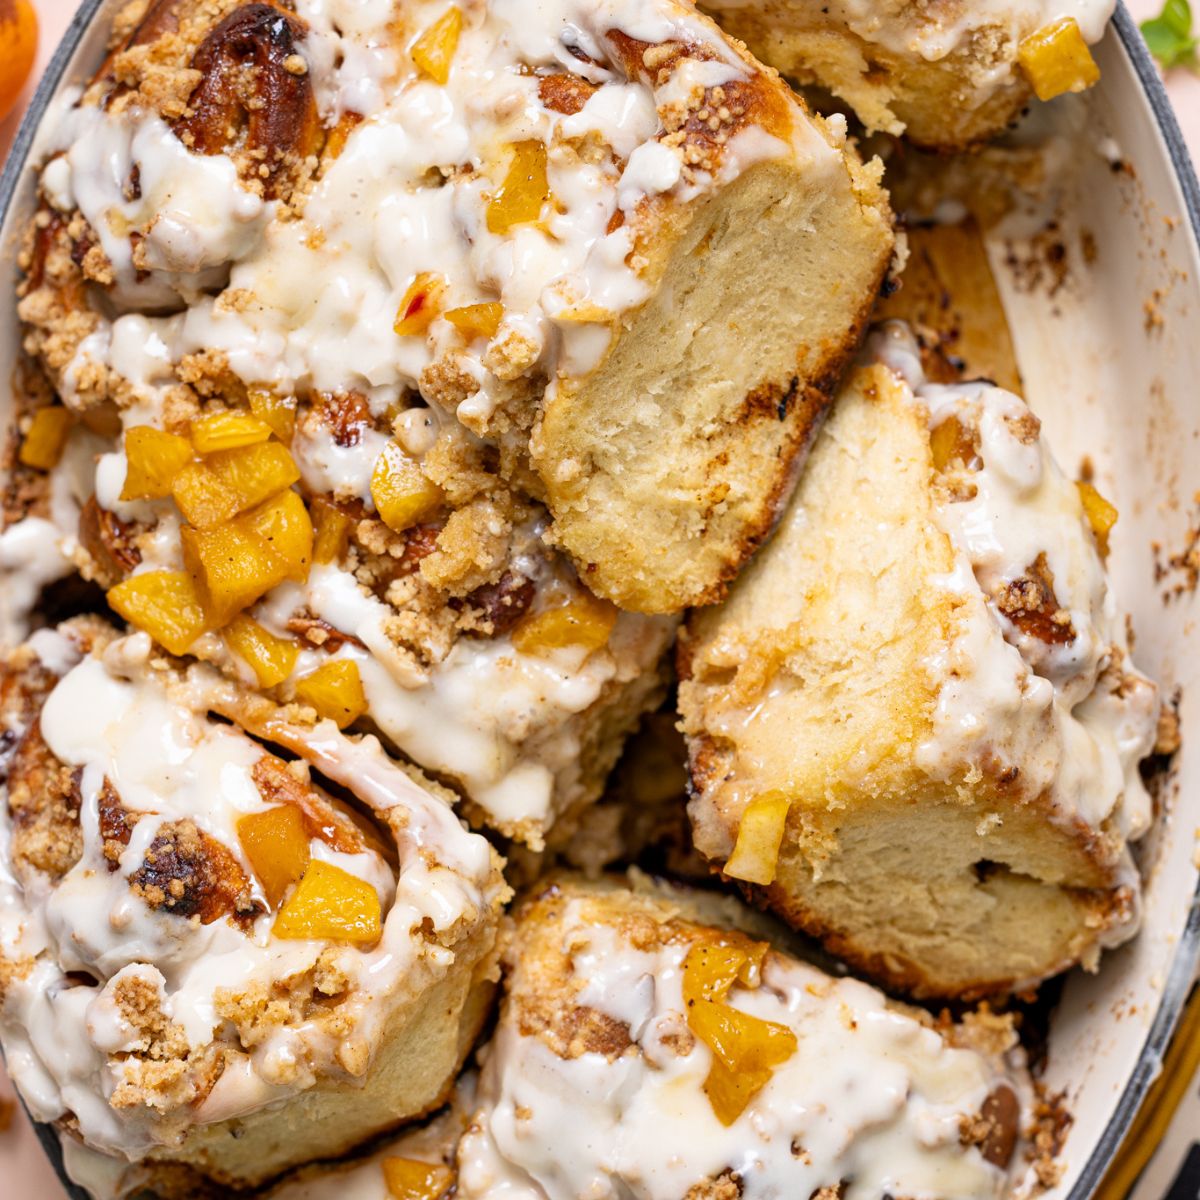
If a Southern peach cobbler and a gooey cinnamon roll had a baby—it would be this. These Southern Peach Cobbler Cinnamon Rolls are fluffy, buttery, and filled with sweet, sautéed peaches, brown sugar, and warm spices thanks to our signature Dessert Lover Blend. Topped with a peachy crumble and rich cream cheese glaze—this recipe is soul food with a sweet twist. Gluten-free, Vegan + Overnight Option.
I'm really excited to share this recipe with you. It's truly something special and is a rendition to both my favorite peach recipes: my Southern Peach Cobbler and Peach Cobbler Milkshake. Seriously, these Southern Peach Cobbler Cinnamon Rolls are a hit! And while there are a few extra steps than usual for these cinnamon rolls (i.e. the sautéed peaches and crumble topping), I promise that it's all worth it after the first bite!
They're like fluffy, brioche-style sweet rolls filled with all that peach and spice deliciousness. Seriously, with homemade dough, you can roll up just about anything and it turns out mouthwateringly good—that's why I've got so many cinnamon roll recipes on my site!
These peach cobbler cinnamon rolls are next-level GOOD! With their sweet peach filling and a cream cheese glaze that's perfectly sweet, they're an absolute delight. Plus there is a gluten-free, vegan + overnight option! The end result? Incredibly light, airy, and fluffy rolls, topped with a sticky-sweet glaze and a nice crunch from the crumble that guarantees sweetness + texture in every bite. Trust me, it's a winning combo you won't want to miss!
Jump to:
- Why You’ll Love these Peach Cobbler Cinnamon Rolls
- Sweet Rolls or Cinnamon Buns?
- How to Make Southern Peach Cobbler Cinnamon Rolls
- Ingredients For Southern Peach Cobbler Cinnamon Rolls
- Tips for Mastering Yeast (Especially Rapid Rise or Active Dry)
- What Is the Dessert Lover Blend?
- The Best Peaches for Peach Cobbler Cinnamon Rolls
- Perfect Occasions For Southern Peach Cobbler Cinnamon Rolls
- How to Easily Peel Fresh Peaches
- What Is The Best Way To Cut Cinnamon Rolls?
- Tips For Making The Perfect Cinnamon Rolls
- Can I Knead By Hand Instead of Using a Mixer?
- Substitutes:
- Storage + Make-Ahead Tips
- How to Know When Cinnamon Rolls Are Done
- Serving Suggestions with Southern Peach Cobbler Cinnamon Rolls
- Common Southern Peach Cobbler Cinnamon Rolls Q + A's
- More Southern-Inspired Sweets You'll Love!
- MADE OUR RECIPE(S)?
- Southern Peach Cobbler Cinnamon Rolls
Why You’ll Love these Peach Cobbler Cinnamon Rolls
- Filled with spiced peach preserves + real peaches
- Made with Artisan Bread flour for rich, chewy texture
- Features our custom Dessert Lover Blend (or DIY option)
- Perfect for summer brunch, birthdays, or cozy mornings
- Dairy-free and make-ahead friendly!
Sweet Rolls or Cinnamon Buns?
No matter what you call them—cinnamon buns, cinnamon rolls, sweet rolls, sticky buns, sticky rolls, cinnamon swirl, cinnamon danish—everyone has a favorite. I've never met someone who didn't like them. A cinnamon bun or sweet roll is a sweeter, fluffier bread dough with a filling, usually cinnamon-based, in the middle. They are usually served around the holidays. When the filling is cooked, it makes an iconic swirl of deliciousness.

How to Make Southern Peach Cobbler Cinnamon Rolls
Make the Dough
- In a bowl, combine warm water, 1 tablespoon sugar, and yeast. Let sit 5–10 minutes until frothy.
- In a stand mixer, combine yeast mixture with eggs, almond milk, remaining sugar, Dessert Lover Blend, vanilla, and melted butter.
- Add flour gradually. Knead for 5–8 minutes until soft and elastic.
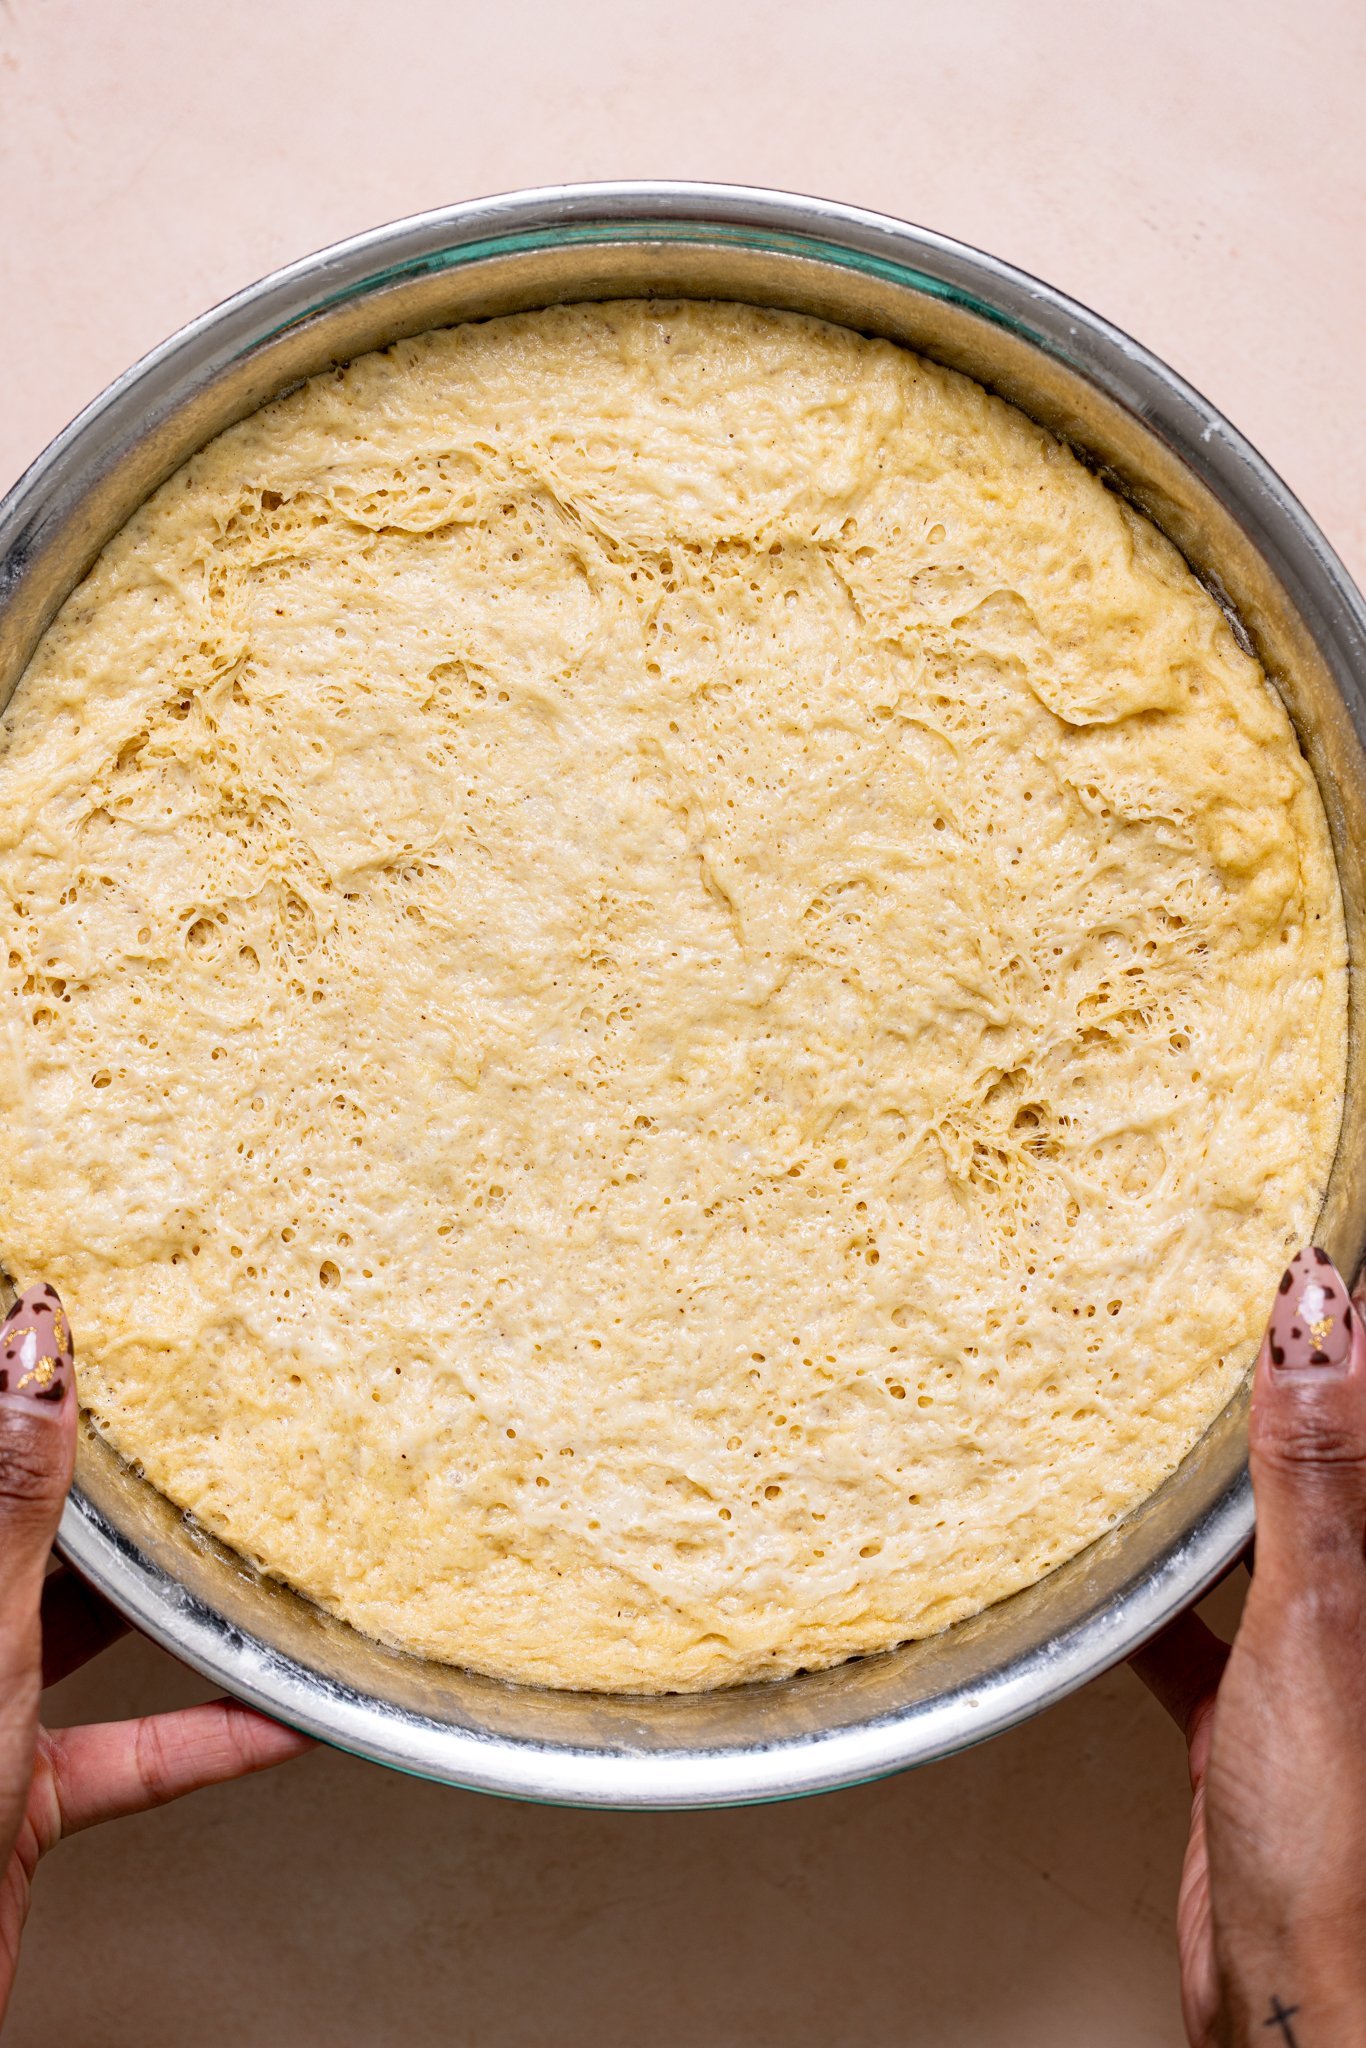
- Cover and let rise in a warm place for 1 hour.
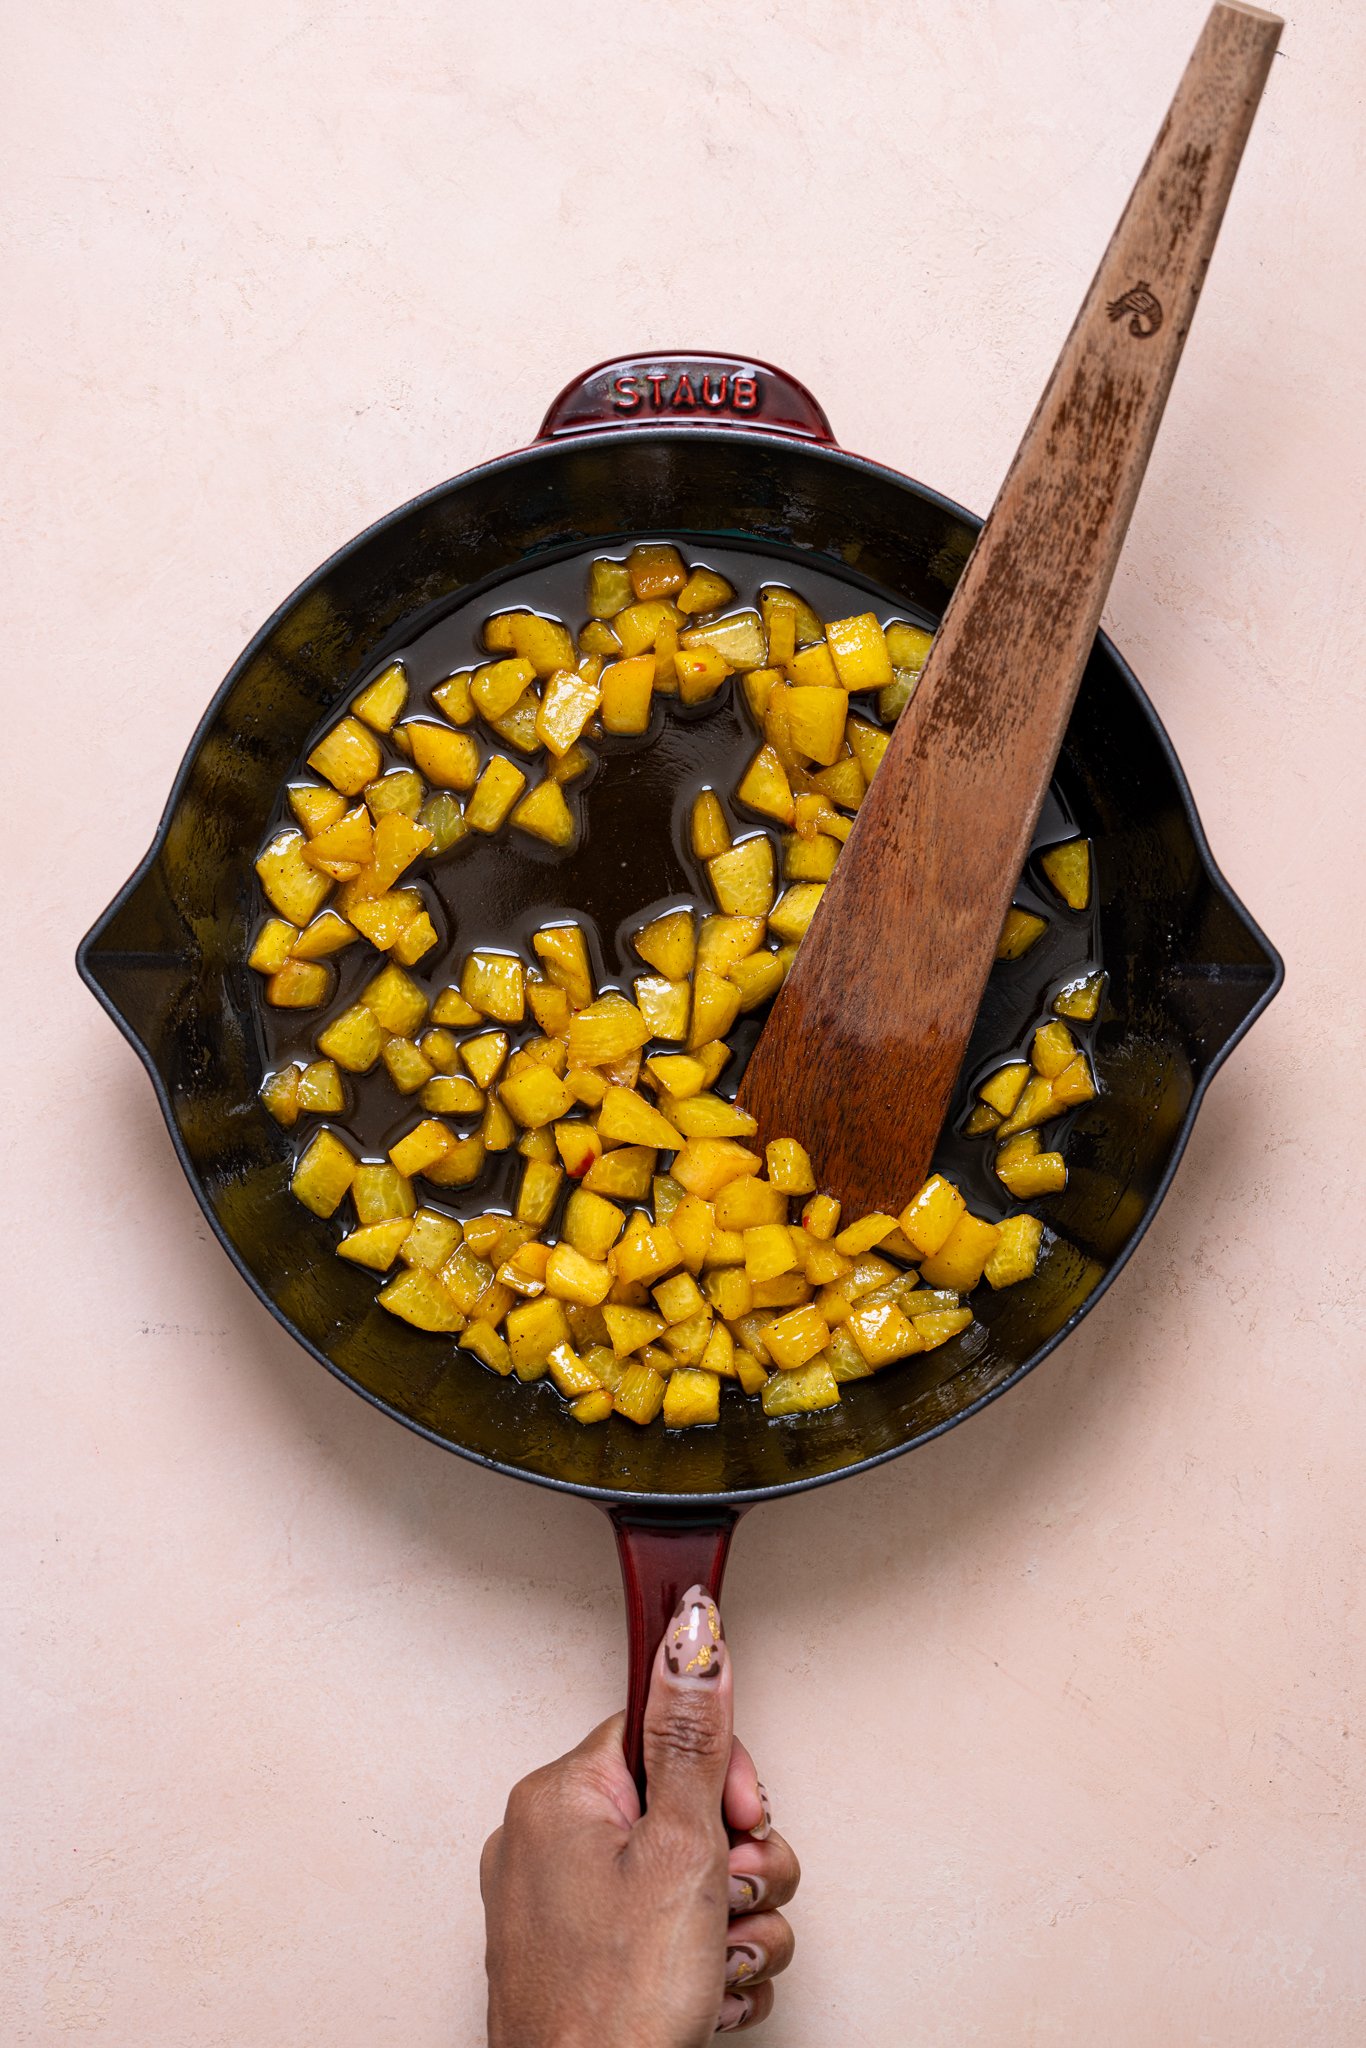
Prepare the Sautéed Peaches
- In a skillet, melt butter over medium heat. Add diced peaches, brown sugar, vanilla, and Dessert Lover Blend.
- Sauté until soft, bubbly, and syrupy (about 6–8 minutes). Let cool.
Assemble the Filling
- In a bowl, mix softened butter, brown sugar, peach preserves, and Dessert Lover Blend until creamy.
- Stir in the cooled sautéed peaches.
Roll + Fill
- Roll dough into a large rectangle (about ¼ inch thick).
- Spread peach filling evenly.
- Roll tightly into a log and slice into 12 rolls.
- Place in greased baking dish and cover to rise for 15-20 minutes.
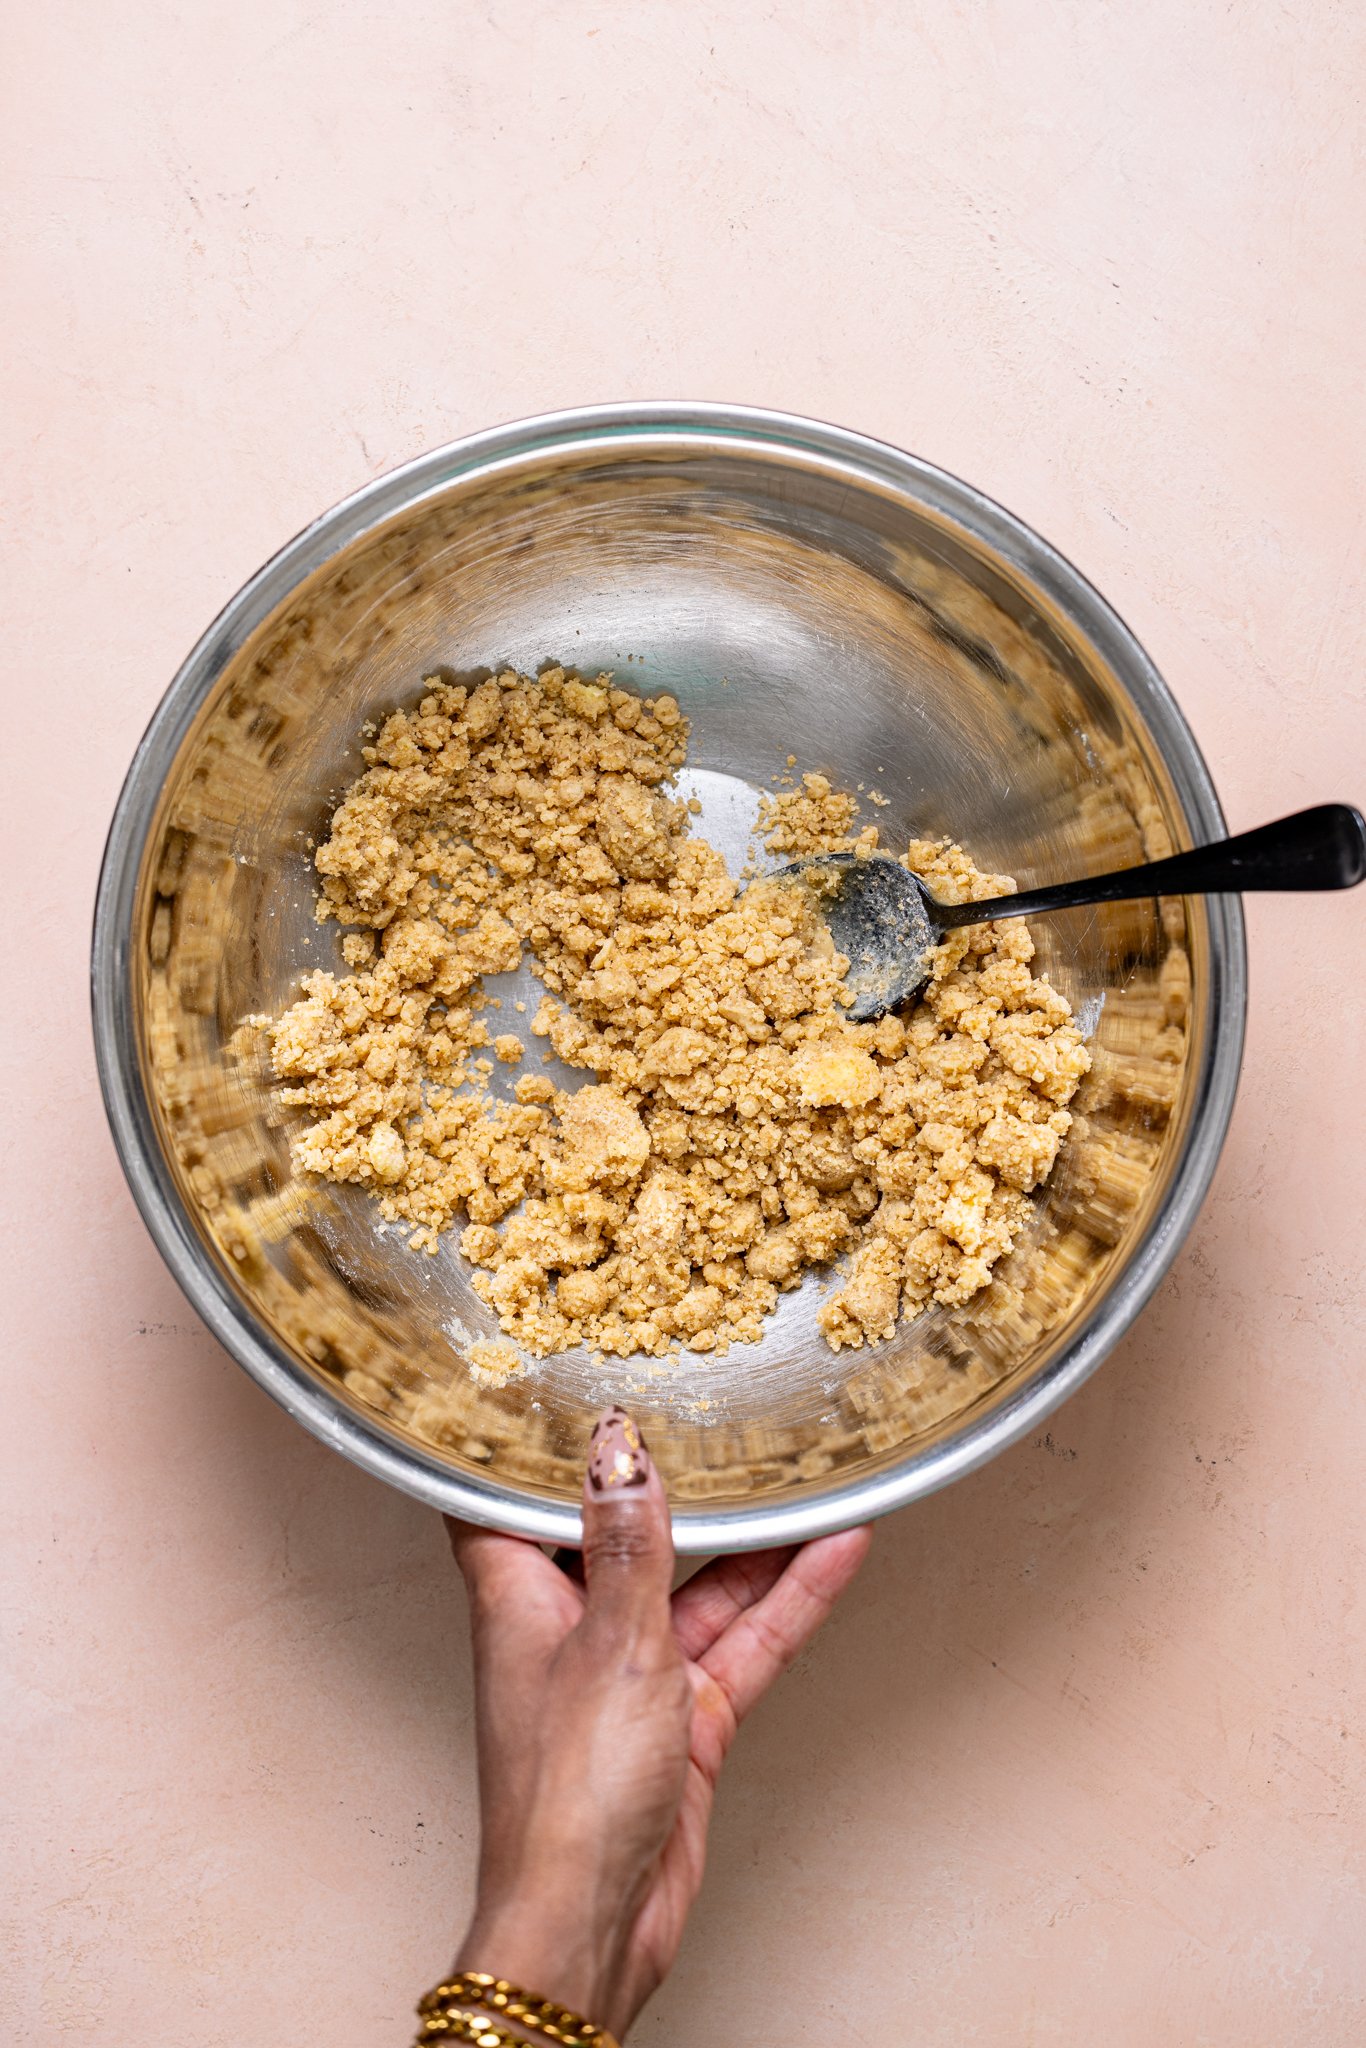
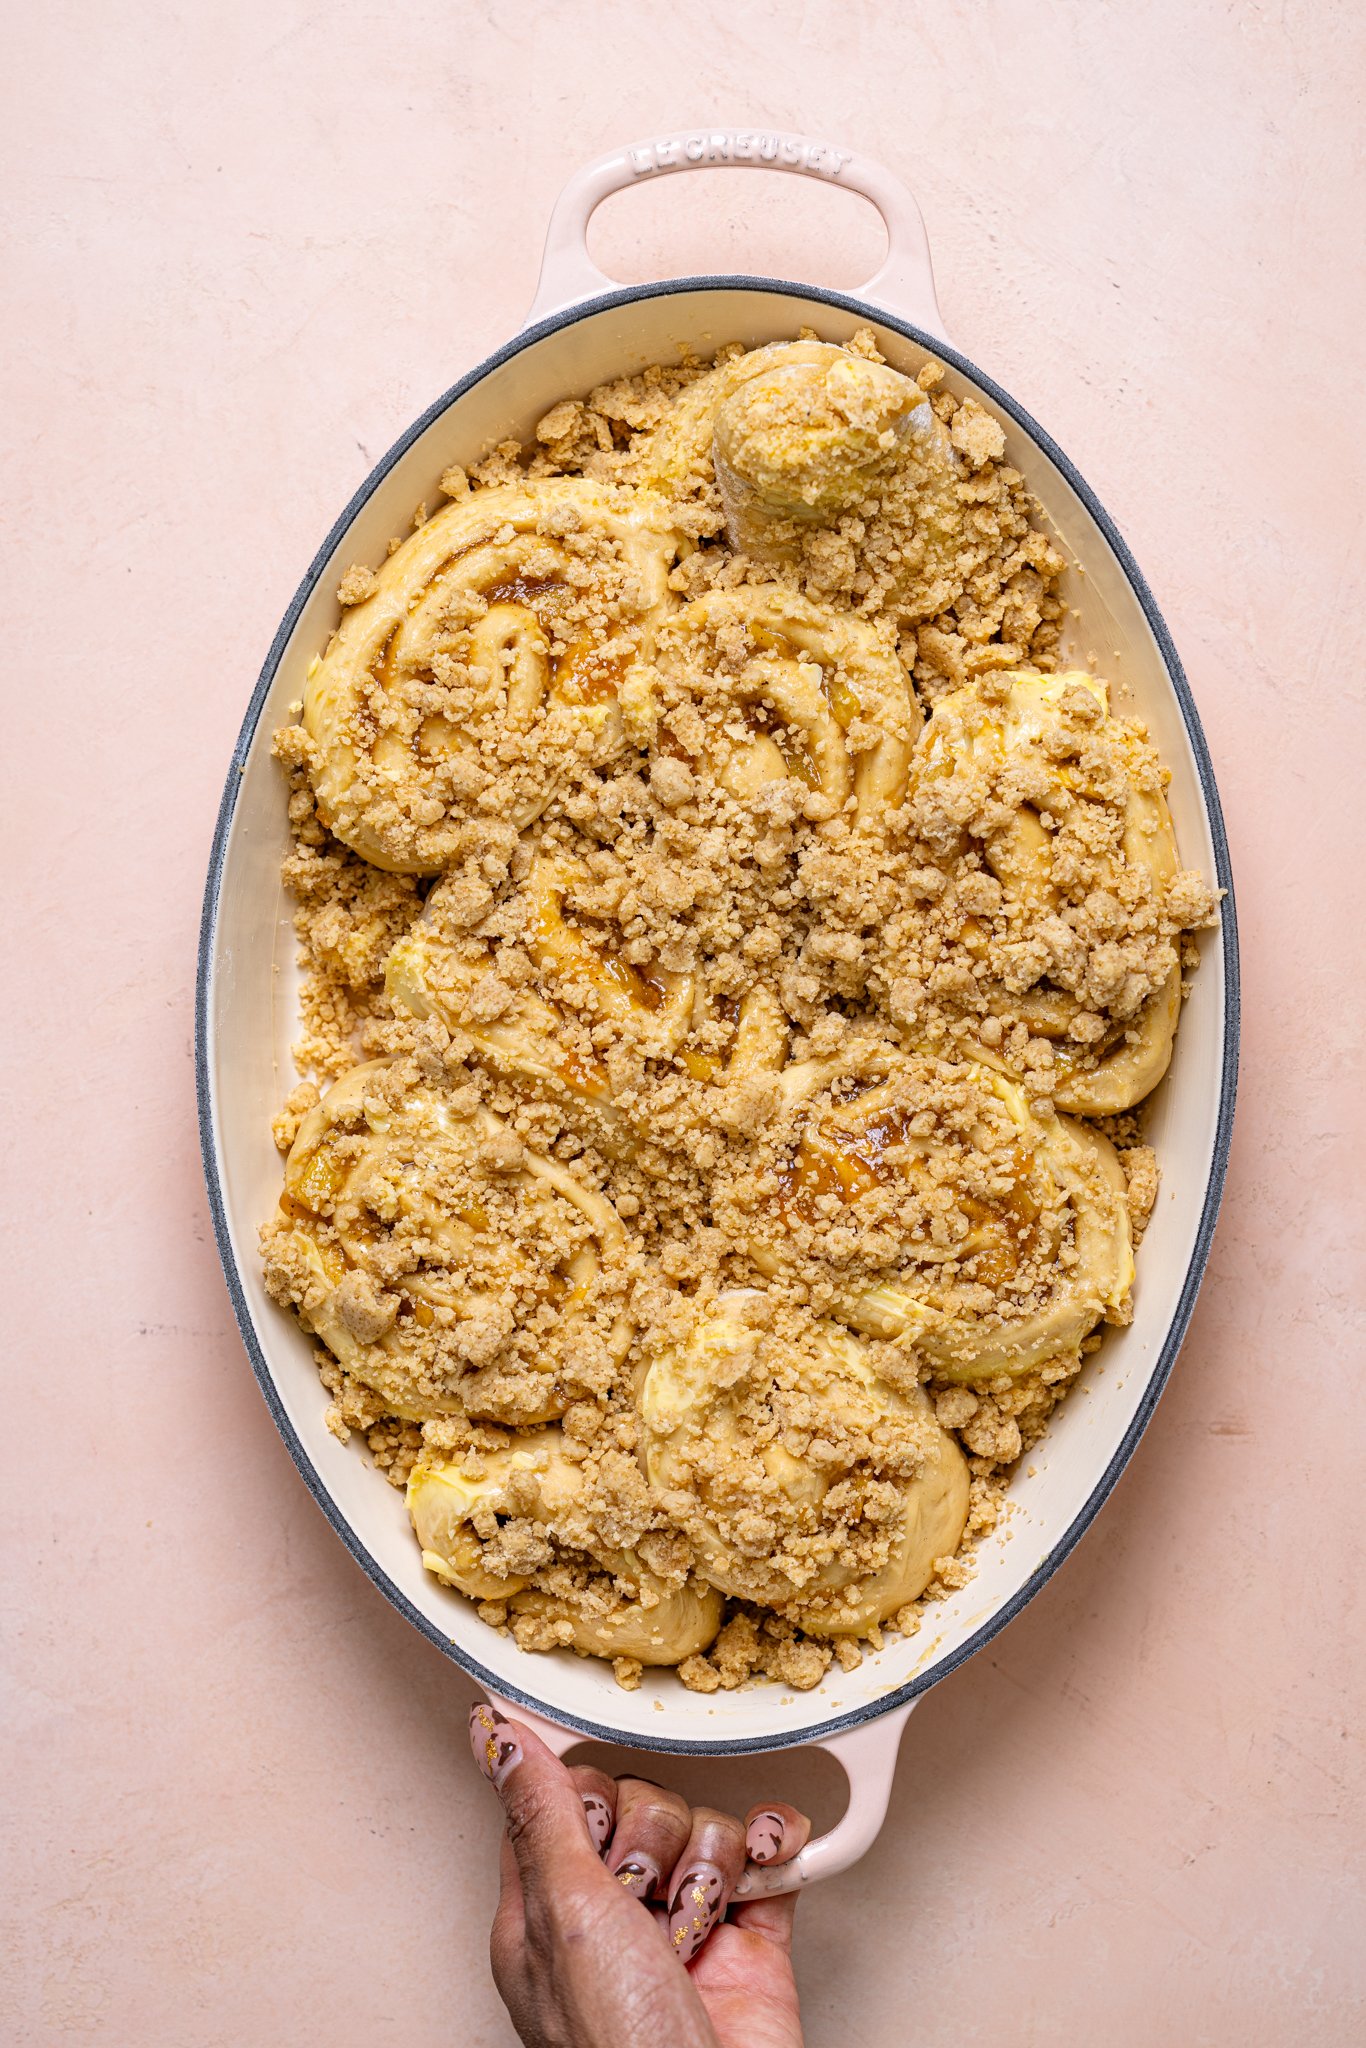
Add Crumble Topping
- Mix flour, sugar, Dessert Lover Blend, and butter until crumbly.
- Sprinkle generously over risen rolls.
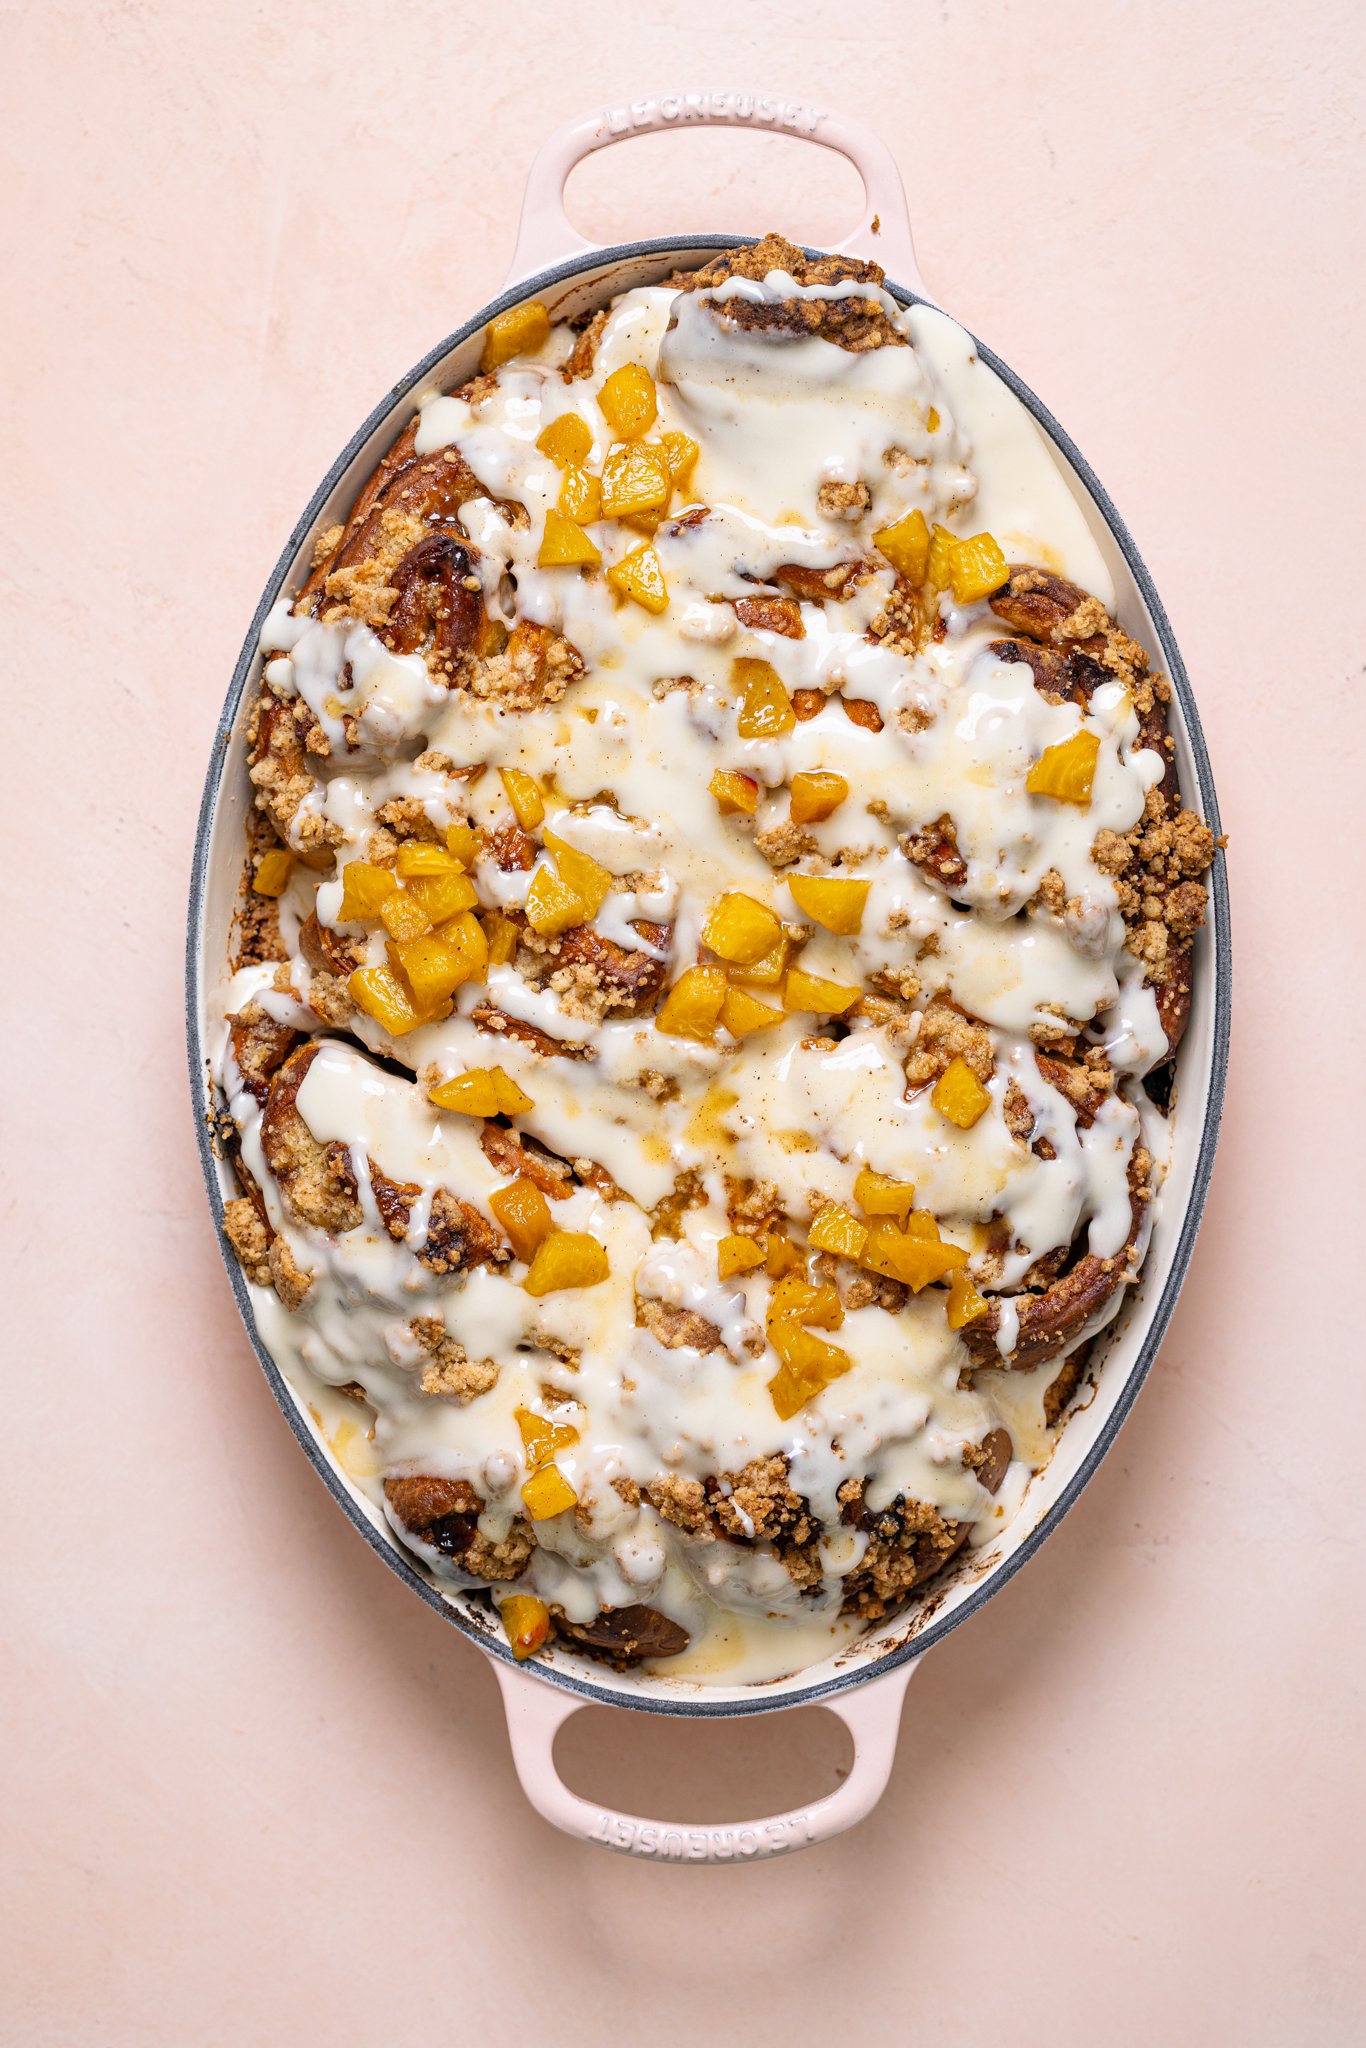
Bake + Glaze
- Bake at 350°F for 35-40 minutes, until golden and bubbling.
- Let cool slightly, then drizzle with cream cheese glaze.
Ingredients For Southern Peach Cobbler Cinnamon Rolls
Here's what you need for the fluffy brioche-style dough that reminds you of Grandma's peach cobbler in cinnamon roll form:
DOUGH:
- All-purpose flour. I use organic flour from Bob's Red Mill.
- Artisan Bread flour. You can find this from King Arthur or Bob's Red Mill.
- Brown sugar. You could also use organic cane sugar or coconut sugar.
- Instant yeast. Also called Rapid Rise Yeast.
- Spices. What's a cinnamon roll without some spices right? You can purchase my Dessert Lover Blend for authentic flavor or you can create a homemade spice mix.
- Eggs. At room temp.
- Almond milk. At room temp. You can totally use regular whole milk or another plant-based milk. Choose unsweetened. Feel free to use a different plant-based milk if you like. I recommend making easy homemade almond milk (my recipe doesn’t require soaking!)
- WARM water. This is important to help activate the yeast at the beginning.
- Butter. Use warm, melted salted butter. You can also use unsalted butter and add ¼ teaspoon of salt to dry ingredients.
- Vanilla extract. Use pure vanilla extract for the best vanilla flavor.
FILLING + PEACHES:
- Diced peaches. You can use fresh or canned peaches, which means this is a year-round recipe! For the canned peaches, you'll need to drain them thoroughly and pat dry to remove all excess moisture + juices.
- Organic brown sugar. This adds an extra layer of sweetness to the filling.
- Peach preserves/jam. I love Bonne Maman Preserve or St. Dalfour, however, homemade jam works great too!
- Salted butter. Softened at room temp. You can also use unsalted butter and add ¼ teaspoon of salt to recipe.
- Organic brown sugar. This adds an extra layer of sweetness to the filling.
- Spices. What's a cinnamon roll without some cinnamon? You can purchase my Dessert Lover Blend for authentic flavor.
SAUTEED PEACHES:
- Peaches. You can use either canned organic peaches, drained or you can use about 4-6 peaches, dicing them into medium-sized chunks.
- Butter. Use unsalted for the best flavor control.
- Brown sugar. This will help the peaches caramelize.
- Vanilla extract. Use pure vanilla extract for the best vanilla flavor.
- Spices. You can purchase my Dessert Lover Blend for authentic flavor.
CRUMBLE TOPPING:
- Flour. I use all-purpose flour for the creation of the topping. For the gluten-free option, use a high-quality GF flour from Bob's Red Mill or King Arthur.
- Brown sugar. Ensure that it's organic for healthiest option. You can use either light or dark. You can substitute with brown coconut sugar for a healthier option.
- Salted butter. Partially melted.
GLAZE + TOPPING:
- Cream cheese. Softened at room temp.
- Powdered sugar. Sifted.
- Milk. To add a bit of moisture to create a velvety glaze.
Tips for Mastering Yeast (Especially Rapid Rise or Active Dry)
Choose the Right Yeast
- Rapid Rise Yeast (a.k.a. Instant Yeast): Can be added directly to dry ingredients. Rises faster and doesn’t require proofing, but warm liquid still helps activate it better.
- Active Dry Yeast: Must be dissolved (“proofed”) in warm water first to activate before using in your dough.
TIP: Since you’re using Rapid Rise yeast, you can skip the proofing step—but pre-warming your milk and water will still help jumpstart the rise.
Use the Right Water Temperature
- Ideal range: 105°F to 115°F (warm to the touch, but not hot)
- Water that’s too hot (>130°F) will kill the yeast.
- Water that’s too cool (<100°F) won’t activate the yeast fully, making your dough rise slower or not at all.
TIP: Test by dipping a clean finger—it should feel like a warm bath, not scalding.
Feed Your Yeast
Yeast loves sugar. A small amount of sugar in your dough (like brown sugar in your recipe) helps “feed” the yeast and boost rise.
TIP: Even 1–2 teaspoon of sugar can speed up activation during proofing if you’re using active dry yeast.
Watch the Dough, Not the Clock
Instead of strictly timing your rise, look for visual cues:
- Dough should double in size
- When gently poked, it should leave a slight indent and spring back slowly
TIP: Rise time can vary based on humidity, temperature, and altitude.
Create the Perfect Proofing Environment
Yeast loves warmth and moisture. If your kitchen is chilly, try:
- Turning your oven on for 2 minutes, then turning it off—place dough inside the warm (not hot!) oven
- Placing a damp towel over the bowl
- Using a proofing drawer or a turned-off microwave with a mug of hot water inside
Don’t Overdo the Flour
Too much flour = dense rolls. Add just enough for a soft, slightly sticky dough. Artisan Bread flour helps build structure, but too much will weigh it down.
TIP: Your dough should be tacky, but not stick to clean hands.
Punch Down Gently
Once the dough has risen, release air bubbles with a light “punch” or gentle fold—not aggressive kneading. This helps maintain softness and prevents uneven baking.
Second Rise = Better Texture
Don’t skip the second rise after shaping your rolls. It gives your dough time to relax, puff, and develop those signature soft, pillowy layers.
Bake When Risen, Not Overproofed
If rolls rise too long during the second proof, they can collapse while baking. Bake when they’ve just doubled and look puffy—not spilling over or sagging.
Fresh Yeast = Fluffy Rolls
Always check your yeast’s expiration date and store it in a cool, dry place (or the fridge after opening). Old yeast = flat dough.
Bonus Tip: Test Your Yeast!
To make sure your yeast is still active:
- Mix 1 packet yeast + 1 teaspoon sugar + ¼ cup warm water
- Wait 5–10 minutes
- It should foam and bubble—if not, toss it.
What Is the Dessert Lover Blend?
It’s our exclusive blend of cinnamon, nutmeg, allspice, and a kiss of vanilla bean—designed to amplify any dessert with warmth and depth.
DIY Version: Mix 1 tablespoon cinnamon, ½ teaspoon nutmeg, and ⅛ teaspoon allspice.
The Best Peaches for Peach Cobbler Cinnamon Rolls
When it comes to getting that authentic, sweet Southern flavor in your cinnamon rolls, not all peaches are created equal. The texture, sweetness, and juiciness of the peach can make a big difference in your filling’s flavor and how well it caramelizes inside your rolls.
Best Peaches to Use:
Freestone Peaches (Fresh) – Best for Summer
Freestone peaches have pits that easily separate from the flesh, making them super easy to slice and dice. They’re firm yet juicy—perfect for sautéing without turning mushy.
NOTE: Look for yellow-fleshed varieties for the best peachy flavor.
Clingstone Peaches (Fresh or Local)
Clingstones are incredibly sweet and juicy, but their pits are harder to remove. If you're buying at a farmers' market or orchard, these are common early-season peaches.
Frozen Peaches – Best Off-Season Option
Frozen peaches are picked and flash-frozen at peak ripeness, making them a great year-round option.
NOTE: Thaw completely and drain any excess liquid before sautéing to prevent a watery filling.
Canned Peaches – Quick & Easy
If you’re in a pinch, canned peaches in juice (not syrup) work well too. Be sure to drain them and lightly pat dry before using.
NOTE: Avoid heavy syrup versions—they’re overly sweet and can throw off your filling’s balance.
Tips for Working with Peaches
- Peel or No Peel?
Peeling is optional for fresh peaches. The skins will soften during sautéing, but peeling gives a smoother texture if you prefer. - Don’t Skip the Sauté
Lightly cooking your peaches with brown sugar and butter before layering them into the rolls helps concentrate their flavor and create that classic cobbler vibe. - Pairing with Peach Preserves
Use a few spoonfuls of organic peach preserves or jam along with the fresh or frozen peaches. It boosts the peach flavor and adds a caramelized, sticky goodness.
SHOP MY FAVORITE BAKEWARE ITEMS AND ACCESSORIES!
Here, I’ve curated a list of bakeware essentials that I use to achieve my favorite baking treats, especially with these Southern Peach Cobbler Cinnamon Rolls. Everything from my fave baking sheets, parchment paper, mixing bowls, and more. SEE THEM HERE!
Perfect Occasions For Southern Peach Cobbler Cinnamon Rolls
These events are a great excuse to eat cinnamon rolls!
- Birthdays
- Anniversaries
- Barbecues
- Potlucks
- Kids Sleepovers
- Holiday Gatherings
- Graduations
- Baby Showers
- Dinner Parties
- Actually, any time is a good time for cinnamon rolls, right (much like cake)? Bake away for a little weekday pep-up!
How to Easily Peel Fresh Peaches
If you decide while making this peach cobbler cinnamon rolls recipe that you'd prefer to peel the skins off your peaches----no worries! A great hack to do so is to gently lower a few peaches at a time (best to use a skimmer) into a pot of boiling water and leave them in fro 20-30 seconds before removing them and into an ice bath to stop the "cooking process". Then you should be able to peel them with no problem without the need for a knife or any tool.
What Is The Best Way To Cut Cinnamon Rolls?
Ready to ditch the traditional knife and embrace a quirky method for cutting sweet rolls? It's time to bring out the dental floss. Yes, you read that right! Unflavored dental floss is the secret weapon for perfectly sliced cinnamon rolls.
Why? Because it slices from the inside out, avoiding any squishing mishaps that can happen with a regular knife. Simply run it along the bottom of the rolls, and cross the two ends over each other. Give it a pull, and voila! Your perfectly sliced cinnamon rolls are ready to bake. But if you're using a knife, remember to channel your inner lumberjack and saw gently back and forth without squishing the rolls.
Tips For Making The Perfect Cinnamon Rolls
Due to many delicious attempts at perfecting this recipe, I have come across some very helpful tips that will ensure a perfectly baked peach cobbler cinnamon roll.
NEVER OVERHEAT THE MILK!
It is so important that your milk is warm but NOT hot! It should be warm to the touch. If you find that your milk has overheated, allow it to cool before adding the yeast. Milk that is too hot will kill the yeast, and you won't get the big, fluffy rise in the dough. We want these rolls super fluffy, and that's only possible when the yeast is bloomed properly.
USE VERY SOFT BUTTER AT ROOM TEMPERATURE
Like in most baking, room-temperature ingredients mix better than cold ingredients. Beat in your butter while it is completely at room temperature for a seamless, tender texture.
DO NOT WORRY ABOUT OVER-MIXING
I know it sounds weird, but hear me out. With cakes and cookies, you never want to overwork the dough because working develops the gluten in the flour. Gluten development leads to a chewy, unpleasant texture in cakes and cookies, making them dense and heavy. Because cinnamon rolls use a yeast dough, it is required to develop the gluten in the dough. The yeast brings elasticity that lightens and fluffs the dough, much like bread dough. When making these rolls, keep on mixing even after you think you've mixed enough!
RISE THE DOUGH OVERNIGHT
While I developed this recipe as a quick-bake cinnamon roll, more flavor develops in the dough if you allow it to rise overnight. The dough has more time to rise, leading to a more developed, yeast-bread flavor. This yeast flavor is a perfect pairing with the sweet filling and frosting.
USE A BREAD FLOUR MIX
After much trial and tribulation, I have found that a mix of bread flour and all-purpose flour is the perfect combination for cinnamon rolls. The bread flour gives a tender, thick, brioche-like texture that I think is perfect for this dish.
ROLL THEM UP TIGHT!
A loose roll will fall apart upon slicing and bake unevenly. Instead, begin with a very tight roll and keep that momentum throughout the roll. The dough is sturdy and can handle being rolled tightly due to its elasticity.
Can I Knead By Hand Instead of Using a Mixer?
Absolutely! Usually, I make my cinnamon roll dough via my electric stand-mixer which has the appropriate attachments for the kneading process, however, with these cinnamon rolls, I have had the pleasure of doing this all by hand and it wasn't difficult.
It just requires a bit more arm work, that's all! Plus, there’s nothing that a light drizzle of flour can’t help, right?! You'll basically follow all the steps for making the dough in a large bowl and once it begins to come together and can form a ball, then you'll begin working the dough in a front-to-back and folding motion a few times until you begin to feel the dough "soften" and become elastic-like. It took me about 5-6 minutes or so total. Not bad!
Substitutes:
- Almond Milk: Can be swapped with oat, soy, or dairy milk.
- Artisan Bread Flour: All-purpose flour works in a pinch, but bread flour yields fluffier results.
- Vegan Version: Use flax eggs or apple cider vinegar, dairy-free butter, and plant-based cream cheese.
- Peaches: Frozen or canned peaches work when fresh aren’t in season.
- Egg-Free: Sub with flax egg (1 tablespoon ground flax + 3 tablespoon water) per egg.
- Gluten-Free: Use 1:1 gluten-free baking flour (results may vary slightly in texture).
Storage + Make-Ahead Tips
- Store in an airtight container for 2–3 days (room temp) or 5-7 days (fridge).
- To Freeze: Freeze unbaked rolls tightly wrapped. Thaw overnight, bake the next day. Baked rolls can be frozen up to 2 months.
- Reheat: Warm in oven or microwave with a splash of milk to keep them moist.
How to Know When Cinnamon Rolls Are Done
Knowing when your cinnamon rolls are done is key to achieving that soft, fluffy center without underbaking—or ending up with dry, tough rolls. Here's how to get it right every time:
Signs Your Rolls Are Ready:
Golden-Brown Tops
The tops should be a light golden brown, not pale or overly dark. If the center still looks pale while the edges are browning, tent the rolls with foil and bake a few minutes longer.
Center Rolls Are Set, Not Doughy
Gently press the center roll with a clean finger or fork—if it feels soft but springy, it’s done. If it feels too squishy or sinks in deeply, it likely needs 5–10 more minutes.
Internal Temp Reads 190–200°F
Use a kitchen thermometer in the center roll. The ideal internal temperature for baked cinnamon rolls is between 190°F and 200°F. This ensures they’re fully cooked but still tender and moist.
The Edges Pull Slightly from the Pan
When done, the outer rolls will slightly pull away from the sides of your pan. If they’re still sticking tightly to the edge, they probably need more time.
Smell That Sweet Aroma
You’ll know you’re close when your kitchen smells like caramelized sugar and spiced peaches. Trust your nose!
TIP: If your rolls brown too quickly but the center isn’t fully baked, cover loosely with foil and continue baking until done. This protects the top while allowing the center to finish cooking.
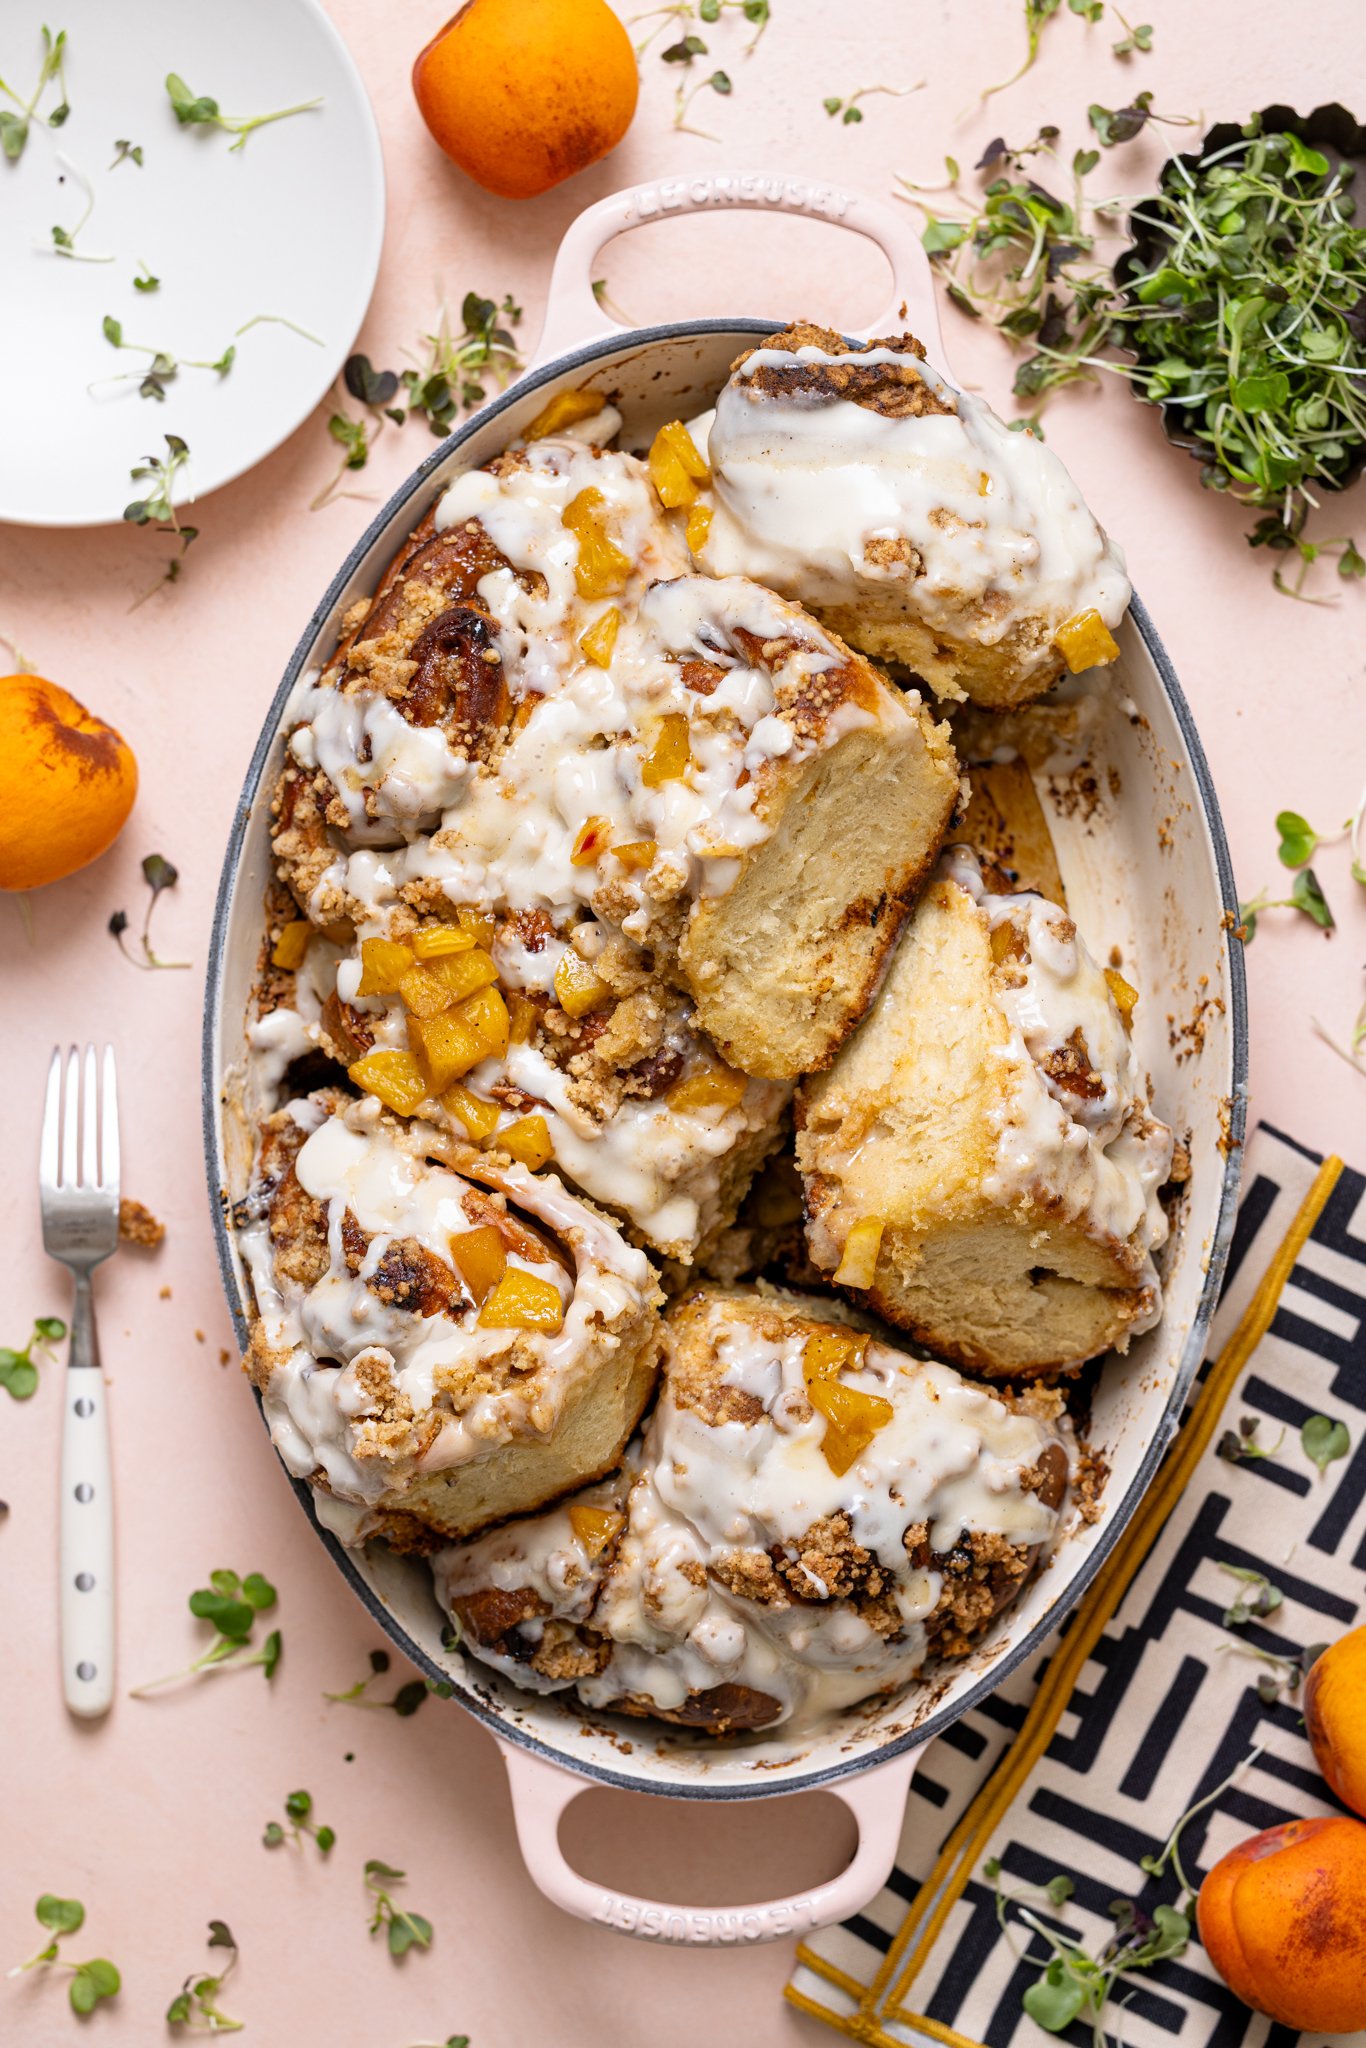
Serving Suggestions with Southern Peach Cobbler Cinnamon Rolls
- Pair with hot coffee or sweet tea or Dirty Chai Maple Iced Latte or Iced Chai Tea Latte
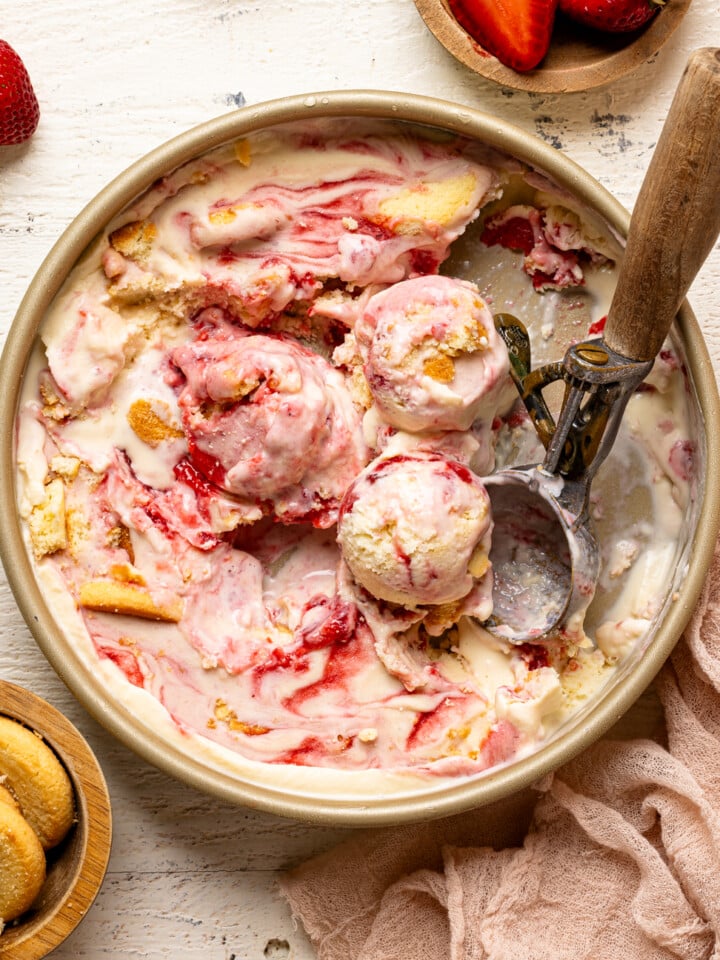
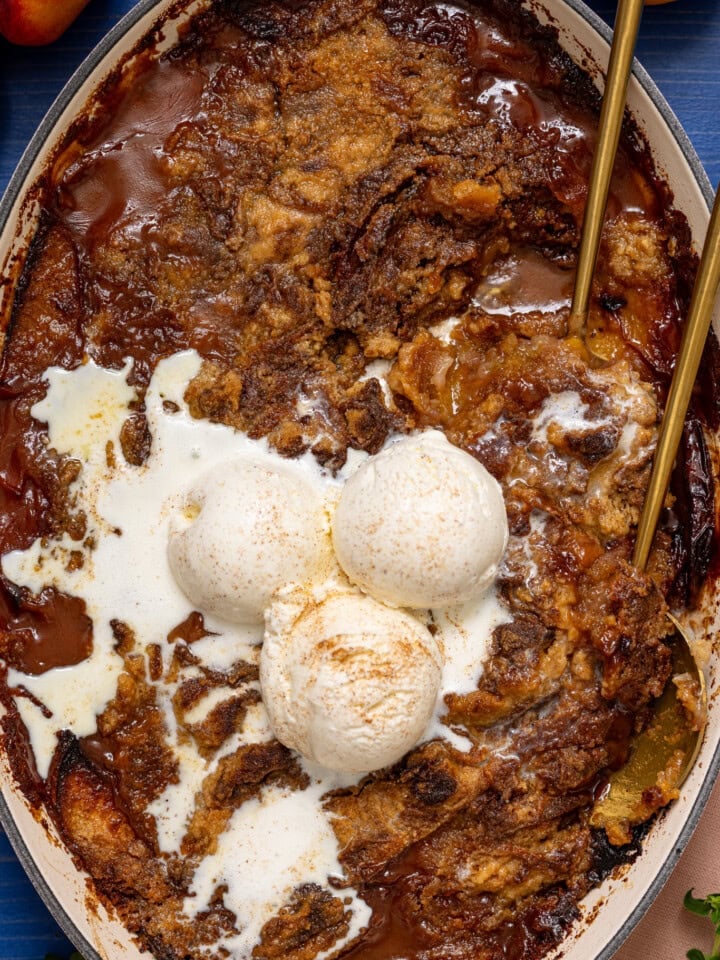
- Add a scoop of vanilla ice cream on top for dessert
- Garnish with chopped pecans or a dusting of powdered sugar
- Enjoy as a dessert after a good Southern meal that includes Southern Smothered Chicken, Hot Honey Southern Cornbread, Asparagus, and Stovetop Southern Mac and Cheese with Fluffy Coconut Rice or Basmati Rice
Common Southern Peach Cobbler Cinnamon Rolls Q + A's
Leftover Cinnamon Rolls can be kept fresh at room temperature when tightly wrapped or sealed for up to 3 days. Fresh for up to 1 week in the Refrigerator.
Yup! You can freeze both baked and unbaked cinnamon rolls. Baked rolls can be frozen up to 2 months. To freeze baked rolls, ensure they are fully cooled before freezing and don't top with crushed cookies to avoid them from getting soggy. Wrap them tightly in plastic wrap and then in freezer-safe bags or containers.
To freeze unbaked rolls, you can freeze them after shaping and before rising, or you can freeze them after the first proof. When ready to bake, thaw frozen rolls in the refrigerator overnight.
If you’re not using the Rapid Rise Yeast for this recipe, please know that the rise time will be twice as long (about 3 hours) since regular Active Yeast doesn’t work as quickly.
Basically, the main reason why your rolls aren't rising is because the yeast didn't fully activate as it should. All in all, your ingredients were TOO HOT or TOO COLD for the yeast to create a warm enough environment to do it's thing and "activate".
However, when using Rapid-rise or quick-rise yeast, it's usually easier to maneuver since it doesn't necessarily need to be "bloomed" before using. It's not dormant as regular active dry yeast, which makes it more convenient!
Absolutely! When it comes to these cinnamon rolls or any for that matter, you always have the option of making them the traditional way which requires a 1-2 hours initial rise and then another 20-25 minute rise before baking OR an overnight option.
However, if you're in a rush to make these or don't want to deal with a long rise time, you can simply create your dough and do a quick rise (20-25 minutes) and placing them straight in the oven to bake. Either way, cinnamon rolls are AMAZING and worth whatever wait time you choose!
OK, so the great debate has been the idea of needing to add heavy cream or yogurt to your cinnamon rolls in order to add moisture. Now, I've seen many people top their cinnamon rolls with a few cups of heavy cream right before baking after it rises to create a soft, tender roll, BUT I've found a better trick.
Simply, make your glaze/frosting a few minutes before your rolls are out of the oven, then once you take them out, allow them to SLIGHTLY COOL for 10 minutes before topping half of your glaze atop the warm rolls. This way, it'll melt and seep through your rolls and add moisture. Then after 5-10 minutes, add the remaining glaze as your "final layer" and wallah! PERFECTLY MOIST ROLLS!
Absolutely! If you're looking to make these GF, I recommend substituting both flours with Bob's 1:1 Baking flour and slightly reducing the amount by 1 cup, slowing adding more if the dough is too sticky.
To make these peach cobbler cinnamon rolls vegan, simply omit the eggs and substitute with 1 tablespoon apple cider vinegar. Also, substitute the butter with vegan butter and ensure that you use plant-based milk. Lastly, omit the cream cheese and substitute with vegan cream cheese or vegan butter.
OK, so you might think it's possible, but you can totally make cinnamon rolls, including these strawberry cinnamon rolls without yeast, if you ever need to! Just know that the texture wouldn't be as brioche-like or fluffy, and they'll be more dense, but still good.
Instead of yeast, you'll just need to substitute with 2 ¼ teaspoons baking powder to allow some level of rise to occur.
Yup! If you don’t want to make your Cinnamon Rolls on the same day, you can simply follow all steps (including the initial 1+ hour rise and making of diced peaches for filling) and after cutting rolls and placing them into your baking pan, just cover them tightly (using foil paper of plastic wrap) and refrigerate them overnight or for 8-12 hours instead. The following day, remove from refrigerator and keeping them covered, let cinnamon rolls rise at room temp 1 to 1 ½ hours.
Yes—drain well and sauté per the recipe to enhance flavor.
Absolutely. Hand-knead the dough until smooth and elastic. It just requires a bit more arm work, that's all! Plus, there’s nothing that a light drizzle of flour can’t help, right?! You'll basically follow all the steps for making the dough in a large bowl and once it begins to come together and can form a ball, then you'll begin working the dough in a front-to-back and folding motion a few times until you begin to feel the dough "soften" and become elastic-like. It took me about 5-6 minutes or so total. Not bad!
Yes! Let shaped rolls rise overnight in the fridge. Bring to room temp before baking.
More Southern-Inspired Sweets You'll Love!
- Southern Strawberry Banana Pudding
- Strawberry Shortcake with Buttermilk Biscuits
- My Grandma's Baked Southern Banana Pudding
- My Childhood Cinnamon Toast Crunch French Toast
- The Best Southern Strawberry Cobbler
- Southern Candied Yams
- 1-Layer Maple Sweet Potato Cake
- Dairy-Free Apple Cobbler with Cheddar Herb Biscuits
- Skillet Blueberry Cobbler
- Maple Chocolate Chip Banana Bread
- Easy Southern Peach Cobbler [with Canned Peaches]
- Southern Maple Sweet Potato Casserole


MADE OUR RECIPE(S)?
If you tried this Southern Peach Cobbler Cinnamon Rolls recipe or any other recipe on my website, please please leave a 🌟 star rating and let me know how you go in the 📝 comments below. And don't forget to tag @shanikagrahamwhite on Instagram. I love hearing from you!
Southern Peach Cobbler Cinnamon Rolls
Ingredients
DOUGH:
- 3 cups organic All-purpose flour (See Notes!)
- 2 ½ cups Artisan Bread flour
- ½ cup organic brown sugar + 1 Tbsp
- 1 packet Rapid Rise Yeast (That's 2 ¼ tsps!)
- ¼ cup WARM water
- 1 teaspoon Dessert Lover Blend (You can purchase my Dessert Lover Blend for authentic flavor; See Notes for homemade option!)
- 2 large eggs, at room temp.
- 1 ¼ cups unsweetened Almond milk, room temp. (You can also use regular cow's milk, if preferred!)
- 6 Tbsps salted butter, melted + cooled (Make sure that it's WARM, not hot!; You can use unsalted butter and just add ¼ teaspoon salt)
- 2 tsps vanilla extract
PEACH FILLING:
- Cooled sautéed peaches
- ½ cup salted butter, softened at room temp.
- ½ cup organic brown sugar
- 5-6 Tbsps organic peach preserves or jam
- 2 tsps Dessert Lover Blend (You can purchase my Dessert Lover Blend for authentic flavor; See Notes for homemade option!)
- ⅓ cup organic heavy cream, for topping
SAUTEED PEACHES:
- 2 cups diced peaches (That's about 4-6 medium peaches)
- 2 Tbsps salted butter (You can use unsalted butter and just add ¼ teaspoon salt)
- ½ cup organic brown sugar
- 1 teaspoon vanilla extract
- ½ teaspoon Dessert Lover Blend (You can purchase my Dessert Lover Blend for authentic flavor; See Notes for homemade option!)
CRUMBLE TOPPING:
- 1 ¼ cups organic all-purpose flour
- ½ cup organic brown sugar
- ½ teaspoon Dessert Lover Blend, optional (You can purchase my Dessert Lover Blend for authentic flavor; See Notes for homemade option!)
- 5 Tbsps salted butter, partially melted
CREAM CHEESE GLAZE:
- 2 cups organic powdered sugar, sifted
- 4 oz. organic cream cheese, softened at room temp.
- 3-4 Tbsps unsweetened Almond milk (You can also use regular cow's milk, if preferred!)
Instructions
TO MAKE THE DOUGH:
- Combine yeast and 1 tablespoon sugar in the bowl of an electric mixer and slowly pour in warm water while stirring frequently. Allow 5-10 minutes for the mixture to sit and for the yeast to activate.
- Add in the room temperature milk and warm butter to the yeast mixture and whisk until well combined. Add in the eggs and vanilla, whisking to incorporate.
- In a large bowl, whisk together the all-purpose flour, bread flour, sugar, and Dessert Lover Blend, and add them to the wet ingredients and mix on low-speed until well combined and everything begins to form into a dough-like consistency, about 2-3 minutes.
- Change “Mixer head” to kneading accessory and knead dough for 5-10 minutes on high speed until dough ball becomes smooth and elastic and dough springs back when lightly pressed together with 2 fingers. NOTE: If dough is still too sticky, add 1 tablespoon of flour at a time until texture is achieved!
- Lightly grease a large bowl with a small amount of olive oil and place the dough ball in the bowl, tossing it around until coated. Cover with plastic wrap (or a towel) and let sit for 1 hour, allowing the dough to rise and double in size.
- In the meantime, you can work on the filling.
TO SAUTE THE PEACHES:
- In a medium (10-inch) skillet over medium-high heat, add the butter and heat until melted. Add the brown sugar, Dessert Lover Blend, and vanilla and stir until combined and everything begins to bubble a bit, about 1-2 minutes.
- Add the diced peaches and toss until well coated and cook for another 3-4 minutes, until tender and the sauce has thickened. Remove from heat. NOTE: For more tender peaches (if using fresh), you can cook for an extra 4-5 minutes or so, but be sure to reduce the heat to medium-low. Cool completely!
TO MAKE THE CRUMBLE TOPPING:
- In a bowl, add the flour, brown sugar, and Dessert Lover Blend, stirring until combined. Add the melted butter and using a spatula, mix until combined and 'crumbly-like'. Set aside.
FOR THE FILLING:
- Add the peach preserves/jam in a bowl and set aside. In a separate bowl, combine the Dessert Lover Blend and brown sugar, mixing them together. Set aside. Keep the softened butter set aside also.
ASSEMBLY:
- Once the dough has risen fully, preheat the oven to 350 degrees Fahrenheit and line a large 9x13 baking dish with parchment paper, allowing excess to hang from the sides.
- Add a bit of flour to a surface and place the dough onto it, lightly adding a bit of flour to the top. Using a rolling-pin, roll out the dough into a rectangular shape (approximately 9″x14 and ½-inch thick), trimming the edges if needed. NOTE: Try not to make the dough too thin or else rolling it up will be hard to do!
- Then, generously add ¾ of the softened butter atop dough (spreading it out evenly with a spoon or knife), followed by the brown sugar-spice mixture, ensuring that the top is coated evenly. Lastly, add the cooled sautéed peaches (leaving about 2-3 Tbsps aside for topping/garnish) until evenly topped and dollops of the peach preserves/jam.
- Tightly roll dough (long-ways) and using a pastry cutter, cut dough into 1.5" rolls, placing each roll (cut side down) into a large baking dish (lined with parchment paper!). NOTE: This part might getting a little messy, but tuck in any peaches that might fall out as your roll.
RISE A SECOND TIME:
- Then place plastic wrap over the baking dish with rolls, smear the tops with remaining softened butter and let them rise again (for another 20 minutes).
BAKE THE CINNAMON ROLLS:
- Once the rolls have doubled in size (once again!) or have gotten significantly larger, pour the heavy cream evenly atop the rolls and add the crumble topping evenly atop the rolls and bake them for approximately 35-40 minutes in the preheated oven.
- While all the baking magic is happening, make the Cream Cheese Glaze.
TO MAKE THE CREAM CHEESE GLAZE:
- In a bowl, beat (using a hand-mixer) the softened cream cheese until creamy and smooth. Add the powdered sugar and milk, beating everything together until the glaze becomes smooth and velvety and easy to pour.
- Remove the rolls from oven and wait 5-10 minutes or until the rolls slightly cool before pouring the glaze atop the rolls evenly until fully covered. Next, spoon the remaining sautéed peaches atop glaze, lightly spreading it (if desired).
- To serve, cut out each roll desired and enjoy. Add a scoop of whipped cream or vanilla ice cream for complete indulgence!
- Bon Appetit!
Tips & Tricks
- TO STORE: Cinnamon Rolls can be kept fresh at room temperature when tightly wrapped or sealed for up to 3 days. Fresh for up to 1 week in the Refrigerator. Baked rolls can be frozen up to 2 months.
- RAPID (INSTANT) RISE YEAST VS. ACTIVE DRY YEAST: If you’re not using the Rapid Rise Yeast for this recipe, please know that the rise time will be twice as long (about 3 hours) since regular Active Yeast doesn’t work as quickly.
- FLOUR: If you don’t have bread flour, you can always just use all-purpose flour entirely instead.
- SUBSTITUTIONS + TIPS: See Post for details.
- COMMON QUESTIONS ABOUT RECIPE: See FAQ!
- OVERNIGHT OPTION: See FAQ!
- VEGAN OPTION: To make these cinnamon rolls vegan, simply omit the eggs and substitute with 1 tablespoon apple cider vinegar. Also, substitute the butter with vegan butter and omit the cream cheese and add ¼ cup of softened vegan butter instead. Ensure that you use plant-based milk also.
- SPICE MIX [SUBSTITUTE FOR DESSERT LOVER BLEND]: 1 tablespoon cinnamon, ½ teaspoon nutmeg, and ⅛ teaspoon allspice.
Nutrition
DID YOU MAKE THIS recipe?
Tag @orchidsnsweettea_ on Instagram and hashtag it #orchidsandsweettea

LOVE THIS RECIPE?
LET US KNOW!
These were SO good!! Peach cobbler anything is where it’s at.